They rightly do inherit heaven's graces,
And husband nature's riches from expense.
![]() Shakespeare, Sonnets
Shakespeare, Sonnets
Observe how system into system runs,
What other planets circle other suns.
![]() Alexander Pope, An Essay on Man
Alexander Pope, An Essay on Man
| To do something meaningful in NEXTSTEP programming, you must create a class. Custom classes harness the power of NEXTSTEP objects and give an application its distinctive logic and form. This chapter describes the basic steps that you must follow to create and use a subclass.
Working with Interface Builder |
4
Creating a Class
A roadmap to making and adding custom classes
Naming a new class
Specifying outlets and actions
Creating an instance of your class
Connecting your class's outlets
Connecting your class's actions
Generating source code files
Implementing a subclass of Object
Implementing a subclass of NSObject
Archiving in a mixed world
Acting as delegate
Implementing a View subclass
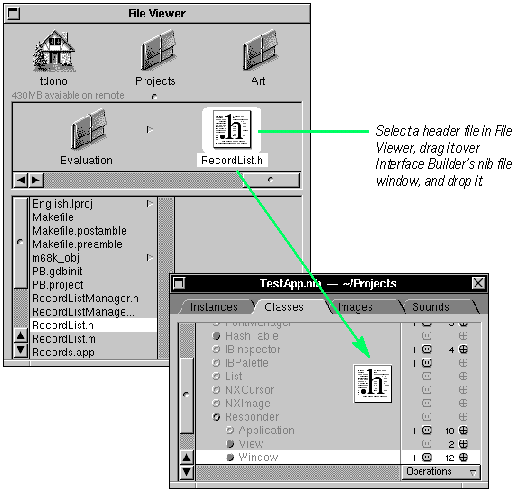
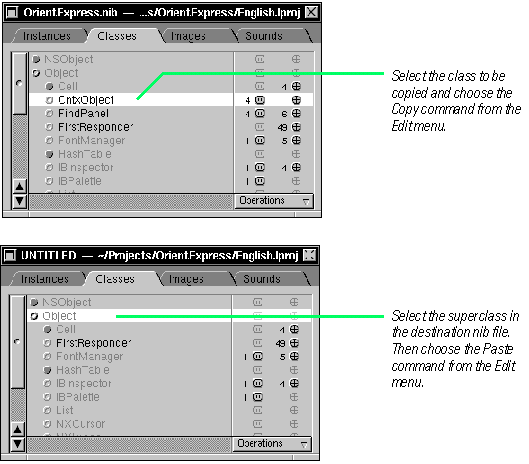
Adding existing classes to your nib file
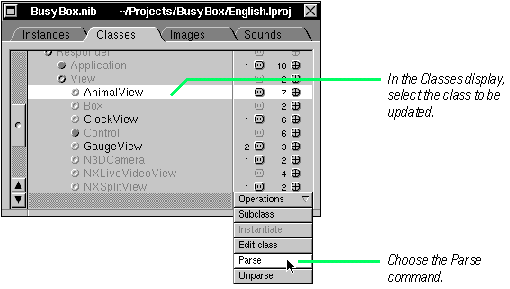
Updating a class definition
| I inherited it brick, and left it marble. They rightly do inherit heaven's graces, Observe how system into system runs, |
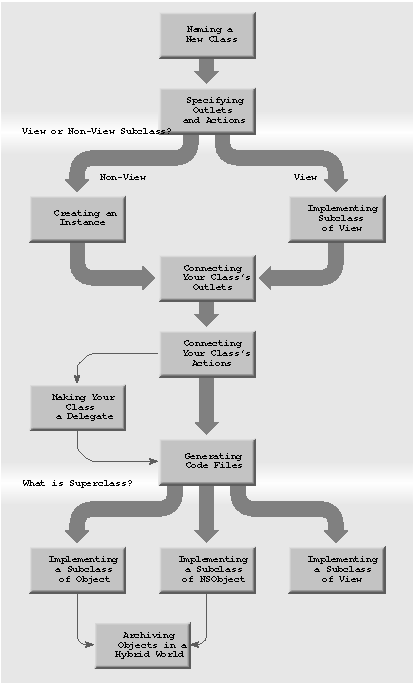
| A ROADMAP TO MAKING OR ADDING CUSTOM CLASSES |
| Determine which flowchart applies to your situation. | ||
| Follow the tasks in this chapter in the order specified by that flowchart. |
| This chapter differs from the other chapters in this manual because its subject is different. Creating a class (or adding an existing class) is not a set of discrete, modular tasks, but a process consisting of many interdependent tasks. The order of tasks in this chapter is therefore significant; with some exceptions, you need only follow the tasks sequentially, from first task to last task, and you'll end up with a useful class.
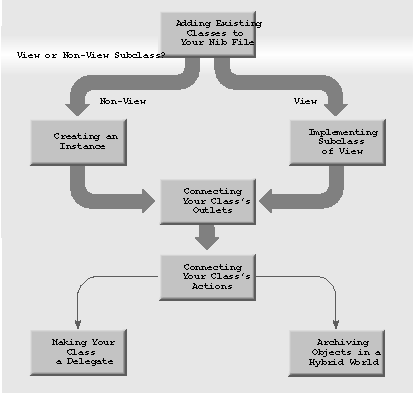
But those exceptions are significant, and so flowcharts are provided to point the way. The flowchart on the facing page guides you through the tasks required to define and implement a subclass of a root class or of the View class. An additional flowchart identifies the tasks you must complete to integrate an existing class into an application. Note: Interface Builder's role in subclass creation is to help you locate the class in the hierarchy, name it, connect an instance of it with other objects in an application, and generate template source files. When Interface Bulder's role is done, you then must make the most important contribution: the source code that gives your class its distinctive behavior. This chapter is also a departure from previous chapters because some of its tasks require other applications: Project Builder and a code editor (such as Edit). See the appropriate chapters in NEXTSTEP Development Tools and Techniques for information on Project Builder and Edit.
Creating a Class
If you branch to "Implementing a Subclass of View" after specifying outlets and actions, complete only the step "Making an Instance of a View Subclass"in this task for now, and go on to the next task. After generating code files, you must switch over to Project Builder and open the header and implementation files in Edit (or some other code editor).
Adding a Class
If you branch to "Implementing a Subclass of View" after specifying outlets and actions, complete You'll probably want to add your class's header and implementation files to Project Builder as well
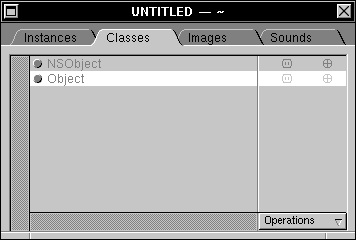
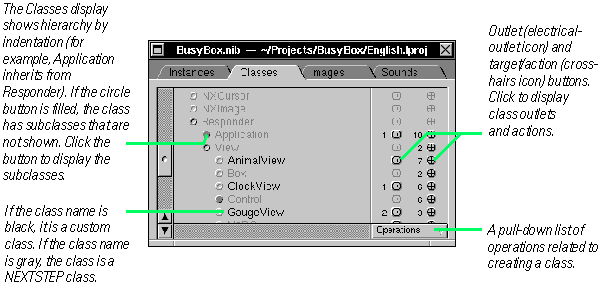
A Class Hierarchy in Transition This book and especially this chapter occasionally refer to a "root class." This phrase does not lack precision, but reflects a current reality: NEXTSTEP has (temporarily) dual class hierarchies. The version of NEXTSTEP that comes with the first release of the Enterprise Objects Framework has two root classes, and therefore it has two class hierarchies. There's Object, the root class that most NEXTSTEP developers are familiar with. And now there's also NSObject. The Classes display of Interface Builder's nib file window shows these two root classes.
NSObject is the root class for the Foundation Kit. and will soon become the root class for all NEXTSTEP classes. The Application Kit and most other NEXTSTEP classes are being converted to the class hierarchy rooted by NSObject. The Foundation Kit (or, simply, Foundation) is a group of classes that replaces the Common classes (List, Hash, Storage, and so on). Foundation is more, however. As the name suggests, it lays down a foundation of object functionality that supports all other classes in NEXTSTEP. It provides base classes for things like strings, values, collections and storage. But more importantly, Foundation improves the persistence and distribution of objects within an object system that is independent of particular operating systems. Foundation also introduces paradigms and mechanisms that enrich the object-oriented development process, especially a new way to deallocate objects. Guidelines For Programming How do you program in a world that mixes objects of different "lineages"? Here are some caveats and guidelines for navigating this mixed-object world (for convenience, instances of NSObjects are referred to as NSObjects): |
| Subclass NSObject when you require specialized controller objects, particularly custom objects related to the Enterprise Objects Framework. Otherwise, create subclasses that inherit from Object; this is especially true if you need an object dependent on the current Application Kit (for instance, a custom View) or an object that can be archived to a nib file. | ||
| If you deal with NSObjects, you are responsible for managing your own cycles. A cycle is a condition where objects retain each other. If you create a cycle, you must break it. (When you retain an object, you increment its reference count, deferring its deallocation. See "Foundation's Approach to Object Disposal" later in this chapter for more on retain and the autorelease mechanism.) | ||
| When to retain and when not to is a tricky question. If you don't retain an object, you can lose it; on the other hand, if you retain an object, you could be generating cycles you have no idea about. Be aware that cycles can exist without you explicitly creating them. For example, an NSArray object retains each object you add to it. Also be aware that, when you're inserting objects into collections (like NSArray) and you want to bypass the retain/release mechanism, you can use NSValue's valueWithNonretainedObject: to wrap objects. | ||
| When you set an NSObject instance variable, autorelease the old object, then retain the new value. See the introduction to Foundation Kit Reference or "Foundation's New Approach to Object Disposal" later in this chapter for more information. | ||
| Use the new NSCoder and NSArchiver API to archive NSObjects; do not archive NSObjects with read: and write:. If you do, it is guaranteed that these objects will be incompatible with future versions of NEXTSTEP. For details, see the "Implementing Archiving and Unarchiving" step of the task "Implementing a Subclass of NSObject." | ||
| If your class has instance variables that inherit from the other root class, archive these variables with the special API. described in "Archiving in a Mixed World," later in this chapter. | ||
| Never send free to an NSObject; send release instead. |
| Note: The most significant new features of Foundation are its notion of class clusters, its new archiving technology, and its mechanism and policy for object deallocation. "Foundations New Approach to Object Disposal" in this book summarizes the latter feature. See the introduction to the Foundation Kit Reference for comprehensive information on all of these features.
|
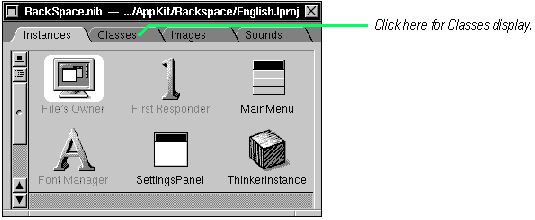
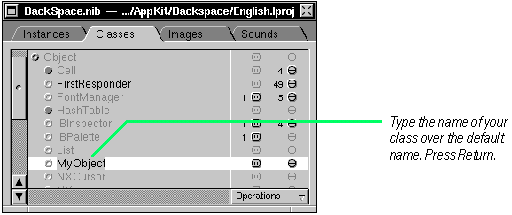
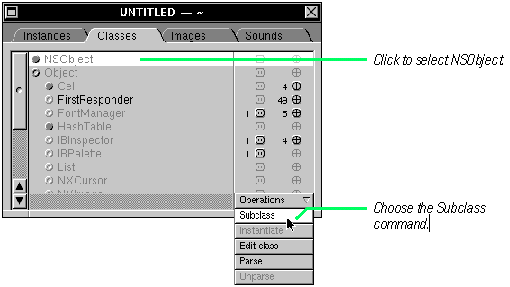
| NAMING A NEW CLASS |
| 1 | Display the Classes display of the nib file window. | |
| 2 | Select the class you want your class to inherit from. | |
| 3 | Choose Subclass from the Operations menu. | |
| 4 | Type the name of your class over the highlighted "default" name. |
| When you create an application in NEXTSTEP, you must create at least one subclass to do anything meaningful. The Application Kit and other NEXTSTEP kits are powerful frameworks that do a lot of the work for you, but you must always supply, in one or more subclasses, the distinctive logical and computational flow of your application.
When you create a class, the first thing you must do is select your class's superclass. Make your selection in the Classes display of the nib file window.
Ideally, the superclass of your class should behave much the way you want your class to behave. Your class merely adds the behavior you want to what the superclass offers, or modifies the superclass's behavior in some way. Often the behavior you want is so bound to resolving a particular problem that the proper choice of superclass is the root class. The root class provides the most generic object behavior. Once you've selected a superclass, you must name your class.
Tip: Pressing Return when a class is selected is equivalent to choosing the Subclass command. The new class is listed under its superclass with a default name: the superclass name prefixed with "My" (such as "MyObject"). Replace this default name with the new name.
Later, if you want to rename the class, first re-select the class name by double-clicking it. Then type the new name, replacing the selected text. See "A Short Practical Guide to Subclassing" later in this chapter for more on the relation between superclasses and subclasses.
A Perspective on the Class Hierarchy The Classes display of the nib file window shows the classes that the current nib file is aware of. The display lets you browse through both NEXTSTEP classes and custom classes. The Classes display also depicts (by indentation) class-inheritance relationships and reveals the names of each class's outlets and actions. Keyboard Navigation
|
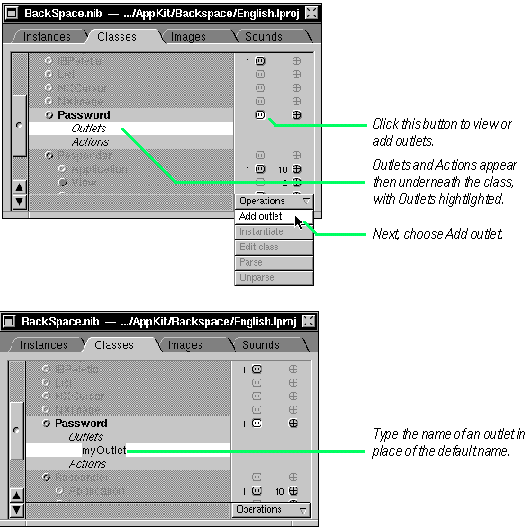
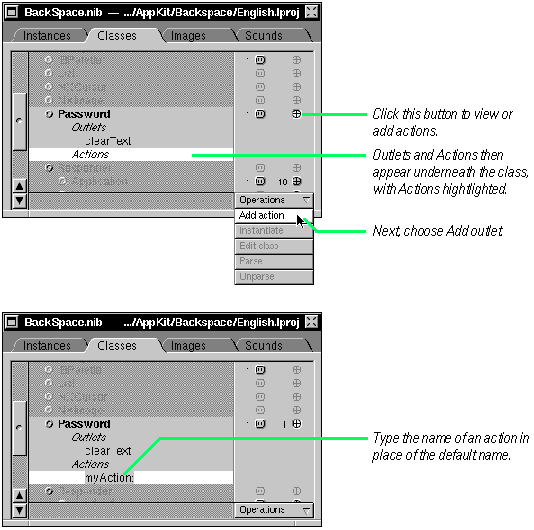
| SPECIFYING OUTLETS AND ACTIONS |
| 1 | Click the button for an outlet or an action. | |
| 2 | Select Outlets or Actions. | |
| 3 | Choose the appropriate command from the Operations menu. | |
| 4 | Enter the name of the outlet or action in place of the default name. |
| An object isolated from other objects is of little use. Interface Builder provides two ways for you to specify how objects of your class communicate with other objects: outlets and actions.
Before you begin this task, take a moment to consider what other objects you want instances of your class to send messages to, and the requests that instances of your class are apt to receive from other objects. The procedure itself is simple, and almost identical for outlets and actions. Adding Outlets
Tip: To display a class's outlets and actions (with Outlets highlighted), you can choose the Edit command from the Operations menu instead of clicking the outlet button. When you press Return, the outlet is renamed and Interface Builder highlights the new outlet. If you have another outlet to specify, choose Add outlet again from the Operations menu and type the outlet's name over the default name. Tip: When an outlet (but not the text of an outlet) is highlighted, you can add a new outlet by pressing the Return key instead of choosing the Add outlet command. Adding Actions
When you press Return, the action is renamed and Interface Builder highlights the new action. If you did not specify a colon (:) after the name, Interface Builder appends it for you. If you have another action to specify, choose Add action from the Operations menu, and type the new action's name over the default action name ("MyAction"). Tip: When an action (but not the text of an outlet) is highlighted, you can add a new action by pressing the Return key instead of choosing the Add action command. When you are finished specifying outlets and actions, click the class name to collapse the list of outlets and actions. For background information on outlets and actions, see "Communicating With Objects: Outlets and Actions" in Chapter 3, "Making and Managing Connections.""
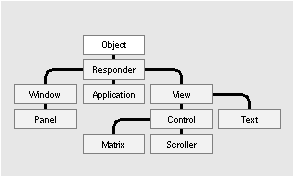
A Short Practical Guide to Subclassing Subclassing is not an esoteric art but one of the most common and essential tasks in object-oriented programming. But it doesn't need to be a difficult chore, especially if you take the time to learn what's in the class hierarchy. What is Subclassing? The principal notion behind subclassing is inheritance. Classes stand in relation to other classes as child to parent or parent to child. A class might have many child classes (or subclasses), but always has only one parent class (superclass). At the head of this class hierarchy is the root class.
The attributes (instance variables) and behavior (methods) defined by a class are shared by all descendents of that class. To put it another way, each new class is the accumulation of all class definitions in its inheritance chain. For example, the View class defines two instance variables for location and size (frame for the superview orientation, and bounds for within the view) from which all instances of its numerous subclasses derive their own basic position and dimensions. The View class also defines several methods for setting and getting these instance variables; again, all subclasses of View inherit the behavior defined by these methods. You can send the same messages to any instance of a View subclass to have it resize itself. So subclassing is usually the extension and specialization of the inheritance chain. When you define a class that inherits from another class, you are specifying how it differs from that superclass. But there are reasons for creating a subclass--or a "branch" of subclasses--other than getting different behavior. You may want to define a class that dispenses generic functionality to its subclasses, such as an Output class that performs tasks common to both a Printer class and a Fax class. You might want a class to declare methods (perhaps unimplemented) that set up a protocol that future subclasses can implement. Code reusability is an additional motive: the behavioral elements shared among classes can go into a single superclass for those classes. Analyzing the Inheritance Chain As the first step in subclassing you should analyze the inheritance chain. This point may seem obvious, but it is important enough to emphasize. You should do more than just identify the most suitable superclass; you want to understand exactly what it does and how it interacts with other classes. Carefully read the specifications in the NEXTSTEP General Reference. Note which methods and instance variables are available. Determine what the methods do and how they are related to each other; identify the accessor methods, those that get and set the instance variables; identify the interfaces to instances of other classes (such as outlets). If you are subclassing a Foundation Kit class, locate the primitive methods (those that access instance variables directly). If the behavior you want for your class is targeted at a special problem, even if that problem is managing an application or window, it might make the most sense to subclass the root class. These kind of subclasses, often called controller or model classes, are common in NEXTSTEP applications. See "Implementing a subclass of Object" and "Implementing a subclass of NSObject" for details on creating typical controller classes. Also, see "The Model-View-Controller Paradigm" later in this chapter for a description of the distinguishing characteristics of controller and model types of classes.
Instance Variables: To Add or Not to Add Instance variables represent an object's attributes and hold pointers to other objects (outlets). If instances of your class require special attributes or outlets, add them. But, as a general rule, avoid adding instance variables unless they are absolutely necessary. Instance variables add weight to objects. You sometimes generate certain objects (for example, cells in a file-system browser) in large numbers. The more data these ojbects carry, the more memory gets consumed. Often you can compute values from other values. Sometimes you can get pointers to other objects without having to specify outlets. Or you can represent attributes in lightweight fashion, especially if they are Boolean in nature, by encoding them as bits in an integer. If you do not want to give subclasses of your class access to its instance variables, put the @private directive before the declarations of the instance variables you want to conceal.
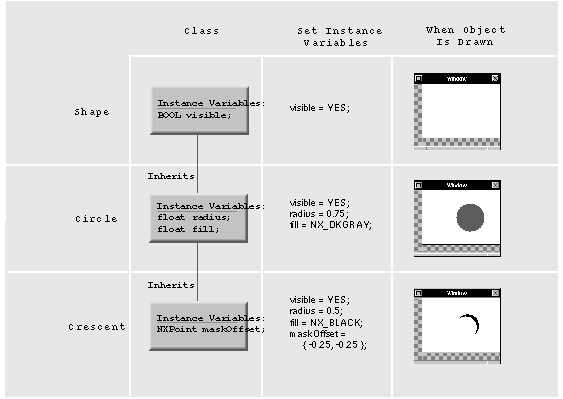
This example illustrates the effects of polymorphism and inheritance in a hypothetical class hierarchy. The Shape Class provides basic functionality and a single instance variable. The Circle class, a subclass of Shape, adds more instance data and actually implements drawing. The Crescent class supplements its superclass (Circle) with more specialized behavior and data.
Determining Your Class's Methods |
| Added methods. These new methods extend the class definition. They include accessor methods for new instance variables. | ||
| Replacement methods. These types of methods completely override the superclass method of the same name. They can also, by being a "null" implementation, block the invocation of the superclass method. | ||
| Extended methods. These methods also override a superclass method, but then in the implementation invoke the superclass method by calling super. This is a common technique for adding behavior or getting cumulative behavior (such as archiving) across the inheritance chain in response to a single message (such as write:). |
| What is Public, What is Private?
When designing your subclass, also identify the code that is part of the interface and code that is private to the class. |
| Public methods. These implement your class's interface. External objects invoke these methods by sending messages to instances of your class. Among these types of methods are accessor methods, which mediate client access to instance variables. You declare public methods in the header file for your class. | ||
| Private methods. These methods can be invoked by objects within a project but are invisible to external objects. You usually declare them in a private header file and prefix the method name with an underscore character. | ||
| Functions. Non-library static C functions are also private to your class. They are marginally faster than methods because they don't involve the overhead of the run-time object system. |
| Use a method if you're accessing instance variables, and use a public method if that method is part of your public interface. Otherwise, use functions.
Alternatives to Subclassing Sometimes you can get particular behavior without additional subclassing. NEXTSTEP and the Objective C language give you many ways to merge and synchronize your class's behavior with the behavior of NEXTSTEP classes and even other custom classes. |
| Delegation. A kit object can send, on specific occasions, messages to another object registered as its delegate. If the delegate implements the methods so invoked, it can participate in the work of the kit object. For example, an NXBrowser object sends messages to its delegate requesting cells to insert into a column. Other major Application Kit classes with delegation protocols are Application, Window, and Text. | ||
| Notifications. Many kit objects post notifications to all interested observers when a particular event takes place or is about to take place. Notifications allow observing objects to coordinate related activities and sometimes give them a chance to veto the event. This can be better than delegation because an object can have many observers but only one delegate. See the specification for NSNotificationCenter (a Foundation Kit class) for details on adding an observer object and on responding to notifications. | ||
| Protocols. A protocol is a list of method declarations associated with a particular purpose but unattached to a class definition. By adopting the protocol and implementing the methods, your class can interact with NEXTSTEP classes and accomplish that purpose. NEXTSTEP publishes many protocols, including those for spell-checking and interacting with the Workspace Manager. | ||
| Categories. These are Objective C constructs that enable you to add methods to a class without having to subclass it. The methods become part of the class, inherited by all of its subclasses. The only major drawback is that you cannot declare new instance variables (however, you can access all existing instance variables). Besides extending a class definition, you use categories to group, manage, and configure methods in large classes. |
| Note: For the version of Interface Builder packaged with the initial release of the Enterprise Objects Framework, there are twin root class, Object and NSObject. For details on these root classes and guidelines for programming in this dual-root situation, see "A Class Hierarchy in Transition" earlier in this chapter. Also read the release notes for the Enterprise Objects Framework.
For complete information on the requirements, strategies, and techniques for creating a class, see NEXTSTEP Object-Oriented Programming and the Objective C Language.
|
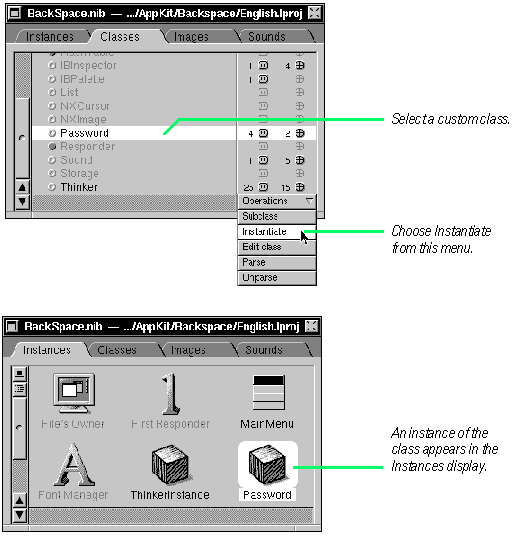
| CREATING AN INSTANCE OF YOUR CLASS |
| 1 | Select your class in the Classes display. | |
| 2 | Choose Instantiate from the Operations menu. |
| You cannot connect classes to other classes. Only instances of classes--objects--can really communicate with each other. Interface Builder requires a real instance of your class to enable the connection of your object to other objects.
The procedure for generating instances of non-View classes in Interface Builder is simple. This procedure applies only to classes that don't inherit from the View class.
When the new instance appears in the Instances display, it takes the same name as the class. Rename it, if you want, to something more indicative of an object. (Double-click the text to select it, then type the new name.) For example, AppController could become AppControllerObject. Be aware, however, that this name is merely a convenient way to identify the object in Interface Builder; it does not create an identifier that you can reference in code. For details on creating an instance of a View subclass, see "Implementing a View subclass" later in this chapter. |
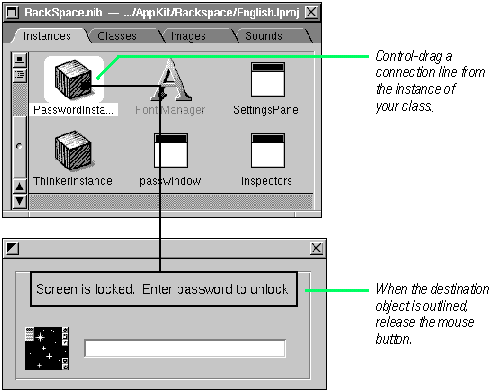
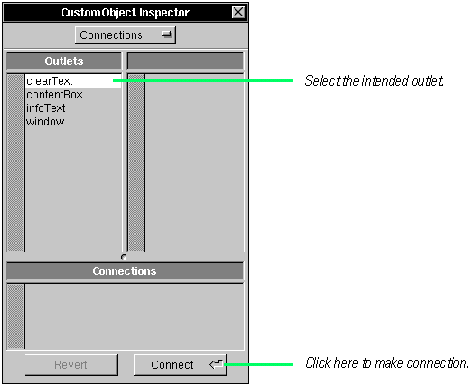
| CONNECTING YOUR CLASS'S OUTLETS |
| 1 | Control-drag a connection line from the instance to another object. | |
| 2 | In theConnections display, select the outlet that identifies the destination object. | |
| 3 | Click the Connect button. |
| An outlet is an instance variable that identifies another object. You initialize an outlet in Interface Builder by making a connection from your instance to another object.
When you establish the line connection, the Inspector panel for the destination object becomes the key window. Specify the outlet identifier for this object.
This task and the next one, "Connecting Your Class's Actions," summarize information more fully presented in Chapter 3, "Making and Managing Connections." |
| CONNECTING YOUR CLASS'S ACTIONS |
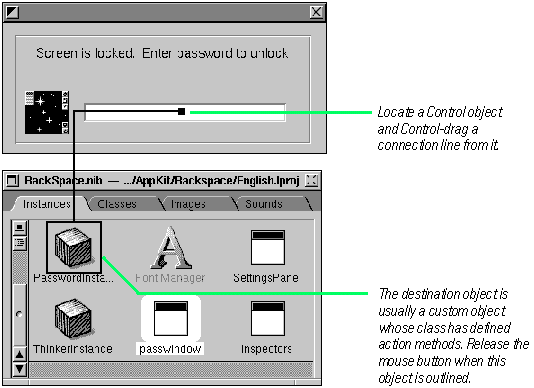
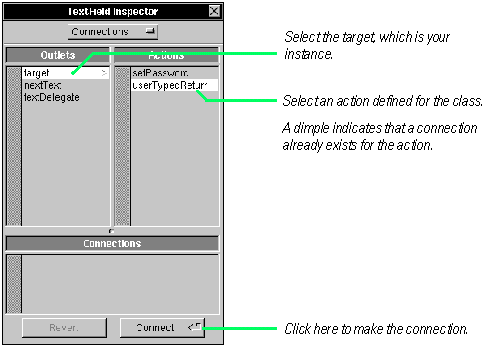
| 1 | Control-drag a connection line from a Control object to your class's instance. | |
| 2 | In the Inspector's Connections, select the appropriate action. | |
| 3 | Click the Connect button. |
| An action is the method that a Control object invokes in your instance--the target object--when a user activates the Control (for example, clicks a button). You make an action connection in Interface Builder by drawing a connection line from the Control object to the instance of your class.
When the line is set between the objects, the second column of the Connections display shows the action methods that the target object (your instance) has declared. Select the action for this Control object.
You can make connections between objects entirely within the outline mode of the Instances display. For more information on the outline mode, see Chapter 3, "Making and Managing Connections."
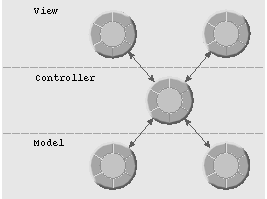
A common and useful paradigm for object-oriented applications, particularly business applications, is Model-View-Controller (MVC). MVC derives from Smalltalk-80; it proposes three types of objects in an application, separated by abstract boundaries and communicating with each other across those boundaries.
Model Objects View Objects Controller Object Because of the Controller's central, mediating role, Model objects need not know about the state and events of the user interface, and View objects need not know about the programmatic interfaces of the Model objects. You can make your View and Model objects available to others from a palette in Interface Builder. Hybrid Models The MVC Model in EO Framework
|
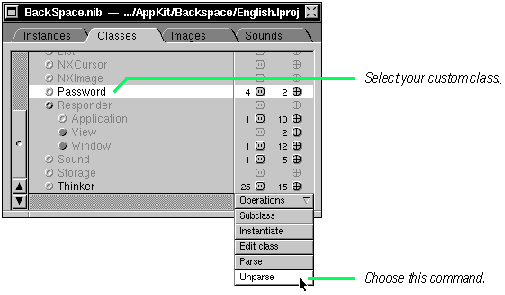
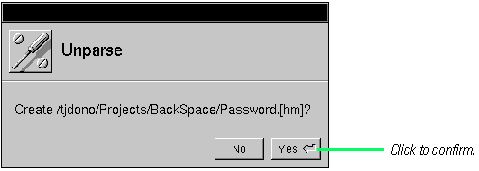
| GENERATING SOURCE CODE FILES |
| 1 | Select your class in the Classes display. | |
| 2 | Choose Unparse from the Operations pull-down menu. | |
| 3 | Click Yes in the subsequent attention panels. |
| Before you begin specifying the behavior of your class in code, you typically generate template source code files for your class from the information contained in the nib file. The header file (MyClass.h) created by Interface Builder declares the outlets you specified as instance variables (of type id) and declares the actions as instance methods of the form methodName:sender. The implementation file (MyClass.m) contains empty function blocks for each of these methods.
Interface Builder generates template code files by unparsing the nib file.
Interface Builder then displays an attention panels to confirm creation of the files.
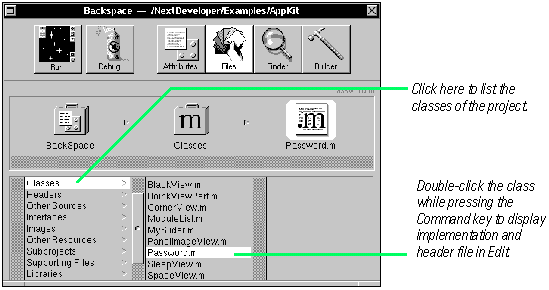
If you confirm creation and the nib file is associated with a project, another attention panel subsequently asks if you wish to add the template code files to the project. Click Yes to add the files to the project. |
| IMPLEMENTING A SUBCLASS OF OBJECT |
| Import header files. | ||
| Declare new instance variables. | ||
| Implement accessor methods. | ||
| Define target/action behavior. | ||
| Define initialization and clean-up behavior. | ||
| Define how objects are copied. | ||
| Define how objects are compared. | ||
| Implement archiving and unarchiving. | ||
| Define special behavior for your class. |
| This task summarizes the steps that you must complete--and can optionally complete--to implement a subclass of Object. With this kind of subclass, the subtleties arising from inherited behavior are simplified. Still, the interaction of your class with the root class is very important, and applies to all subclasses.
In this task you write code, and so there is a temporary departure from Interface Builder. The task assumes that you have completed the following prerequisites in Interface Builder, presented earlier in this chapter: |
| Naming a class, positioning it in the class hierarchy | ||
| Specifing outlets and actions for the class | ||
| Creating an instance of the class | ||
| Connecting the instance to other objects through the outlets and actions | ||
| Generating code files by unparsing the nib file |
| When you have generated code files in Interface Builder, switch over to the Project Builder application and open your project. Open your class's header file (ClassName.h) and implementation file (ClassName.m) in Edit windows.
Importing Header Files Remember to import your class's header file. By doing so you include the interface files for all inherited classes. To include the Application Kit classes, all you need to |
![]() // Record.h
// Record.h
![]() #import <appkit/appkit.h>
#import <appkit/appkit.h>
![]() // Record.m (implementation file)
// Record.m (implementation file)
![]() #import "RecordList.h"
#import "RecordList.h"
![]() #import "Record.h"
#import "Record.h"
| Declaring New Instance Variables The header file generated by Interface Builder declares outlets as instance variables of type id. You might want to add new instance variables for your class to this list of declarations. These instance variables can hold strings, integers, floating-poing values, and other objects. All instance variables should be data that is essential to an instance of your class. |
![]() @interface RecordListManager:Object
@interface RecordListManager:Object
![]() {
{
![]() id recordCountField;
id recordCountField;
![]() id recordForm;
id recordForm;
![]() RecordList *recordList;
RecordList *recordList;
![]() }
}
| Notes on the code: In this example the instance variables recordCountField and recordForm derive from the outlets specified in Interface Builder. They are written to the header file when template files are generated. The instance variable recordList has been added to identify an instance of a custom class (RecordList). You can declare your object variables as type id although explicit typing improves type-checking during compilation.
Implementing Accessor Methods Accesor methods that retrieve a copy of an instance variable by convention take the same name as the instance variable. They usually have a single statement that returns the value of the instance variable. Methods that set the value of an instance variable by convention take the name of the instance variable (first letter capitalized) prefixed with "set." For variables of most types, these kinds of methods assign the new value, passed in as an argument, to the instance variable and then either return self or do not return at all (if declared as void). Set methods often test passed-in values for validity before assigning them. |
![]() - (const char *)key
- (const char *)key
![]() {
{
![]() return key;
return key;
![]() }
}
![]() - setKey:(const char *)newKey;
- setKey:(const char *)newKey;
![]() {
{
![]() if (key) NX_FREE(key);
if (key) NX_FREE(key);
![]() if (newKey) {
if (newKey) {
![]() key = NXCopyStringBuffer(newKey);
key = NXCopyStringBuffer(newKey);
![]() }
}
![]() return self;
return self;
![]() }
}
| Notes on the code: The key method retrieves the value of the instance variable key; it simply returns the value and does not return self. The setKey: method sets the value of the instance variable key. Since, in this example, the variable is dynamically allocated, it frees it first (NX_FREE()) before allocating and copying the new value with NXCopyStringBuffer(). Accessor methods that set values always return self.
Your class might not need to implement accessor methods if it has no need for client objects to set or retrieve the values of its objects' instance variables. Defining Target/Action Behavior |
![]() - moveRecord:sender
- moveRecord:sender
![]() {
{
![]() // move record to the index
// move record to the index
![]() if ([recordList moveRecord:[recordList currentRecord]
if ([recordList moveRecord:[recordList currentRecord]
![]() to:[sender intValue]] == NO) {
to:[sender intValue]] == NO) {
![]() NXBeep();
NXBeep();
![]() return nil;
return nil;
![]() }
}
![]() // update the interface
// update the interface
![]() [sender setStringValue:NULL];
[sender setStringValue:NULL];
![]() [self fillForm];
[self fillForm];
![]() [recordForm selectText:self];
[recordForm selectText:self];
![]() return self;
return self;
![]() }
}
| Notes on the code: This code calls sender, which identifies the Control object sending the message, to get further information and to update the Control object. It also returns nil instead of self if a certain condition blocks the successful completion of the requested action.
Defining Initialization and Clean-up Behavior Subclasses of the Object class almost always need to override init and free. (An exception is a subclass of Object that has no instance variables; in this case, it can rely on Object's implementation of init, which simply returns self.) You can define other initialization methods for your class that take arguments and perform more specialized initializations. However, a subclass of Object must always implement init, even if init only invokes one of these specialized initializers, passing in a default value. Designated Initializer: One of a subclass's initialization methods must be the designated initializer. The designated initializer invokes its superclass's designated initializer (in Object's case, init), performs most of the work, and returns self. The other initialization methods in a class eventually end up invoking the designated initializer. Invoking super's Initializer: Since an object's full complement of attributes includes those instance variables declared and initialized by superclasses, initialization should cascade down the inheritance chain, starting with the Object class. This means that initialization should almost always begin with the invocation of the superclass's designated initializer. For the same reason, deinitialization should almost always end by invoking the superclass's free method, after freeing its own dynamically allocated instance variables. If your free method invokes super's free first, the object will be deinitialized before it has had a chance to free its own allocated storage. |
![]() - init
- init
![]() {
{
![]() if (self = [super init]) {
if (self = [super init]) {
![]() locked = NO;
locked = NO;
![]() key = NULL;
key = NULL;
![]() contents = NULL;
contents = NULL;
![]() }
}
![]() return self;
return self;
![]() }
}
![]() - free
- free
![]() {
{
![]() if (key) NX_FREE(key);
if (key) NX_FREE(key);
![]() if (contents) NX_FREE(contents);
if (contents) NX_FREE(contents);
![]() return [super free];
return [super free];
![]() }
}
| Notes on the code: This example shows the init method (which is also the designated initializer in this case) starting off by sending init to super to have its superclass (Object) complete its initializations first. It then sets the object's instances variables to initial values and returns self. Until it returns self, the object is in an unusable state. If for some reason initialization fails, free the object (if it's non-nil) and return nil. In the example init method, the code verifies that the object returned from [super init] is not nil before proceeding with initialization. Exceptions typically are not raised in initialization methods (except for things like programmer errors).
Initialization After Unarchiving: The init method is invoked in an object once and only once, usually just after memory is allocated for it. Subsequently you can archive and unarchive the object. After your object is unarchived, the Object class sends it various messages, among them awake. You can implement awake to initialize any instance variables not initialized when the object was unarchived. After all objects have been unarchived from a nib file and all outlets are set, the Object class sends awakeFromNib to each of those objects. You can implement awakeFromNib in your class to perform any initializations that require communication with outlet objects in the interface. |
![]() - awakeFromNib
- awakeFromNib
![]() {
{
![]() fieldEditor = [[FieldEditor alloc] initFrame:NULL];
fieldEditor = [[FieldEditor alloc] initFrame:NULL];
![]() [[nameField window] makeKeyAndOrderFront:self];
[[nameField window] makeKeyAndOrderFront:self];
![]() [nameField selectText:self];
[nameField selectText:self];
![]() return self;
return self;
![]() }
}
| Notes on the code: In this implementation of awakeFromNib, the object must communicate through its outlet nameField with a field on the interface. It makes the window of this field key, orders it front, and selects the contents of the field. These initializations are done here and not in init because the connection between the objects must be unarchived from the nib file first.
Defining How Objects are Copied If you want objects of your class copied differently, you must override copyFromZone: (not copy, which merely calls copyFromZone: with the receiver's zone as argument). Allocate new instances of the pointed-to objects and initialize them with the values of the original objects. |
![]() - copyFromZone:(NXZone*)zone {
- copyFromZone:(NXZone*)zone {
![]() Customer *theCopy;
Customer *theCopy;
![]() theCopy = [[Customer allocFromZone:zone] init];
theCopy = [[Customer allocFromZone:zone] init];
![]() [theCopy setCustNo:custNo];
[theCopy setCustNo:custNo];
![]() [theCopy setName:name fromZone:zone];
[theCopy setName:name fromZone:zone];
![]() [theCopy setCompany:company fromZone:zone];
[theCopy setCompany:company fromZone:zone];
![]() [theCopy setAddress:address fromZone:zone];
[theCopy setAddress:address fromZone:zone];
![]() [theCopy setState:state fromZone:zone];
[theCopy setState:state fromZone:zone];
![]() [theCopy setCity:city fromZone:zone];
[theCopy setCity:city fromZone:zone];
![]() [theCopy setZip:zip fromZone:zone];
[theCopy setZip:zip fromZone:zone];
![]() [theCopy setPhone:phone fromZone:zone];
[theCopy setPhone:phone fromZone:zone];
![]() [theCopy setCreditLimit:creditLimit];
[theCopy setCreditLimit:creditLimit];
![]() return theCopy;
return theCopy;
![]() }
}
| Defining How Objects are Compared A problem similar to copying objects is comparing objects. Object's default behavior, in the isEqualTo: method, is to compare the identifiers of objects (their ids). If the ids of the receiving and argument objects are equal, the objects are considered equal. You might find this behavior acceptable for instances of your class, but if you don't, override isEqualTo:. Suppose you have a class named Color, and this class has one instance variable, an integer which holds an industry-accepted identifier of a color. What is important in demonstrating equality of objects in this case is not the equality of ids, but of the values of their color instance variables. Implementing Archiving and Unarchiving You archive an object by indirectly invoking its write: method. Then, when the application starts up again, a read: message is sent to all objects, allowing them to unarchive themselves. In these methods you read from and write to a typed stream that is passed as an argument. A typed stream is a special kind of data stream that holds not only an object's data but information about the types of data, the class of the object, and (optionally) the version of the class. Begin both your write: method by sending write: to super, requesting the superclass to archive its instance variables first. Similarly, begin your read: method by invoking super's read:. The invocation of super's method should come first because data in the stream occurs in order of inheritance (superclass to subclass). |
![]() - read:(NXTypedStream *)stream
- read:(NXTypedStream *)stream
![]() {
{
![]() [super read:stream];
[super read:stream];
![]() NXReadTypes(stream, "i*******d",
NXReadTypes(stream, "i*******d",
![]() &custNo, &name, &company,
&custNo, &name, &company,
![]() &address, &city, &state,
&address, &city, &state,
![]() &zip, &phone, &creditLimit);
&zip, &phone, &creditLimit);
![]() return self;
return self;
![]() }
}
![]() - write:(NXTypedStream *)stream
- write:(NXTypedStream *)stream
![]() {
{
![]() [super write:stream];
[super write:stream];
![]() NXWriteTypes(stream, "i*******d",
NXWriteTypes(stream, "i*******d",
![]() &custNo, &name, &company,
&custNo, &name, &company,
![]() &address, &city, &state,
&address, &city, &state,
![]() &zip, &phone, &creditLimit);
&zip, &phone, &creditLimit);
![]() return self;
return self;
![]() }
}
| Notes on the code: This code example shows an integer, seven C strings, and a floating-point value being archived and unarchived. As the example shows, the write: and the read: methods should mirror each other in what they read and write. The data read from the stream should be exactly in the same order (by type) as the data that was written to the stream. Both methods should end by returning self.
NEXTSTEP provides several common and Application Kit functions to write data to and read data from a typed stream. Among these are NXWriteType(), NXReadType(), NXWriteTypes(), NXReadTypes(), NXWritePoint(), and NXReadRect(). You call the NXWriteRootObject() function to invoke a write: method and the NXReadObject() function to invoke a read: method. Never invoke read: or write: directly. You don't need to archive every instance variable of your class. Some of these values you can re-create from scratch and others are transitory and hence unimportant (such as a seconds variable used for timing the period since a certain event). Kit objects configured in Interface Builder are automatically unarchived from their nib file, but only as you originally initialized them. If you want to retain some changed attribute of these objects, you should archive the attribute and then initialize the object with the unarchived attribute in the awakeFromNib method. Implementing Special Behavior For more on typed streams, on typed-stream functions, and on the format-string characters used for specifying types, see Chapter 3, "Common Classes and Functions" in the NEXTSTEP General Reference. If you're programming in the Enterprise Objects Framework and want to create a class for your enterprise objects or your own controller class, NeXT recommends that you subclass NSObject rather than Object. See the next task, "Implementing a Subclass of NSObject," for details. For more on the Object class, see Chapter 1 of the NEXTSTEP General Reference. The NEXTSTEP book Object-Oriented Programming and the Objective C Language describes in detail many topics related to the Object class and class creation. For more on designated initializers, see the description of the init method in the Object class specification (NEXTSTEP General Reference or Object-Oriented Programming and the Objective C Language). For more information on what happens during object archiving and unarchiving, see Object-Oriented Programming and the Objective C Language. Also read the instructions for archiving and unarchiving objects on the following pages. For more information on awakeFromNib, see the NXNibNotification protocol specification in Chapter 2 of the NEXTSTEP General Reference.
You can obtain useful functionality by overriding Object methods other than the ones described so far in this task. printForDebugger: Implement this method to write a descriptive debugging message to the stream provided in the argument. (Object's default action is to print the class name and the address of the receiver.) When a user issues the po command in gdb, printForDebugger: is invoked to display its message. finishUnarchiving Implement this method to examine an unarchived object and, if necessary, replace it with another object. initialize Implement this class method if you want to initialize your class before it receives its first message. This is a good place to set your class's version (setVersion:). forward: Implement this method if you want to forward messages with unrecognized selectors to another object that can handle the message.
Header File |
| Begin by importing header files for declaration types (#import). | ||
| @interface begins class interface declaration. Class name precedes superclass, separated by a colon. | ||
| Put the declarations of instance variables within curly braces. | ||
| After right curly brace declare your methods. | ||
| Action methods take the argument of sender. | ||
| End class interface declaration with @end. |
![]() #import <appkit/appkit.h>
#import <appkit/appkit.h>
![]() @interface Controller:Object
@interface Controller:Object
![]() {
{
![]() id dateField;
id dateField;
![]() id nameField;
id nameField;
![]() id phoneField;
id phoneField;
![]() id SSNField;
id SSNField;
![]() id listing;
id listing;
![]() FieldEditor *fieldEditor;
FieldEditor *fieldEditor;
![]() }
}
![]() - addRecord:sender;
- addRecord:sender;
![]() - clearForm:sender;
- clearForm:sender;
![]() - formAction:sender;
- formAction:sender;
![]() - (BOOL)textWillEnd:textObject;
- (BOOL)textWillEnd:textObject;
![]() - windowWillReturnFieldEditor:sender toObject:client;
- windowWillReturnFieldEditor:sender toObject:client;
![]() @end
@end
| Implementation File |
| Begin by importing relevant header files, especially the class header file. | ||
| @implementaion followed by class name begins implementation section. | ||
| Implement all methods. | ||
| End implementation section with @end. |
![]() #import "Controller.h"
#import "Controller.h"
![]() #import "TextAppender.h"
#import "TextAppender.h"
![]() #import "FieldEditor.h"
#import "FieldEditor.h"
![]() @implementation Controller
@implementation Controller
![]() - addRecord:sender
- addRecord:sender
![]() {
{
![]() // some code here
// some code here
![]() return self;
return self;
![]() }
}
![]() - (BOOL)textWillEnd:textObject
- (BOOL)textWillEnd:textObject
![]() {
{
![]() return NO;
return NO;
![]() }
}
![]() // ...
// ...
![]() @end
@end
| IMPLEMENTING A SUBCLASS OF NSOBJECT |
| Import header files. | ||
| Declare new instance variables. | ||
| Implement accessor methods. | ||
| Define target/action behavior. | ||
| Define initialization and deallocation behavior. | ||
| Define how objects are copied. | ||
| Define how objects are compared. | ||
| Implement archiving and unarchiving. | ||
| Define the special behavior of your class. |
| The list of implementation steps recommended for subclasses of Object can apply almost unchanged to subclasses of NSObject. However, there are significant differences within some of the steps. These differences even start earlier, in the Classes display of the nib file window when you designate the superclass.
The remaining Interface Builder procedure is the same as for all non-View objects. You specify outlets and actions, make an instance of your class, and connect your object to other objects. Afterwards, generate code files and open those files up in a text editor (such as Edit). Then implement your subclass of NSObject. Note: When you want to create an enterprise object class or a controller class for the Enterprise Objects Framework (EO Framework), you should subclass NSObject. Coding Steps Identical With Subclasses of Object |
| Importing header files | ||
| Declaring new instance variables | ||
| Implementing accessor methods | ||
| Defining target/action behavior | ||
| Initializing instances of your class | ||
| Defining how your objects are compared (isEqualTo:) |
| Defining Initialization and Deallocation Behavior The procedure for initializing instances of your class is the same for subclasses of NSObject as it is for subclasses of Object. In your implementation of init (or the init... method that serves as designated initializer) invoke super's init method, initialize instance variables, and then return self. However, the way you deallocate instances of your class is different. For subclasses of NSObject, you must override dealloc rather than free. Similar rules apply, however: deallocate the memory allocated to instance variables and then invoke super's dealloc method. This code fragment shows a dealloc method and the initialization and "set" accessor methods related to it: |
![]() - (void)dealloc {
- (void)dealloc {
![]() [title release];
[title release];
![]() [super dealloc];
[super dealloc];
![]() }
}
![]() - (void)setTitle:(NSString *)newImage
- (void)setTitle:(NSString *)newImage
![]() {
{
![]() [title autorelease];
[title autorelease];
![]() title = [newTitle retain];
title = [newTitle retain];
![]() }
}
![]() - (id)initWithTitle:(NSString *)newTitle
- (id)initWithTitle:(NSString *)newTitle
![]() {
{
![]() [super init];
[super init];
![]() [self setTitle:newTitle];
[self setTitle:newTitle];
![]() return self;
return self;
![]() }
}
![]() - (id)init
- (id)init
![]() {
{
![]() return [self initWithTitle:nil];
return [self initWithTitle:nil];
![]() }
}
| Notes on the code: The dealloc method mirrors the init... method where initialization actually takes place. This example releases the object title, and then invokes super's dealloc method. Since dealloc is declared as returning void, there's no need to return.
The release message sent to title is Foundation's counterpart to free. The release message decrements an object's reference count and, if the count afterwards is zero, dealloc is invoked and the object is deallocated. (You should never send the message free to a Foundation type.) The implementation of the setTitle: method in this example sends autorelease to the old title object and retains the new one. Before an instance of this NSObject subclass is destroyed, it deallocates title with release. Defining How Objects Are Copied |
![]() @interface MyClass : NSObject <NSCopying, NSMutableCopying>
@interface MyClass : NSObject <NSCopying, NSMutableCopying>
| Next implement the protocol methods, copyWithZone: and mutableCopyWithZone:. These are simple implementations of these methods: |
![]() - (id)copyWithZone:(NSZone *)zone {
- (id)copyWithZone:(NSZone *)zone {
![]() return [[MyClass allocWithZone:zone] init];
return [[MyClass allocWithZone:zone] init];
![]() }
}
![]() - (id)mutableCopyWithZone:(NSZone *)zone {
- (id)mutableCopyWithZone:(NSZone *)zone {
![]() return [[MyMutableClass allocWithZone:zone] init];
return [[MyMutableClass allocWithZone:zone] init];
![]() }
}
| Implementing Archiving and Unarchiving NSObject introduces a new mechanism for archiving and unarchiving objects that replaces the typed-stream approach of Object. This mechanism, implemented by the NSCoder, NSArchiver, and NSUnarchiver classes and the NSCoding protocol, encodes the objects of an application in a way that enhances their persistency and distributability. The repository of this encoded object information can be a file or an NSData object. You should archive any instance variables or other data critical to an object's state. NSObject adopts the NSCoding protocol and so, by inheritance, all of its subclasses adopt it as well. Instances of these subclasses receive, at the appropriate times in their life cycles, a message requesting that they encode themselves and a message asking that they decode and initialize themselves. You implement two NSCoding methods to intercept these messages: encodeWithCoder: and initWithCoder:. Your implementation of these methods is similar to Object's write: and read: methods, but there are significant differences too. Both encodeWithCoder: and initWithCoder: should begin by invoking the corresponding superclass method. The invocation of super's initWithCoder: returns the partially initialized object (self). End initWithCoder: by returning self, but do not return in encodeWithCoder:. |
![]() - (id)initWithCoder:(NSCoder *)coder
- (id)initWithCoder:(NSCoder *)coder
![]() {
{
![]() self = [super initWithCoder:coder];
self = [super initWithCoder:coder];
![]() offsets = [coder decodeSize];
offsets = [coder decodeSize];
![]() [coder decodeValuesOfObjCTypes:"@@s", &cell, &view, &flags];
[coder decodeValuesOfObjCTypes:"@@s", &cell, &view, &flags];
![]() return self;
return self;
![]() }
}
![]() - (void)encodeWithCoder:(NSCoder *)coder
- (void)encodeWithCoder:(NSCoder *)coder
![]() {
{
![]() [super encodeWithCoder:coder];
[super encodeWithCoder:coder];
![]() [coder encodeSize:offsets];
[coder encodeSize:offsets];
![]() [coder encodeValuesOfObjCTypes:"@@s", &cell, &view, &flags];
[coder encodeValuesOfObjCTypes:"@@s", &cell, &view, &flags];
![]() }
}
| Notes on the code: NSCoder defines matching sets of methods for encoding and decoding objects of different types. In this example, encodeValuesOfObjCTypes: takes a format string consisting of the same type specifiers used by NXWriteTypes() (used in read:). Following this is a variable sequence of arguments, each of which is the address of a variable (usually instance variable). Note that the data, by type, must be decoded in the same sequence as it was encoded.
Just as NXWriteRootObject() initiates archiving in classes that inherit from Object by invoking write:, NSArchiver's archiveRootObject:toFile: initiates archiving in the NSObject world, invoking encodeWithCoder:. NSUnarchiver's unarchiveObjectWithFile: initiates unarchiving in NSObject instances by invoking initWithCoder: in them. Never invoke encodeWithCoder: or initWithCoder: directly. Defining Special Behavior
NSObject is the new root class for NEXTSTEP introduced by the Foundation Kit. The Object and NSObject classes coexist as root classes. They are very similar, but have significant differences. See "A Class Hierarchy in Transition" earlier in this chapter for background. For complete information on the NSObject class see the Foundation Kit Reference. Remember, if you create a Foundation object (such as a instance of NSString) in your initialization code or elsewhere, you are responsible for its deallocation (with autorelease or release). If you create a Foundation object in an initialization method, the proper place for releasing it is in dealloc. See "Foundation's New Approach to Object Disposal"in this chapter for some background. For complete details, read the introduction to Foundation Kit Reference.
There are several other NSObject methods that you might want to implement: description Implement this method to return a descriptive debugging message as a string object. When a user, debugging with gdb, issues the po command, gdb displays your message. awakeAfterUsingCoder: Implement this method to re-initialize the receiver, providing it one last chance to propose another object in its place. replacementObjectForCoder: Implement this method to substitute another object for your object during encoding. initialize Implement this class method if you want to initialize your class before it receives its first message. This is a good place to set the version of your class (setVersion:). forwardInvocation: Implement this method if you want to forward messages with unrecognized selectors to another object that can handle the message.
Foundation's New Approach to Object Disposal The Foundation Kit introduces a policy that helps to ensure that objects are deallocated when they are no longer needed. The policy concerns object ownership; you conform to it by using an API that affects the mechanism behind object disposal: autorelease pools and reference counting. Reference Counts, Autorelease Pools, and Deallocation Each application has an autorelease pool to track objects marked for eventual release. You put an object in the pool by sending the object an autorelease message. When your code finishes executing and control returns to the application object (typically at the end of the event loop), the application object sends release to the autorelease pool, and the pool releases its contents. If afterwards the reference count of a pool object is zero, that object is deallocated. Who Owns Which Object? You shouldn't release objects that you receive from other objects (unless you precede the release or autorelease with a retain). You don't own these objects, and can assume that their owner has seen to their eventual deallocation. You can also assume that a received object remains valid within the method it was received in. That method can also safely return the object to its invoker. You should send release or autorelease to an object only as many times as are allowed by its creation (one) plus the number of retain messages you have sent it. You should never send free to a Foundation object. Some Practical Implications |
![]() - (void)setTitle:(NSString *)newImage
- (void)setTitle:(NSString *)newImage
![]() {
{
![]() [title autorelease];
[title autorelease];
![]() title = [newTitle retain];
title = [newTitle retain];
![]() }
}
| Use retain in this context if you don't mind sharing the passed-in object with another object; use copy if you want your own private version of the object.
You should also use retain and autorelease to prevent an object from being invalidated as a normal side-effect of a message. For more on this topic ("Validity of Shared Objects") and on the object-ownership policy in general, see "Object Ownership and Automatic Disposal" in the introduction to the Foundation Kit Reference.
|
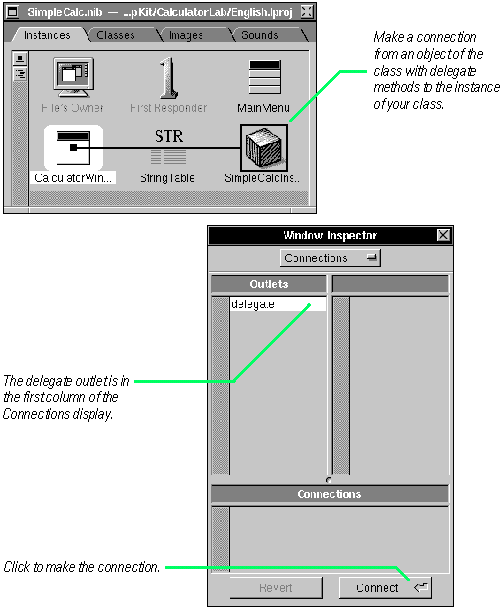
| MAKING YOUR CLASS A DELEGATE |
| 1 | Connect your instance to an object that has delegates. | |
| 2 | Select the delegate outlet in the Connections inspector. | |
| 3 | Click Connect. | |
| 4 | Implement the delegate methods. |
| Several NEXTSTEP classes allow you to register an object as their delegate. As certain events occur, the kit objects send messages to their delegates, giving them the opportunity to participate in processing. In Interface Builder, you can easily designate your class's instance as a delegate.
Next, implement the delegate methods you want your class to respond to. In this example, the object acting as delegate constrains the resizing of the window. |
![]() - windowWillResize:sender toSize:(NXSize *)frameSize;
- windowWillResize:sender toSize:(NXSize *)frameSize;
![]() {
{
![]() frameSize->width = MAX(frameSize->width,400.0);
frameSize->width = MAX(frameSize->width,400.0);
![]() frameSize->height = MAX(frameSize->height,350.0);
frameSize->height = MAX(frameSize->height,350.0);
![]() return self;
return self;
![]() }
}
| Tip: You can programmatically make any object in your application a delegate of another object (as long as that object specifies a delegate as an outlet) with the setDelegate: method.
Messages to delegates sometimes notify them of impending or just-transpired events, and sometimes request them to complete some work. Major classes with delegate methods are Application, Window, Text, and NXBrowser. See the NEXTSTEP General Reference for details on delegate methods. |
| ARCHIVING OBJECTS IN A MIXED WORLD |
| If your class inherits from NSObject and has Object instance variables, use special methods for archiving and unarchiving those variables. | ||
| If your class inherits from Object and has NSObject instance variables, use special functions for archiving and unarchiving those variables. |
| In the dual root-class situation, you might have a class that inherits from one root class but that has some instance variables that inherit from the other root class. When it comes to archiving objects that inherit from Object along with objects that inherit from NSObject, there might seem to be a problem: Do you use the old approach to archiving (write:), or the new (encodeWithCoder:)?
As an example, consider these declarations: |
![]() @interface Author:NSObject
@interface Author:NSObject
![]() {
{
![]() NSString *au_id; // These descend from NSObject
NSString *au_id; // These descend from NSObject
![]() NSString *au_fname;
NSString *au_fname;
![]() NSString *au_lname;
NSString *au_lname;
![]() NSString *address;
NSString *address;
![]() NSString *city;
NSString *city;
![]() NSString *state;
NSString *state;
![]() int contract; // Scalar type
int contract; // Scalar type
![]() List *titles; // Descends from Object
List *titles; // Descends from Object
![]() }
}
| The Author class descends from NSObject, but it has a List object (titles) as one of its instance variables. List inherits from the Object class, and List objects are thus supposed to be archived with the NXWriteObject() (or similar) function within the write: method.
This mix of archived object hierarchies makes compatibility with future releases of NEXTSTEP a problem. To get around this problem, NEXTSTEP provides some compatibility methods and functions for you to use when archiving and unarchiving in these situations. If you have an NSObject sublcass with objects in its instance variables that inherit from the Object class, use the encodeNXObject: and decodeNXObject methods to archive and unarchive those objects. |
![]() - (void)encodeWithCoder:(NSCoder *)aCoder
- (void)encodeWithCoder:(NSCoder *)aCoder
![]() {
{
![]() [super encodeWithCoder:aCoder];
[super encodeWithCoder:aCoder];
![]() [aCoder encodeObject:au_id];
[aCoder encodeObject:au_id];
![]() [aCoder encodeObject:au_fname];
[aCoder encodeObject:au_fname];
![]() [aCoder encodeObject:au_lname];
[aCoder encodeObject:au_lname];
![]() [aCoder encodeObject:address];
[aCoder encodeObject:address];
![]() [aCoder encodeObject:city];
[aCoder encodeObject:city];
![]() [aCoder encodeObject:state];
[aCoder encodeObject:state];
![]() [aCoder encodeValuesOfObjCTypes:"i", &contract];
[aCoder encodeValuesOfObjCTypes:"i", &contract];
![]() [aCoder encodeNXObject:titles];
[aCoder encodeNXObject:titles];
![]() }
}
![]() - initWithCoder:(NSCoder *)aDecoder
- initWithCoder:(NSCoder *)aDecoder
![]() {
{
![]() [super initWithCoder:aDecoder];
[super initWithCoder:aDecoder];
![]() au_id = [[aDecoder decodeObject] retain];
au_id = [[aDecoder decodeObject] retain];
![]() au_fname = [[aDecoder decodeObject] retain];
au_fname = [[aDecoder decodeObject] retain];
![]() au_lname = [[aDecoder decodeObject] retain];
au_lname = [[aDecoder decodeObject] retain];
![]() address = [[aDecoder decodeObject] retain];
address = [[aDecoder decodeObject] retain];
![]() city = [[aDecoder decodeObject] retain];
city = [[aDecoder decodeObject] retain];
![]() state = [[aDecoder decodeObject] retain];;
state = [[aDecoder decodeObject] retain];;
![]() [aDecoder decodeValuesOfObjCTypes:"i", &contract];
[aDecoder decodeValuesOfObjCTypes:"i", &contract];
![]() titles = [aDecoder decodeNXObject];
titles = [aDecoder decodeNXObject];
![]() return self;
return self;
![]() }
}
| What about the opposite case? You create a class that inherits from Object, and declare some instance variables that are instances of NSObject or one of its subclasses. In these situations, use the NXWriteNSObject() and NXReadNSObject() functions within the write: and read: methods, respectively.
Assuming the previous declarations of instance variables are now made for a class that inherits from Object, the archiving and unarchiving methods would look like this example. |
![]() - write:(NXTypedStream *)stream;
- write:(NXTypedStream *)stream;
![]() {
{
![]() [super write:stream];
[super write:stream];
![]() NXWriteNSObject(stream, au_id);
NXWriteNSObject(stream, au_id);
![]() NXWriteNSObject(stream, au_fname);
NXWriteNSObject(stream, au_fname);
![]() NXWriteNSObject(stream, au_lname);
NXWriteNSObject(stream, au_lname);
![]() NXWriteNSObject(stream, address);
NXWriteNSObject(stream, address);
![]() NXWriteNSObject(stream, city);
NXWriteNSObject(stream, city);
![]() NXWriteNSObject(stream, state);
NXWriteNSObject(stream, state);
![]() NXWriteType(stream, "i", &contract);
NXWriteType(stream, "i", &contract);
![]() NXWriteObject(stream, titles);
NXWriteObject(stream, titles);
![]() return self;
return self;
![]() }
}
![]() - read:(NXTypedStream *)stream;
- read:(NXTypedStream *)stream;
![]() {
{
![]() [super read:stream];
[super read:stream];
![]() au_id = (NSString *)NXReadNSObject(stream);
au_id = (NSString *)NXReadNSObject(stream);
![]() au_fname = (NSString *)NXReadNSObject(stream);
au_fname = (NSString *)NXReadNSObject(stream);
![]() au_lname = (NSString *)NXReadNSObject(stream);
au_lname = (NSString *)NXReadNSObject(stream);
![]() address = (NSString *)NXReadNSObject(stream);
address = (NSString *)NXReadNSObject(stream);
![]() city = (NSString *)NXReadNSObject(stream);
city = (NSString *)NXReadNSObject(stream);
![]() state = (NSString *)NXReadNSObject(stream);
state = (NSString *)NXReadNSObject(stream);
![]() NXReadType(stream, "i", &contract);
NXReadType(stream, "i", &contract);
![]() titles = NXReadObject(stream);
titles = NXReadObject(stream);
![]() return self;
return self;
![]() }
}
| There are some caveats on this method of archiving a "mixed world" of objects inheriting from different root classes: |
| There is no sharing of information between the worlds. This is an important fact when you have complex graphs with cycles or multiple references to the same object. While NEXSTEP tracks this information within a single world, it doesn't when you mix objects of the different worlds. So avoid graphs of objects with cycles. | ||
| Container objects can't contain objects from the other world when they're archived. An NSArray object, for instance, can't contain any objects inheriting from Object and a List object can't hold any instance of NSObject or its subclasses. |
| Pre-existing archives of objects, all of which inherit from Object, and new archives of objects that all inherit from NSObject are forward compatible.
The compatability methods and functions (encodeNXObject:, decodeNXObject, NXWriteNSObject(), and NXReadNSObjct()) are declared in NSArchiver.h. |
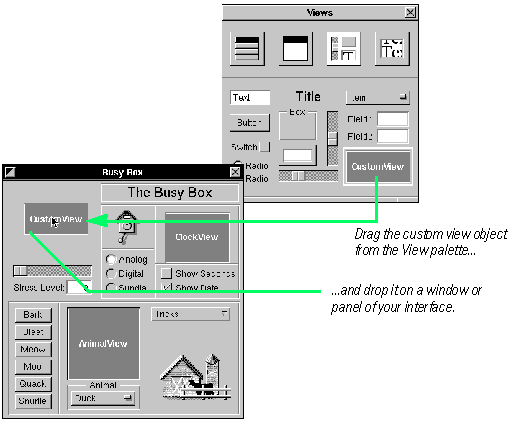
| IMPLEMENTING A VIEW SUBCLASS |
| 1 | Identify the class and its outlets and actions. | |
| 2 | Place and resize a CustomView object on a window or panel. | |
| 3 | Assign your class as the class of the CustomView. | |
| 4 | Connect the instance to other objects in the interface | |
| 5 | Generate code files. | |
| 6 | Complete programming tasks necessary for any object. | |
| 7 | Complete programming tasks specific to View objects: |
| Initialize a View object. | ||
| Draw a View object. | ||
| If necessary, handle events. |
| Making a subclass of the View class is a procedure that differs from making a subclass of the Object class. But it starts out the same. In the Classes display of Interface Builder, choose Subclass from the Operations menu while View is highlighted in the browser. Then name your class and add outlets and actions.
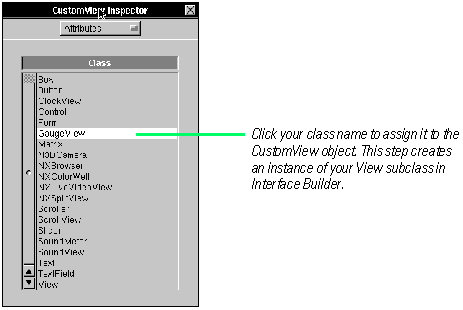
Note: The steps in this task, insofar as they apply to View, also apply to creating classes that inherit from subclasses of View. Making an Instance of a View Subclass
Position and resize the CustomView object, and, while it's still selected, bring up the Attributes display of the Inspector panel. Assign a class name to the object; this creates an instance of your View subclass.
The next three steps that you must complete are the same tasks that follow the instantiation of Object subclasses: |
| Connect the instance to other objects in the interface ("Connecting Your Class's Outlets" and "Connecting Your Class's Actions"). But now the instance appears as part of the interface, and not as an icon in the Instances display of the nib file window. | ||
| Generate code files and have them inserted in your project ("Generating Source Code Files"). | ||
| Switch over to the project in Project Builder that contains the nib file. Open your class's code files in Edit. |
| Since View inherits from Object, next complete some of the same programming tasks recommended for subclasses of Object: |
| Declaring new instance variables | ||
| Implementing accessor methods | ||
| Implementing target/action methods | ||
| Archiving and unarchiving |
| To create a functional subclass of View, you must complete two additional steps (and might want to complete another), which are described on the following pages.
Initializing View Objects In this example, initFrame: initializes instance variables of varying types and performs other housekeeping chores. |
![]() - initFrame:(const NXRect *)frameRect
- initFrame:(const NXRect *)frameRect
![]() {
{
![]() [super initFrame:frameRect];
[super initFrame:frameRect];
![]() face = [[NXImage allocFromZone:[self zone]]
face = [[NXImage allocFromZone:[self zone]]
![]() initSize:&bounds.size];
initSize:&bounds.size];
![]() [face useDrawMethod:@selector(drawFace:) inObject:self];
[face useDrawMethod:@selector(drawFace:) inObject:self];
![]() littleFont = [Font newFont:"Helvetica" size:12 style:0
littleFont = [Font newFont:"Helvetica" size:12 style:0
![]() matrix:NX_IDENTITYMATRIX];
matrix:NX_IDENTITYMATRIX];
![]() mediumFont = [Font newFont:"Times-Roman" size:14 style:0
mediumFont = [Font newFont:"Times-Roman" size:14 style:0
![]() matrix:NX_IDENTITYMATRIX];
matrix:NX_IDENTITYMATRIX];
![]() bigFont = [Font newFont:"Times-Roman" size:24 style:0
bigFont = [Font newFont:"Times-Roman" size:24 style:0
![]() matrix:NX_IDENTITYMATRIX];
matrix:NX_IDENTITYMATRIX];
![]() /* Set the default state (analog face, no seconds, date on) */
/* Set the default state (analog face, no seconds, date on) */
![]() clockType = ANALOG;
clockType = ANALOG;
![]() showSeconds = NO;
showSeconds = NO;
![]() showDate = YES;
showDate = YES;
![]() center.x = bounds.size.width/2.0;
center.x = bounds.size.width/2.0;
![]() center.y = bounds.size.height/2.0 + [mediumFont pointSize]/2.0;
center.y = bounds.size.height/2.0 + [mediumFont pointSize]/2.0;
![]() radius = MIN(center.x,center.y-[mediumFont pointSize]);
radius = MIN(center.x,center.y-[mediumFont pointSize]);
![]() [face recache];
[face recache];
![]() // Start the time entry. YES indicates that this is the 1st time
// Start the time entry. YES indicates that this is the 1st time
![]() [self startTimedEntry:YES];
[self startTimedEntry:YES];
![]() [self display];
[self display];
![]() return self;
return self;
![]() }
}
| Notes on the code: The implementation of an initFrame: method begins by invoking super's initFrame: method, ends by returning self, and in between sets the instance variables to initial values. Often the attributes set have a visual aspect, and affect how the view is drawn. For instance, the face outlet variable binds an image (the gauge face) to the view. Near the end of the method is [display self]; this invokes the view's drawSelf:: method, forcing it to draw itself.
As with Object subclasses, you might have to implement the free method to free dynamically allocated storage. Drawing View Objects The two arguments passed to drawSelf:: indicate how much of the View needs to be drawn. The first argument is a pointer to an array of rectangles and the second argument indicates how many rectangles are in the array (always one or three). If there's one rectangle in the array, that rectangle defines the drawing area. If there are three rectangles, the first rectangle is the union of the second and third--that is, it's the smallest rectangle that completely encloses the other two. |
![]() - drawSelf:(NXRect *)drawRects :(int)rectCount
- drawSelf:(NXRect *)drawRects :(int)rectCount
![]() {
{
![]() if (needRedraw)
if (needRedraw)
![]() [self drawFace];
[self drawFace];
![]() PScomposite(0.0, 0.0, bounds.size.width, bounds.size.height,
PScomposite(0.0, 0.0, bounds.size.width, bounds.size.height,
![]() [cacheWindow gState], 0.0, 0.0, NX_COPY);
[cacheWindow gState], 0.0, 0.0, NX_COPY);
![]() [self drawHand];
[self drawHand];
![]() return self;
return self;
![]() }
}
![]() // Calculates the angle for current value, draws hand there.
// Calculates the angle for current value, draws hand there.
![]() - drawHand
- drawHand
![]() {
{
![]() float valueAngle;
float valueAngle;
![]() valueAngle = startAngle - degreesPerUnit*(value-minValue);
valueAngle = startAngle - degreesPerUnit*(value-minValue);
![]() PSWdrawHand(center.x,center.y,valueAngle);
PSWdrawHand(center.x,center.y,valueAngle);
![]() return self;
return self;
![]() }
}
| Notes on the code: The example above shows drawSelf:: and an auxiliary drawing method (drawHand). You might also want several drawing methods to draw parts of the View based on certain conditions. In this scenario drawSelf:: acts as kind of a dispatch center, evaluating for conditions and then invoking the appropriate auxiliary method.
In implementing drawSelf::, write whatever code helps to draw your View. You can call pswrap-generated functions to send PostScript code to the Window Server. You can send messages to bitmap objects, requesting them to composite source images stored in off-screen windows. You can change font styles and text colors. If your View uses a Cell to do any of its drawing, you can send drawSelf:inView: or drawInside:inView: to the Cell within drawSelf::. The drawSelf:: method defines a View's static appearance on the screen. Your subclass can also add other methods for dynamic drawing in response to user events. In these methods you might highlight the View, drag it from one place to another, or animate it. The Application Kit locks focus automatically when drawSelf:: is invoked. In dynamic-drawing contexts you must lock and unlock focus yourself when drawing. If you want your view to respond to mouse clicks, key presses, or other user events, you must do at least two things: |
| Re-implement View's acceptsFirstResponder method to return YES. | ||
| Decide which event types you want to respond to and implement the appropriate methods: mouseUp:, mouseDown:, keyDown:, mouseEntered:, and so on. |
| The event methods are defined in the Responder class, where the default implementation is to forward the event message to the next responder.
When it invokes an event method, the input system passes in a pointer to an NXEvent data structure. This structure holds details related to the event: the type of event, the mouse's location (in the window's base coordinates), the window number, a time value associated with the event, flags indicating modifier keys and mouse buttons, and supplementary data. You can find or derive much of the information required for handling an event in the NXEvent parameter. For instance, you can convert the NXEvent mouse location to your View's base coordinate system with convertPoint:fromView:. You can check for modifier keys or mouse buttons using the keyboard-state flags masks. You can also modify the window's event mask temporarily and handle a known or probable sequence of events. The following example illustrates several of these techniques. |
![]() - mouseDown:(NXEvent *)event
- mouseDown:(NXEvent *)event
![]() {
{
![]() NXPoint pt;
NXPoint pt;
![]() NXRect dirty;
NXRect dirty;
![]() // modify event mask
// modify event mask
![]() int emask=[window addToEventMask:(NX_MOUSEUPMASK |
int emask=[window addToEventMask:(NX_MOUSEUPMASK |
![]() NX_MOUSEDRAGGEDMASK)];
NX_MOUSEDRAGGEDMASK)];
![]() if( ! [backingImage lockFocus] ) return self;
if( ! [backingImage lockFocus] ) return self;
![]() // convert mouse click to local coordinate system
// convert mouse click to local coordinate system
![]() pt = event->location;
pt = event->location;
![]() [self convertPoint: &pt fromView: nil];
[self convertPoint: &pt fromView: nil];
![]() pt.x += .5; pt.y += .5;
pt.x += .5; pt.y += .5;
![]() [brush brushMoveTo: pt.x : pt.y
[brush brushMoveTo: pt.x : pt.y
![]() withPressure: event->data.mouse.pressure/255.0
withPressure: event->data.mouse.pressure/255.0
![]() dirtyRect: &dirty];
dirtyRect: &dirty];
![]() [self display: &dirty : 1];
[self display: &dirty : 1];
![]() // handle anticipated events
// handle anticipated events
![]() while(1) {
while(1) {
![]() event=[NXApp getNextEvent:(NX_MOUSEUPMASK
event=[NXApp getNextEvent:(NX_MOUSEUPMASK
![]() | NX_MOUSEDRAGGEDMASK)];
| NX_MOUSEDRAGGEDMASK)];
![]() if(event->type == NX_MOUSEUP)
if(event->type == NX_MOUSEUP)
![]() break;
break;
![]() pt = event->location;
pt = event->location;
![]() [self convertPoint: &pt fromView: nil];
[self convertPoint: &pt fromView: nil];
![]() pt.x += .5; pt.y += .5;
pt.x += .5; pt.y += .5;
![]() [brush brushLineTo: pt.x : pt.y
[brush brushLineTo: pt.x : pt.y
![]() withPressure:event->data.mouse.pressure/255.0
withPressure:event->data.mouse.pressure/255.0
![]() dirtyRect: &dirty];
dirtyRect: &dirty];
![]() [self display: &dirty : 1];
[self display: &dirty : 1];
![]() NXPing(); // wait for the window server to catch up
NXPing(); // wait for the window server to catch up
![]() }
}
![]() [backingImage unlockFocus];
[backingImage unlockFocus];
![]() [window setEventMask:emask];
[window setEventMask:emask];
![]() return self;
return self;
![]() }
}
| Tip: If you want your View to handle target/action messages sent to the First Responder (for example, copy and paste), be sure to override acceptsFirstResponder to return YES, and then implement the appropriate method (copy: and paste:).
The View class offers your subclass a wealth of inherent functionality. It includes methods for managing the view hierarchy, for converting coordinates and modifying the coordinate system, for managing cursors and events, and for focusing, clipping, scrolling, dragging, and printing. See the description of the View class in Chapter 2 of the NEXTSTEP General Reference. The PostScript functions and operators available for use are described in Chapter 5, "DisplayPostScript," of the NEXTSTEP General Reference. pswrap is a program that creates a C function to correspond to a sequence of PostScript code. Note that your custom pswrap code (extension .psw) must go in the Other Sources suitcase of Project Builder. pswrap is described in detail in Adobe Systems' pswrap Reference Manual. The NXEvent data structure and related data structures, constants, and flag masks are declared in dpsclient/event.h, and are described in Chapter 5 of the NEXTSTEP General Reference under "Types and Constants." |
| ADDING EXISTING CLASSES TO YOUR NIB FILE |
| Drag the header file from the File Viewer or Project Builder into the nib file window. |
| Or |
| Copy a class in one nib file and paste it in another. |
| The easiest way to add a class to your nib file is to drag the header file for an existing custom class from the Workspace Manager's File Viewer into Interface Builder.
You can also add a class definition to a nib file by dragging a header or implementation file from Project Builder into a nib file window. The new class appears in the Classes display under its subclass and with its outlets and actions defined. After adding the class, you must still connect it to other objects through its outlets and actions. To do this, complete these steps: |
| Make an instance of the class (for View subclasses, that means assigning your class name to the CustomView object). | ||
| Connect the instance's outlets and actions to other objects in the nib file. |
| Tip: Instead of defining a class in Interface Builder, you can write a header file and drag it into a nib file window (as described above). When writing your header file, be sure to declare outlets as instance variables of type id. Declare actions as methods with a single argument: sender.
Copying Classes Between Nib Files
A duplicate of the original class appears in the Classes display of the destination nib file. Generate an instance of the class in the destination nib file and connect it to other objects in the nib file through its outlets and actions. If you are going to write a header file and then drag the file into Interface Builder, follow the conventions for header files described in "The Structure of Header Files and Implementation Files," earlier in this chapter. |
| UPDATING A CLASS DEFINITION |
| Choose the Parse command and select a header file in the Open Panel. |
| If you later add outlets and actions to the header file, or delete them from it, Interface Builder allows you to update the nib file with this new information.
Interface Builder brings up an Open panel for you to confirm (or select) the class definition to update.
If there are any new outlets and actions, remember to connect these outlets and actions to other objects in the nib file. Tip: You can also use the Parse command to add an existing class to a nib file, or you create a header file and read it into a nib file through the Parse command. |