Copyright ©1995 by NeXT Computer, Inc. All Rights Reserved.
| 3 |
The Interface Builder Application
 |
| For in formation on using Interface Builder, see Working with Interface Builder. The on-line version of this manual is in:
Some of the topics that the new Interface Builder manual does not cover are retained from this chapter.
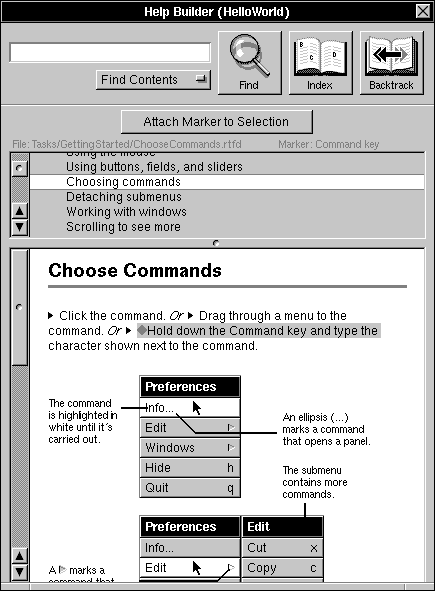
Attaching Help to Objects The Help Builder panel makes it easy to associate help text with any object in your application's user interface. (To learn about the design of the NEXTSTEP help system, see the NXHelpPanel class specification in the NEXTSTEP General Reference manual.) The Help Builder panel is a slightly modified version of the standard Help panel. |
 |
| Attaching help to an object involves selecting an object in your application, displaying the help text in the Help Builder panel, optionally selecting a help marker within the text, and clicking the Attach... button. Thereafter, when the application runs and the user Help-clicks the object (that is, holds down the Help key and clicks the object), the specified help text will appear in the application's Help panel. However, before you begin attaching help text to your application's objects, you must provide your application with two components: a Help menu item and a Help directory.
Interface Builder's Menu palette supplies an Info menu item that, when dragged to your application's main menu, reveals a submenu containing a Help menu item. This menu item is preconfigured to open the Help panel. (If you inspect the Help item's connections, you'll see that it sends a showHelpPanel: message to the First Responder object.) Project Builder can provide your application with the required Help directory. Choose the Add Help Directory command in Project Builder's Project menu to create this directory. Project Builder creates the directory within the ".lproj" directory of your chosen development language (for example, English.lproj/Help). It copies into this directory generic table-of-contents and index files. The next step is to customize these files and to add content files of your own. The generic help text that's accessed through the supplied table-of-contents and index files gives help on basic operations, such as using the mouse and choosing commands. You'll want to add files that describe the operations that are unique to your application. You can also override or eliminate any of the generic help text that isn't applicable to your application. You create help files using Edit. (Make sure that Edit is in Developer Mode so that the Help commands can be accessed from the Format menu.) Perhaps the easiest way to ensure that the files you add agree in style and formatting with the generic help files is to display a generic file, copy its contents, and paste it into a new Edit document. Be sure to resize thenew document's window to the same width as the original so that the text will wrap tothe same margins. You can then modify the contents of the new help document and saveit in the Help directory. If you think you'll want to associate objects with specific passages within the file, rather than to the file in general, you can place help markers within the document. Each file you add should be represented by a new entry in the table-of-contents file. (However, see the NXHelpPanel class specification for an exception to this rule.) After adding content files, you'll also probably have to update the index. Once the table-of-contents, content, and index files for your help system are finished, you can begin attaching help to your application's user-interface objects. Display the Help Builder panel by choosing the Help Builder command from Interface Builder's Tools menu or by clicking the Help Builder button in the Help display of the Inspector panel. Select an object in your application's user interface, locate the relevant help text in the Help Builder panel, and click the Attach... button. If the Help inspector is open, it displays this new association in its Help Attachments list. The Help Builder panel offers several ways to locate specific portions of help text. First, you can use the table-of-contents or index displays to locate a file. In addition, the pop-up list below the Find field lets you search for help files by name, for marker names within the help files, or for any string.
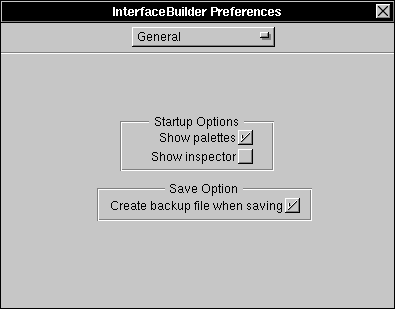
Setting Preferences You open the Preferences panel by choosing the Preferences command in the Info menu. This panel has two displays; you use the pop-up list at the top of the panel to access thesedisplays.
General Preferences These preferences control which panels appear when Interface Builder is launched and also whether a backup file is created when the nib file is saved. |
 |
| If the Save Option box is checked, Interface Builder will create a backup file whenever you save a nib file that's been modified. Assuming the box is checked, if you open a nib file named FindPanel.nib, make changes, and then save the modified file, Interface Builder will rename the original file FindPanel.nib~ before saving the modified file as FindPanel.nib. Because of the safety of having a backup file, it's generally better to leave this box checked.
Adding Custom Palettes, Inspectors, and Editors Interface Builder's primary value as a development tool is that it lets you interact directly with the objects that will make up your application. In general, these objects are defined by the NEXTSTEP system software. However, it's possible to extend Interface Builder's library of objects by creating custom palettes, thus letting you interact directly with objects that you or other developers have created. A custom palette can contain objects of various sorts. Most commonly, a custom palette contains View objects, objects that the user instantiates by dragging into a standard window. It's also possible to create custom palettes that contain MenuCells (which are instantiated by dragging into a menu), Windows (which are instantiated by dragging into the workspace), and other non-View objects (which are instantiated by dragging into the Filewindow). For any custom palette object, you can provide one or more inspectors. A custom object's inspector appears in the Inspector panel when the user selects the object. Most custom objects will require an Attributes inspector. For example, the fictitious RepeatButton class mentioned earlier would probably require an Attributes inspector to let the user set the repeat rate for a given button. It could also supply its own Connections, Size, and Helpinspectors, although the standard versions of these inspectors are generally adequate for most uses. Finally, a more complex custom object may require its own editor. An editor controls how a user can interact with a selected object. Interface Builder itself supplies editors for the objects it knows about. For example, when you double-click a window icon in the File window, Interface Builder's window editor is invoked and brings the actual window to the front. Or, when you double-click a Form object in an application window, Interface Builder's matrix editor is invoked, letting you drag cells to new positions. An editor that you provide must open its own window when the user double-clicks the custom object. (In this respect, your editor will be like the one provided by the Database Kit for the DBModule object. For a demonstration, load the palette /NextDeveloper/Palettes/DatabaseKit.palette, drag a DBModule object into the File window, and double-click the object.) Since each custom object can have its own editorwindow, editors make copy and paste or drag and drop operations between editor windows possible. Creating custom palettes, inspectors, and editors involves working with Interface Builder's application programming interface (API). This API is described in detail in Chapter 8 of the NEXTSTEP General Reference manual. You should also consult Chapter 18 of this manual for a tutorial describing the process of making a custom palette and inspector. |