Release 3.3 Copyright ©1995 by NeXT Computer, Inc. All Rights Reserved.
|
Changes made for the current release of NeXTstep affect the information presented in this chapter. For details see:
 /NextLibrary/Documentation/NextDev/ReleaseNotes/AppKit.rtf /NextLibrary/Documentation/NextDev/ReleaseNotes/AppKit.rtf
/NextLibrary/Documentation/NextDev/ReleaseNotes/AllocInitAndNew.rtf
The previous chapter, "Program Structure," described how a program based on the Application Kit is constructed from a small number of interconnected objects. This chapter shows how applications use that structure to carry out essential interactive activities: |
|
 |
Responding to events |
|
|
Drawing on the screen (and on the printed page) |
|
|
Sending and receiving remote messages |
|
Because events motivate almost all program activities, the chapter begins with a discussion of event handling in the Application Kit. |
|
NeXT applications are driven by the user's actions on the keyboard and mouse--that is, by events. The application receives an event from the Window Server, responds to it, then looks for the next event. If there is no next event, the application waits until the user does something and an event is received.
The Application object, NXApp, initiates this event loop--the application's main event loop--when it receives a run message: |
[NXApp run];
|
On each cycle of the loop, NXApp gets an event, analyzes it, and sends an appropriate message to initiate the application's response. It passes keyboard events to the key window and mouse events to the Window associated with the event in the event record. The Window, in turn, dispatches the event to one of its Views. Most of your program's activity will be in reaction to the messages NXApp and the application's Windows send out after receiving an event. |
|
|
Some of their event messages will reach objects that can respond directly. |
|
|
|
Some event messages will reach Control objects--Buttons, Sliders, Scrollers, TextFields, and the like--and will be translated into more specific action messages for other objects. |
|
NXApp continues to get events out of the event queue and dispatch them until the event loop is broken. Typically, it's broken only when the application terminates. If the response to an event includes a terminate: message, |
[NXApp terminate:self];
|
NXApp closes all the application's windows, frees its objects, and exits the program.
Note: The terminate: method takes an argument only so that it can respond to an action message, usually an action message coming from the Quit command. It doesn't actually looks at its argument, so it doesn't matter what value is passed. See "Action Messages," later in this chapter, for more on the structure of these messages.
Sometimes an application's response to an event is to set up a modal event loop that will get all subsequent events for a short period of time. For example, the response to a mouse-down event may be to set up a modal loop that will collect events until the user releases the mouse button and a mouse-up event is received. Modal loops are set up within the main event loop in response to an event or action message.
Most of the unique behavior of your application will be encoded in class definitions for objects that can respond to event and action messages.
This section of the chapter looks at event handling in a typical application, beginning where the application itself begins, with the code that sets up its event-handling objects.
Setting Up Event-Handling Objects
An Objective-C program begins just as a C program does, by calling its main() function. In a program based on the Application Kit, main() is usually very short. Its job is to set up the Application object and other core objects your program needs at startup, then to turn over control of the program to them. It can be as short as just three or four lines of code: |
main()
{
[Application new];
setUp();
[NXApp run];
[NXApp free];
}
|
In this version of main(), the new method creates an Application object, NXApp, which receives a run message to begin getting events from the Window Server. When the run method quits, free cleans up after the application.
Most of the application's time is spent in the run method, getting and responding to events. But before a run message can be sent, the application must prepare itself for the events it's about to receive. It must: |
|
|
Create the Windows, Views, and other objects it needs to handle events at startup. It's possible to create new objects at any time while the program is running, but an initial set of core objects must be in place before the first event is processed. |
|
|
|
Initialize the objects so they're connected into a program framework. |
|
|
|
Present the application to the user by placing the initial display on-screen and designating a Window to serve as the initial key window. If the application allows users to edit text or graphics within the window, it should also designate a View to show the initial selection, and then set the selection. |
|
In the version of main() shown above, all this code has been segregated into the setUp() function. For some applications, it might be appropriate to define a subclass of the Application class and include setup code in a redefined version of the new method: |
@implementation MyApplication : Application
{
}
+ new
{
self = [super new];
/* setup code goes here */
}
|
The main() function could then consist of just a single line of nested messages: |
main()
{
[[[MyApplication new] run] free];
}
|
When you design your application using Interface Builder, you can do most of the work of setting up your application by selecting objects from palettes and editing them on-screen. Interface Builder lets you graphically lay out the Windows, Views, and other interface objects your application needs, initialize them, display them, and archive them in a file for later use. The file can then be inserted into the __NIB segment of the application executable: |
cc ... -segcreate __NIB myProject.nib myProject.nib
|
Here the -segcreate linker option copies the myProject.nib file into a section of the __NIB segment and assigns the section the same name as the file.
A message to NXApp to open this section takes the place of the setUp() function: |
main()
{
[Application new];
[NXApp loadNibSection:"myProject.nib" owner:NXApp];
[NXApp run];
[NXApp free];
}
|
In the example above, the objects that were archived in myProject.nib are loaded into memory and connected to the object that "owns" them, NXApp.
Archived objects can have owners other than NXApp: |
main()
{
id theHub;
[Application new];
theHub = [MyCoordinator new];
[NXApp setDelegate:theHub];
[NXApp loadNibSection:"newProject.nib" owner:theHub];
[NXApp run];
[NXApp free];
}
|
For this example, the programmer defined a class, MyCoordinator, to contain the basic algorithms of the application--its inner workings as opposed to its interface. After creating an Application object, main() creates an instance of the MyCoordinator class, makes it the delegate of the Application object, and connects it with the user-interface objects archived in newProject.nib. Whenever a Window object is loaded from the archive, it's automatically added to NXApp's list of windows; NXApp doesn't have to be named as the Window's owner.
With Interface Builder, you can create any number of archive files (or __NIB sections), each with a different set of objects and, if desired, a different owner. For example, every panel the application uses could be archived separately. The archive file (or section) would contain the Panel object and all the Control objects it displays; its owner would be an object you'd design to receive action messages from the panel and coordinate its activities. The owner could be made the Panel's delegate; if needed, NXApp could be provided with an instance variable to keep track of the Panel's owner.
In this way, your application can build its own network of objects, all relying on the basic network of core objects described under "Program Framework" in the previous chapter.
Interface Builder is described in the next chapter. This chapter concentrates on the program structure defined in the Application Kit, and so returns to a simple version of a setUp() function that can be bracketed (as can loadNibSection:owner:) by new and run messages.
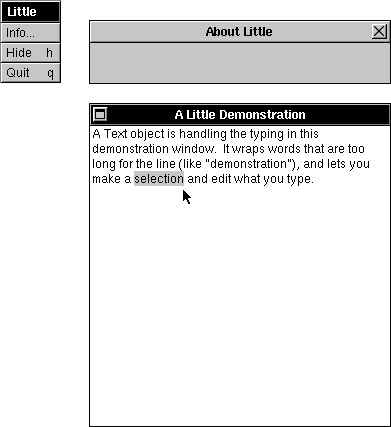
setUp() Example
Interface Builder is the preferred way to program an application. But to show the steps required by the Application Kit for setting up an application, the code for a simple program is listed below.
There are three windows in this example program--a main menu, an information panel, and a small window where the user can enter and edit text. All three are illustrated in Figure 7-1. |
|
 |
|
Figure 7-1. Little
This program has the basic elements of a real application, but is too simplified to be very useful, hence its name, "Little." But despite its simplicity, it behaves like a full-fledged application. It can be hidden, its principal window can be miniaturized, the panel and menu disappear when it's deactivated and reappear again when it's activated, the keyboard alternatives work, the text the user types can be selected and edited, and so on.
So that you can compile this little program and try it out for yourself, the source code and a makefile for it are on-line in /NextLibrary/Documentation/NextDev/Examples/Little.
The entire application is written in two functions, main() and setUp(); it includes no class definitions of its own. The main() function has just four lines of code, as illustrated above and repeated below; the setUp() function is just 58 lines, so the whole program can be printed in a little over a page. |
#import <appkit/appkit.h>
void setUp(void)
{
id myWindow, myPanel, myMenu, windowText;
NXRect aRect;
/*** Step 1: Set up a Window ***/
NXSetRect(&aRect, 100.0, 350.0, 300.0, 300.0);
myWindow = [Window newContent:&aRect
style:NX_TITLEDSTYLE
backing:NX_BUFFERED
buttonMask:NX_MINIATURIZEBUTTONMASK
defer:NO];
[myWindow setTitle:"A Little Demonstration"];
NXSetRect(&aRect, 0.0, 0.0, 300.0, 300.0);
windowText = [Text newFrame:&aRect
text:""
alignment:NX_LEFTALIGNED];
[windowText setOpaque:YES];
[[myWindow contentView] addSubview:windowText];
/*** Step 2: Set up a Panel ***/
NXSetRect(&aRect, 100.0, 700.0, 300.0, 40.0);
myPanel = [Panel newContent:&aRect
style:NX_TITLEDSTYLE
backing:NX_BUFFERED
buttonMask:NX_CLOSEBUTTONMASK
defer:YES];
[myPanel setTitle:"About Little"];
[myPanel removeFromEventMask:(NX_KEYDOWNMASK | NX_KEYUPMASK)];
/*** Step 3: Set up a Menu ***/
myMenu = [Menu newTitle:"Little"];
[[myMenu addItem:"Info..."
action:@selector(orderFront:)
keyEquivalent:'\0']
setTarget:myPanel];
[myMenu addItem:"Hide"
action:@selector(hide:)
keyEquivalent:'h'];
[myMenu addItem:"Quit"
action:@selector(terminate:)
keyEquivalent:'\0'];
[myMenu sizeToFit];
[NXApp setMainMenu:myMenu];
/*** Step 4: Display all windows that aren't deferred ***/
[myWindow display];
/*** Step 5: Move myWindow on-screen ***/
[myWindow orderFront:nil];
/*** Step 6: Make it the key window ***/
[myWindow makeKeyWindow];
/*** Step 7: Show a selection in the key window ***/
[windowText selectAll:nil];
}
main()
{
[Application new];
setUp();
[NXApp run];
[NXApp free];
}
|
All the methods used in this example are defined in the Application Kit. Some were discussed in the previous chapter under "Managing Windows"; others are described in Chapter 9, "User-Interface Objects." The NXSetRect() function, which assigns values to an NXRect structure, is discussed in NeXTstep Reference, Volume 2.
As its first act (step 1), the setUp() function creates a new instance of the Window class and titles it. It then creates a Text object the same size as the Window's content area and makes it a subview of the Window's content view. (It could equally as well have made the Text object the content view and freed the default content view provided by the Window object.)
Next (step 2), setUp() creates a Panel to serve as Little's information panel. The Panel is assigned a title, and keyboard events are removed from its event mask so that it can't become the key window. This panel will behave just like any other information panel, except for the glaring fact that it doesn't contain any information. Additional code would be required to draw the application's icon in the panel and provide text giving version and copyright information. (Little is too little to have any such information to impart.) Usually, information panels are designed in Interface Builder.
The setUp() function then (step 3) creates a menu with the three minimal commands every application should have: |
|
|
The Info command sends an orderFront: message to its target, the information panel, placing the panel on-screen at the front of its tier. |
|
|
|
The Hide command sends a hide: message that NXApp will respond to by hiding all the application's windows. The command is assigned Command-h as its keyboard alternative. |
|
|
|
The Quit command sends a terminate: message that NXApp will respond to by shutting down the application. Although it's not required by the user-interface guidelines, the command is assigned the common keyboard alternative Command-q. |
|
The size of the Menu is altered so that it exactly fits the three commands, and it's made the main menu of the application.
At this point, all the objects in the application have been created and initialized. It remains only to present the application to the user by displaying the contents of the one window that hasn't been deferred (step 4), moving the principal Window of the application on-screen (step 5), making it the key window on launch (step 6), and setting the Text object to display an initial selection (step 7). Steps 5 and 6 could have been combined by using a single method, makeKeyAndOrderFront:.
The display message that myWindow receives in step 4 calls upon every View within its view hierarchy to draw itself. The images are displayed into the window's backup buffer, but nothing appears on-screen. A window must be reordered into the screen list for its display to be visible. That's the function of step 5.
It's unnecessary to supply code in step 4 to display myMenu and myPanel along with myWindow. Menus are created as deferred windows and so are displayed automatically just before they're placed on-screen. The Panel was also created as a deferred window in step 2, and will be displayed just before the user brings it to the screen with the Info command.
Similarly, no code is needed to put the Menu and Panel on-screen. When the application is activated, the Application Kit places the main menu at the location specified by the NXMenuX and NXMenuY parameters. By default, it's in the upper left corner of the screen. The Info command will put the information panel on-screen and the panel's close button will remove it again.
Opening Files
If the Little program had the ability to open and display files, it would be organized a bit differently. Instead of creating a main window (myWindow) at the outset, it would have waited for an instruction indicating which file to open. Only then would it create a Window for the file and, in actions paralleling steps 4, 5, 6, and 7 of the example program, display the file in the Window, move the Window on-screen, make it the key window, and designate an initial selection.
The instruction to open a file can come from three different sources: |
|
|
If the user launches an application by double-clicking an icon for one of its files, the Workspace Manager passes the name of the file to the application. The Application object receives an openFile:ok: message just before getting its first event. |
|
|
|
If the user double-clicks a file in a directory window after the application is launched, the Workspace Manager sends the application a message with the name of the file. Application's openFile:ok: method is again entrusted with the message. |
|
|
|
If the user selects a file from the application's Open panel, the application must get the name (and directory) of the file from the OpenPanel object and open the file. The Open panel is brought to the screen by the Open menu command, in much the same way that an information panel is. |
|
In all three cases the application must supply the code that creates the Window, displays the file, places the Window on-screen, makes it the key window, and sets the initial selection within the window. But instead of doing this as part of a setUp() function, it's done in response to the user's selection of a file.
If the selection of a file generates an openFile:ok: message to the Application object, you should put this code in an appOpenFile:type: method defined in either an Application subclass or as part of the Application object's delegate. openFile:ok: does some preprocessing of the message, and sends an appOpenFile:type: message for the delegate or NXApp to actually open the file.
Final Initialization
Just before the run method gets its first event, it does some final initialization to make sure that the application is ready: |
|
|
It activates the application, which will cause it to receive an application-activated subevent (of the kit-defined event). |
|
|
|
It provides the application with default Listener and Speaker objects, if a Listener and Speaker weren't created in the application's setup code. These objects give the application the ability to communicate with the Workspace Manager and other applications. |
|
|
|
It checks in the application with the network name server so that it will have a public port where it can receive messages from the Workspace Manager and other applications. The application is checked in under the name returned by the Application object's appListenerPortName method, which is usually the name assigned in the header to the __ICON segment of the application executable, or possibly the name passed in the first string of the NXArgv array. You can override appListenerPortName so that it returns a different name. If it returns NULL,, the application is assigned a private port so that it can communicate with the Workspace Manager, but it won't have a public port. |
|
|
|
It sends an openFile:ok: message to NXApp, if the user launched the application by double-clicking a file icon. |
|
The run method also gives the application one last chance to do any final initialization of its own. It sends the Application object's delegate an appDidInit: message, if the delegate has a method that can respond.
The delegate's appDidInit: method can make any adjustments necessary for the events that are about to arrive. For example, if an application normally opens and displays a file, but the user launched it by double-clicking an application icon rather than a file icon, appDidInit: could open an empty window for the user to work in.
The argument passed in an appDidInit: message is the Application object's id.
Event Masks
Each window's event mask, maintained by the Window Server, determines which events the Server can send to the application process for that window. See Chapter 5, "Events," for information on the structure of event masks and the methods used to associate events with particular windows.
Each Window object keeps track of its own event mask through its winEventMask instance variable. The eventMask method returns the current mask: |
int myMask;
myMask = [myWindow eventMask];
|
A new menu or list has these event types in its default event mask: |
|
mouse-down |
(both left and right) |
|
mouse-up |
(both left and right) |
|
mouse-dragged |
(both left and right) |
|
kit-defined |
|
|
The default mask for panels and standard windows includes this full range of events: |
|
mouse-down |
(both left and right) |
|
mouse-up |
(both left and right) |
|
mouse-entered |
|
|
mouse-exited |
|
|
kit-defined |
|
|
system-defined |
|
|
Miniwindows and icons, whether in or out of the dock, have a similar event mask, but exclude key-down and key-up events.
To ensure that they work properly, you should refrain from changing the event masks of menus, lists, icons, and miniwindows. However, the event masks of standard windows and panels can be altered to suit the needs of your application.
If you want a window to receive an event type that's not included in the default mask, or to avoid receiving an event type that is included, you must change the Window object's event mask: |
int oldMask;
oldMask = [myWindow setEventMask:myNewMask];
|
If myNewMask is different from the mask maintained by the Window Server for myWindow, setEventMask: changes both the Window Server's mask and myWindow's winEventMask instance variable. The following code resets a default mask to include flags-changed events: |
oldMask = [myWindow setEventMask:([myWindow eventMask] |
NX_FLAGSCHANGED)];
|
This operation could be accomplished more simply with the addToEventMask: method: |
oldMask = [myWindow addToEventMask:NX_FLAGSCHANGED];
|
There's also a method for removing event types from the current mask: |
oldMask = [myWindow removeFromEventMask:NX_APPDEFINEDMASK)];
|
Each of these methods returns the former event mask so that you can cache it and restore it later if needed.
Asking for Particular Events
An application should limit the events it receives from the Window Server to just those it's interested in. This saves processing time, reduces the amount of code you must write, and limits potential errors from handling unwanted events.
But, for most types of events, it's best to set the window's event mask at the outset so that it will receive all the events you ever want for it. It's generally not a good idea to change the mask in response to events, since the user might act between the time you send the message and the time the Window Server gets around to resetting the mask. The delay could cause your application to miss events it expected to receive.
The principal exception to this rule arises when you want to receive mouse-dragged or mouse-moved events: |
|
|
Since these events are sent continuously, as long as the mouse is in motion, it doesn't matter that the Window Server won't begin sending them until it resets the event mask. Missing the first in a series of mouse-dragged or mouse-moved events is usually of little consequence. |
|
|
|
Since dispatching a continuous stream of events demands a lot of processing time, you should keep the mask for these two events set only for a limited period. Have your application set the Window's event mask to include mouse-dragged or mouse-moved events just before it's ready to respond to them and have it reset the mask when it's finished. Your application shouldn't ask for these events and then attend to other things. |
|
A menu includes mouse-dragged events in its event mask because it must always be ready to respond to them. When using a menu, users typically drag through the list of menu commands.
Receiving Keyboard Events
The Application Kit guarantees that keyboard events are sent to the active application, regardless of whether its on-screen windows have event masks that accept keyboard events. This enables the application to respond to keyboard alternatives when it's active, even if it has no windows for the user to type in.
Although the event mask doesn't determine which application gets keyboard events, it does help determine which Window within the application will receive them: |
|
|
The Application Kit associates keyboard events with the current key window. |
|
|
|
For a Window to be the key window, it must have an event mask that accepts key-down events. The initial event mask for all Windows (except menus, miniwindows, and icons) includes key-down events, so, by default, they all are potential key windows. |
|
Since the NeXT user interface requires every standard window to be the key window whenever it's the main window the user is working in, standard windows should keep key-down events in their event masks. If the window doesn't display typing, it will beep whenever it receives a key-down event.
However, if you have a panel that won't respond to keyboard events and shouldn't be marked as the key window, you must reset its mask to exclude key-down events. Any Window that excludes key-down events should also exclude key-up events, so this example removes both event types from the event mask: |
[myPanel removeFromEventMask:(NX_KEYDOWNMASK | NX_KEYUPMASK)];
|
A Panel should remove keyboard events from its event mask if it meets all three of these tests: |
|
|
It doesn't display typing. |
|
|
|
It's not an attention panel. |
|
|
|
It doesn't have a button that the user can operate from the keyboard by pressing Return. Normally, such a button is only permitted in an attention panel or in a panel that displays a text field. |
|
Receiving Timer and Cursor-Update Events
A Window's event mask never needs to include either timer events or cursor-update events.
Timer events are synthetic events, generated by the application when it needs them. Because they aren't sent across the connection from the Window Server, the event mask doesn't determine whether they can be received. See "Using Timer Events" under "Modal Event Loops" later in this chapter for information on how to generate these events.
Cursor-update events signal that it's time to change the cursor image. Applications don't respond to these events directly; the change is made by the Application Kit.
A Window receives cursor-update events if a cursor has been associated with a particular area (a cursor rectangle) located within the window and registered with the Window object. The Kit makes sure the application gets these events when they're needed; the event doesn't have to be included in the Window's event mask. However, because cursor-update events are based on mouse-entered and mouse-exited events, it's best to keep those two events in the event mask if you want to receive cursor-update events.
See "Changing the Cursor" later in this chapter for more information on setting cursor rectangles.
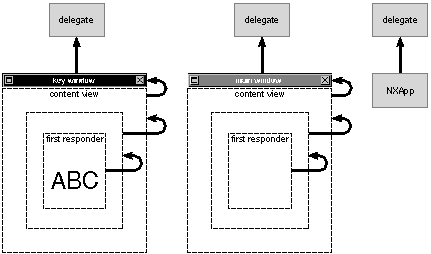
Selecting an Application, Window, and View
After the application's core objects have been set up, the event masks of its windows have been adjusted, and a run message sent, the Application object begins getting events from the Window Server. Most events are dispatched in messages to other objects, as described in the next section, "Event Messages."
Left mouse-down events also serve to select the application, the window, and even the View that will be the focus of future events. The selected object's event-handling status is designated by terms that are mostly familiar from the user interface: |
|
active application |
The application that's been selected to receive keyboard events, and to have visible menus and panels. |
|
|
key window |
The Window that's been selected to handle keyboard events for the application, and to be the primary recipient of action messages from menus and panels. |
|
|
main window |
The Window that's the principal focus of user actions. It's usually identical to the key window. |
|
|
first responder |
The View that's been selected to have the first chance at responding to keyboard events and action messages sent to a Window. |
|
The active application, key window, and main window are concepts important to the user interface and are defined in Chapter 2, "The NeXT User Interface." The first responder is no less important, but, like all Views, is a part of the implementation of the user interface, rather than part of its definition.
The First Responder
When the user clicks in a Text object, such as the one in the Little example program listed earlier under "Setting Up Event-Handling Objects," it's selected to receive subsequent events, especially keyboard events. The click also selects the insertion point where future typing will appear.
That simple demonstration program had just one View--a Text object--displayed within its Window. But imagine a Window, such as the one illustrated in Figure 7-2, with four Text objects sharing its content area. |
|
 |
|
Figure 7-2. Four Text Objects in a Window
By clicking in one quadrant or another, the user determines where typing will appear (which Text object will receive keyboard events). Only one of the four objects will show a selection or insertion point at a time.
The object that's selected to be the focus of future events for a Window is the first responder. Each Window has its own first responder, which it returns when asked: |
id handler;
handler = [myWindow firstResponder];
|
The first responder is typically a View object in the Window's view hierarchy, but it can be any Responder. At the outset, each Window is its own first responder. Because Windows generally can't respond to keyboard and mouse events, this is usually the same as having a nil first responder.
The first responder is a central actor in the handling of event and action messages. It receives: |
|
|
Keyboard event messages (keyDown:, keyUp:, and flagsChanged:). |
|
|
|
Action messages from Controls that don't have explicit targets of their own. This includes messages from menu commands that affect the current selection, such as the Cut, Copy, Paste, Bold, and Italic commands. See "Action Messages," later in this chapter. |
|
|
|
Messages that notify the first responder when the Window becomes the key window and when it stops being the key window (becomeKeyWindow and resignKeyWindow). See "The Key Window and Main Window" below. |
|
|
|
Mouse-moved event messages (mouseMoved:). |
|
If the first responder can't respond to any of these messages, its next responder is given a chance to respond. See "Event Messages in the Responder Chain" and "Action Messages" later in this chapter for details.
Changing the First Responder
As shown by the example illustrated in Figure 7-2 above, the Application Kit lets the user pick the first responder; the Window object alters its firstResponder instance variable on the basis of the left mouse-down events it receives (see "Left Mouse Events," under "Event Messages" below).
Before making the View selected by a mouse-down event the first responder, the Window sends it an acceptsFirstResponder message to ask whether it accepts this role. By default, all Views--in fact, all Responders--answer NO, leaving the current first responder in place. An object can agree to be made the first responder simply by implementing an acceptsFirstResponder method that answers YES: |
- (BOOL)acceptsFirstResponder
{
return YES;
}
|
Some objects may return YES under certain circumstances and NO under others. If a Text object displays editable or selectable text, it answers YES. If the text is neither editable nor selectable, it answers NO.
If the selected View returns YES, the Window attempts to make it the first responder through its makeFirstResponder: method: |
[self makeFirstResponder:selectedView];
|
As used by the Application Kit, the acceptsFirstResponder and makeFirstResponder: methods permit users to alter the first responder in a carefully regulated manner. You can also set the first responder from within your application using the same methods. This is most appropriate when registering an object as the Window's initial first responder on launch.
To function as the initial first responder of a Window, a Text object needs not only to be made the first responder, it must also be assigned a selection. The Text class defines three methods that do both; they register a new selection and send the Window a makeFirstResponder: message. The selectAll: method used in the Little example earlier in this chapter selects all the object's text; the selectText: method does the same. The setSel:: method defines a range of text to select. In the example below, it selects the characters at positions 52 through 190 (up to position 191): |
[windowText setSel:52 :191];
|
If the range of text selected is 0--if both arguments to setSel:: are the same, or there's no text for selectAll: and selectText: to select--the selection is an insertion point. The selectAll: message in the Little example will make the receiving Text object show a blinking caret for the insertion point when the program is launched and the Window becomes the key window; it won't take an initial click to select the Text object as the first responder.
Notification
The makeFirstResponder: method first sends the current first responder a resignFirstResponder message to notify it that a change is about to be made; the new first responder is then notified with a becomeFirstResponder message. The default implementation for both these methods is simply to return self. An object can override the default to keep track of whether it's the current first responder, or to prevent the change from being made: |
|
|
If an object returns nil to a resignFirstResponder message, it refuses to be deactivated and remains the first responder. No becomeFirstResponder message is sent and makeFirstResponder: returns NULL. |
|
|
|
If an object returns nil to a becomeFirstResponder message, it refuses to be the new first responder. Since the current first responder has already resigned, the Window is made the first responder instead. This returns the Window to its state before any events or makeFirstResponder: messages were received. |
|
An object could refuse to become the first responder if its internal state temporarily prevents it from responding to events and action messages. An object might refuse to give up being the first responder if it needs to receive additional events. For example, an object that asks the user to type a directory name might remain the first responder until it receives the name of a valid directory.
Accepting First Responder Status
An object should agree to be the first responder (by returning YES to an acceptsFirstResponder message) only if it needs to receive some of the event and action messages that are directed to a first responder. These messages were listed above and include, most prominently: |
|
|
Keyboard event messages |
|
|
Action messages that aren't hard-wired to a specific target |
|
Action messages from the Controls within the Font panel and from menu commands such as Cut, Copy, and Paste fit this description. They affect the current selection, which can change from Window to Window and from View to View. More precisely, they affect the current selection of the first responder in the key window or main window.
Any View that displays material that the user can select or edit must be able to respond to untargeted action messages like these, and therefore must accept first responder status. In the Application Kit, for example, Text objects, TextFields, and Forms agree to be the first responder when they display editable text, whereas Buttons, Sliders, and Scrollers always refuse.
Most objects that refuse to be the first responder fit into one of two categories: |
|
|
If an object responds only to mouse events, it can set up its own modal loop to get all the events it needs, except the mouse-down events that initiate the loop. It doesn't have to be the first responder to receive mouse-down event messages. See "Modal Event Loops," later in this chapter, for a description of this type of object. |
|
|
|
If an object inherits from View simply so that it can draw on the screen, not so that it can respond to events, it won't want any events at all. The event messages it receives will be passed on to its next responder. |
|
The Key Window and Main Window
The Application Kit changes the key window (and main window) in response to left mouse-down events received from the Window Server. If the window associated with the event isn't already the key window, it's made the new key window provided that it has an event mask that accepts key-down events. Unless the window is a panel, it's also made the main window. The main window changes only when the key window does.
Each Window object keeps track of whether it's the key window or main window: |
BOOL keyStatus, mainStatus;
keyStatus = [myWindow isKeyWindow];
mainStatus = [myWindow isMainWindow];
|
The Application object can identify which of its Windows is the key window and main window: |
id key, main;
key = [NXApp keyWindow];
main = [NXApp mainWindow];
|
These two methods return nil if the application isn't active or if there is no key window or main window.
Changing the Key Window
You can alter the key window (and main window) programmatically with the makeKeyWindow method: |
[myWindow makeKeyWindow];
|
This method can also be performed indirectly, through the makeKeyAndOrderFront: method. makeKeyAndOrderFront: combines a makeKeyWindow message with an orderFront: message. |
[myWindow makeKeyAndOrderFront:self];
|
For the Window that receives a (direct or indirect) makeKeyWindow message to actually be made the key window, it must be on-screen and must accept key-down events. For it also to be made the main window, it must be on-screen, accept key-down events, and not be a Panel. The canBecomeMainWindow method returns whether these three conditions are true: |
BOOL potentialMain;
potentialMain = [myWindow canBecomeMainWindow];
|
Since the key window and main window belong only to the active application, the receiving Window's application must also be the active application when a makeKeyWindow message is sent. If it's not, the message serves only to register the intended key window (and main window) for the next time the application is activated. The user can override this intention simply by clicking another window.
Programmatically making a Window the key window is appropriate only in a limited number of situations: |
|
|
After the user acts in a panel that's the key window, the panel should return key-window status to the main window. For example, when the Font panel sets the font of the current selection, it makes the main window (where the selection is located) the key window. |
|
|
|
To respond to a remote message, the application might need to designate an appropriate key window. After receiving a message to open a file, for example, the application should make the window that displays the file the key window. |
|
|
|
An initial key window is designated in the application's setup code. For example, the Little demonstration program listed under "Setting Up Event-Handling Objects" above sent a makeKeyWindow message to its principal Window as part of its setUp() function. Since the application wasn't active at the time the message was sent, it served only to register the Window as the desired key window (and main window) once the application was activated. |
|
Notification
When the key window changes, the new key window is notified with a becomeKeyWindow message. If the Window also becomes the main window, it's notified with a becomeMainWindow message. The former key window and main window are notified of their lost status with resignKeyWindow and resignMainWindow messages: |
[thatWindow resignKeyWindow];
[thisWindow becomeKeyWindow];
[thatWindow resignMainWindow];
[thisWindow becomeMainWindow];
|
These messages are sent whenever the key window or main window changes, no matter what the reason. The change could be caused by: |
|
|
A left mouse-down event deactivating one application and activating another |
|
|
A left mouse-down event within another window of the same application |
|
|
The user hiding an application, and thus deactivating it |
|
|
The user unhiding an application, and thus activating it |
|
|
The user closing the key window or main window |
|
|
The user miniaturizing the key window or main window |
|
|
A makeKeyWindow message in the active application |
|
In other words, the messages exactly parallel the changes in window status that the user sees. See Chapter 2 for more on how user actions affect a window's status.
When any of the four messages are generated by a left mouse-down event, they're sent before any becomeFirstResponder and resignFirstResponder messages that might be generated by the same event.
The Window class defines methods that can respond to all four messages shown above. Each method records the Window's change in status and notifies the Window's delegate of the change, provided the delegate has a method that can respond to the message: |
[[self delegate] windowDidBecomeKey:self];
[[self delegate] windowDidResignKey:self];
[[self delegate] windowDidBecomeMain:self];
[[self delegate] windowDidResignMain:self];
|
The Window also passes becomeKeyWindow and resignKeyWindow messages on to its first responder, if the first responder can respond. In the Application Kit, the Text object uses these messages to learn when to begin blinking the caret marking the insertion point and when to stop. The caret should blink only in the Text object that will display the user's typing--that is, only in the first responder of the key window.
Your application can use these notification messages to keep itself current with the user's actions. For example, you may want to make sure that the PrintInfo object cached by the Application object reflects the document in the key window. You might also want to update panels (such as an "inspector" panel) so that they display information appropriate for the main window.
To take advantage of the notification, you must implement methods that can respond either to the messages sent to the Window or to the ones sent to its delegate. The methods you define in a Window subclass should perform the default versions defined in the Window class: |
- becomeKeyWindow
{
[super becomeKeyWindow];
. . .
}
|
The Active Application
When a left mouse-down event selects a new active application, it generates an application-activated subevent (of the kit-defined event). The subevent is sent to the application even before the mouse-down event.
When one application is activated, another might be deactivated, so a mouse-down event may also cause an application-deactivated subevent (also of the kit-defined event) to be sent to the current active application. The active application is always deactivated before another application is activated, so the application-deactivated subevent is sent before the application-activated subevent. But since they're sent to different processes, it's not determined which one will be acted on first.
When the user hides an application, an application-deactivated subevent is generated, but no application-activated subevent.
The isActive method returns the application's current status: |
BOOL activeStatus;
activeStatus = [NXApp isActive];
|
The activeApp method returns a user object (an integer) identifying the PostScript execution context of the active application: |
int activeOne;
activeOne = [NXApp activeApp];
|
Changing the Active Application
Usually, applications are activated by left mouse-down events that spawn application-activated and application-deactivated subevents. But the Application Kit is sometimes called upon to activate an application in the absence of an event. An application is activated when: |
|
|
It's launched. |
|
|
It receives a message to open a file. |
|
|
It's returned to the screen after being hidden. |
|
In the first two cases, the activation is conditional: The application will become active only if there's no current active application. This condition is usually met because the Workspace Manager deactivates the current active application both when it launches a new application and when it sends an inactive application an openFile:ok: message. The condition won't be met only if the user chooses another application to work in before the target application has a chance to activate.
If your application accepts messages (other than openFile:ok: messages) from other applications, it may need to activate itself in response: |
[NXApp activateSelf:NO];
|
The NO flag indicates that the activation is conditional. This method may generate application-activated subevents. With YES as an argument, the activation is unconditional; it will force the current active application to be deactivated and so may also generate application-deactivated subevents for another application.
In general, protocols between cooperating applications require the application receiving a message to activate itself conditionally, if it needs user interaction to do its work. The sending application should deactivate itself so the receiving application can become active: |
[NXApp deactivateSelf];
|
If, in response to a message, an application activates itself unconditionally, it should restore the previous active application (the one sending the message) when it's finished. The activateSelf: method returns the PostScript execution context of the previous active application: |
int lastActive
lastActive = [NXApp activateSelf:YES];
|
The number can be used to reactivate the application later: |
[NXApp activate:lastActive];
|
Instead of using activateSelf: for unconditional activation, applications can also use the unhide: method: |
[NXApp unhide:anId];
|
unhide: includes an activateSelf: message (with YES as its argument) and also ensures that the windows of the newly activated application aren't hidden.
Notification
When the Application object receives an application-activated subevent from the Window Server, it first does what's necessary to activate the application. It then sends itself a becomeActiveApp message. An application-deactivated subevent generates a resignActiveApp message.
The methods that respond to these two messages simply notify the Application object's delegate of the change in status, if the delegate has a method that can handle the message: |
[[self delegate] appDidBecomeActive:self];
[[self delegate] appDidResignActive:self];
|
The sole purpose of becomeActiveApp and resignActiveApp messages is to give your application a way of coordinating its activities with changes in its status. You can take advantage of this opportunity either by implementing appDidBecomeActive: and appDidResignActive: methods for the delegate or by overriding Application's becomeActiveApp and resignActiveApp methods in a subclass definition.
Event Messages
As the Application object gets events from the Window Server, it dispatches them as Objective-C messages to other objects. With few exceptions, NXApp sends every event to a Window object: |
|
|
Keyboard events are sent to the key window. (However, Command key-down events, potential keyboard alternatives, can be sent to any Window.) |
|
|
|
Mouse events are sent to the Window associated with the event--that is, to the Window whose window number is recorded in the window component of the event record. |
|
|
|
The window-moved, window-resized, and window-exposed subevents of the kit-defined event are also sent to the Window associated with the event. (The window-resized subevent isn't currently used by the Application Kit. However, should window-resized subevents be posted or placed in the event queue, the Kit would dispatch them to the window in the event record.) |
|
If the event is a keyboard or mouse event, the Window usually sends it on to one of the objects in its view hierarchy. It handles kit-defined subevents itself.
The events that NXApp doesn't dispatch to a Window are: |
|
|
Application-defined events, which NXApp handles itself with the aid of its delegate. |
|
|
|
The application-activate and application-deactivate subevents of the kit-defined event. These two subevents are handled internally by the Application Kit; your objects never need to respond to them directly, though they can be notified when the application is activated or deactivated. See "Selecting an Application, Window, and View" above. |
|
|
|
Subevents of the system-defined event. All but the power-off subevent are used internally by objects defined in the Kit; your application never has to deal with them. The power-off subevent is handled by the Workspace Manager, which notifies all the applications it launched that the power is about to go off. Applications generally respond to the Workspace Manager's message rather than to the event itself. |
|
|
|
Timer events. The Application object doesn't dispatch timer events; you should ask for them only when you're prepared to get them out of the event queue yourself. See "Using Timer Events" under "Modal Event Loops" later in this chapter. |
|
|
|
Cursor-update events, which are used internally by the Application Kit. See "Changing the Cursor" later in this chapter. |
|
The object that receives an event from the Application object, or from a Window, gets it in the form of an event message--a message to apply a method named after the event type or subtype it reports. |
|
Mouse events |
mouseDown: |
(for the left mouse button) |
|
|
mouseUp: |
(for the left mouse button) |
|
|
mouseDragged: |
(for the left mouse button) |
|
rightMouseDown: |
(for the right mouse button) |
|
rightMouseUp: |
(for the right mouse button) |
|
rightMouseDragged: |
(for the right mouse button) |
|
mouseMoved: |
|
|
mouseEntered: |
|
|
mouseExited: |
|
|
Keyboard events |
keyDown:
keyUp:
flagsChanged: |
|
Kit-defined subevents |
windowExposed: |
|
windowMoved: |
|
|
windowResized: |
|
|
|
System-defined subevents |
powerOff: |
|
|
Application-defined events |
applicationDefined: |
|
In each case, the method takes a single argument, a pointer to the event record. By its very name the event message identifies the event type or subtype; its argument passes along all the other available information about the event.
Note: The Application Kit and this documentation take the point of view of a right-handed user. The primary mouse button, whether left or right, generates "left mouse events" and the other mouse button, if it functions differently than the primary button, generates "right mouse events." If a user enables the left mouse button to bring the main menu to the cursor, it will generate right mouse events and the right mouse button will generate left mouse events. If neither button is enabled to bring the main menu to the cursor, both buttons generate left mouse events.
The Application Kit implements default versions of methods that respond to event messages. Some have default behavior that your application can inherit and rely on. Others--especially those for keyboard and mouse events--do little or nothing. You must either implement your own methods so that your application can respond to the events in its own way, or make use of the objects provided in the Kit with defined responses to event messages: |
|
|
The Text object responds to keyboard events by formatting and displaying the user's typing. It responds to mouse events by altering the selection and insertion point. |
|
|
|
Control objects (such as Buttons, Sliders, and TextFields) capture keyboard and mouse events and turn them into action messages for other objects. By implementing a method that can respond to an action message, you can add specific behavior to your application without directly responding to the event message. (Action messages are described in a later section.) |
|
|
|
ScrollViews capture the mouse events that scroll one (larger) View within another (smaller) View, and do the scrolling for you. |
|
The following sections discuss how event messages are dispensed and the Kit's default response to each one.
Keyboard Events
The Application object sends keyboard events to the key window, which passes them on as event messages to its first responder.
There's just one exception to this rule. When the Application object gets a key-down event, it checks whether the Command key was down at the time of the event. If it was, NXApp first tries to pass the event as a potential keyboard alternative--a keystroke that can activate a menu item or a button. Only after determining that no object will respond to the keyboard alternative does NXApp distribute it as an ordinary key-down event. See "Keyboard Alternatives," later in this section, for more information.
Left Mouse Events
Users can select an object on the screen (a View) by moving the cursor so that it points to the object and pressing the left mouse button. The mouse-down event is sent to the object the user selects as a mouseDown: event message. Mouse-dragged and mouse-up events that follow the mouse-down event are sent to the same object.
However, mouse-dragged and mouse-up events generally aren't distributed through event messages. Once an object receives a mouse-down event, its mouseDown: method can set up its own event loop to get these events until the user releases the mouse button. See "Modal Event Loops," later, for details.
Hit Testing
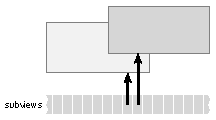
When it receives a mouse-down event, the Window object uses View's hitTest: method to look for the View in which the cursor was located when the mouse button was pressed--the View that contains the coordinates of the mouse-down event's location component. If location is within more than one View, hitTest: picks the View that's lowest in the view hierarchy.
hitTest: searches through a subviews list by starting at the end and working its way back toward the beginning. This gives the last subview to draw the first opportunity to accept the event. If the cursor is located in an area shared by two overlapping subviews of the same superview, as illustrated in Figure 7-3, the subview on top gets the event. |
|
 |
|
Figure 7-3. Overlapping Subviews
Trapping the First Event
A left mouse-down event selects more than just the object that's to receive subsequent mouse events. It can also select: |
|
|
The active application, if the mouse-down event spawns application-activated and -deactivated subevents. |
|
|
|
The key window (and main window), if the Window that receives the event isn't already the key window. |
|
|
|
The first responder, if the View associated with the event accepts first-responder status. |
|
When a left mouse-down event is used to select a new key window, and possibly a new active application, you may not want it to do anything more.
Suppose, for example, that the user has two of the Quadrant windows illustrated above in Figure 7-2, "Four Text Objects in a Window," on-screen at the same time; each of the windows has Text objects displaying editable text. By clicking first in one window, then in another, the user can repeatedly alter the key window. If the click were passed through to the Text object each time, it would also select a new first responder and alter the current text selection or insertion point. This would make it nearly impossible to select a window without also selecting text.
To prevent this from happening, you can trap mouse-down events that choose the key window before they change the first responder and before they're sent through as event messages to Views within the Window's view hierarchy.
Whenever a Window receives a left mouse-down event that makes it the key window, it sends the View that was selected by the event an acceptsFirstMouse message before passing it the event. If the View returns YES, the Window will send it a mouseDown: message for the event. If the View returns NO, the mouse-down event won't be sent to the View, and neither will the mouse-dragged and mouse-up events that follow the mouse-down.
In general, Views that display material that the user can select or edit should return NO to an acceptsFirstMouse message; other Views should return YES. In the Application Kit, Text objects, TextFields, and Forms refuse the first series of left mouse events, but Sliders, Buttons, and Scrollers accept them.
The default response of the acceptsFirstMouse method defined in the View class is NO. To change the default in your View subclass, simply implement your own version of the method: |
- (BOOL)acceptsFirstMouse
{
return YES;
}
|
Selecting the First Responder
The Application Kit tries to make the View selected by a left mouse-down event the first responder. If it answers YES to an acceptsFirstResponder message, its Window is sent a makeFirstResponder: message as discussed above under "The First Responder."
If the View selected by the mouse-down event is one that accepts being the first responder, but the current first responder refuses to give up that status (returns nil to a resignFirstResponder message), the mouse-down event and the following mouse-dragged and mouse-up events are sent to the current first responder, rather than to the View selected by the mouse-down event.
Right Mouse Events
Right mouse events within the key window are distributed very much like left mouse events. When the user presses the right mouse button while the cursor is in the key window, hit testing finds the View where the cursor is located. The right mouse-down event and subsequent right mouse-dragged and right mouse-up events are sent to that View.
However, Views rarely respond to right mouse events. In the user interface, these events are reserved for bringing a copy of the main menu to the cursor. Therefore, rightMouseDown: event messages generally are passed up the responder chain from next responder to next responder until they reach the Window, which then makes sure that the main menu gets the event. The main menu sets up a modal event loop that collects all subsequent right mouse events until the mouse button is released. (Event loops are discussed under "Modal Event Loops" later in this chapter, and passing event messages up the responder chain is discussed under "Event Messages in the Responder Chain" below.)
This pattern of distribution permits a View that needs to distinguish between left and right mouse events to get both. At the same time, it ensures that right mouse events that aren't intercepted by a View do the job that they're meant to do in the user interface.
Unlike left mouse events, right mouse events don't change the active application, key window, or first responder, and they aren't trapped if the View returns NO to an acceptsFirstMouse message.
Only Views in the key window are given a chance to respond to right mouse events. If the Window that receives a right mouse event isn't the key window, it turns the event over to the main menu. This restriction makes the user interface for right mouse events match that of left mouse events more exactly. When the user begins working within a window using the left mouse button, the window becomes the key window. To ensure that the user's work with the right mouse button also takes place in the key window, the window has to be the key window before any right mouse events can be distributed to its Views.
Mouse-Exited and Mouse-Entered Events
An application can receive mouse-exited and mouse-entered events, provided: |
|
|
At least one of its Windows has an event mask that accepts the events, and |
|
|
The application has set a tracking rectangle within the Window. |
|
Mouse-exited events are generated when the cursor leaves the tracking rectangle; mouse-entered events occur when the cursor enters the rectangle.
A Window can have any number of tracking rectangles. So that particular events can be matched to particular rectangles, you can assign each rectangle an identifying tag that will be reported back in the event records of the mouse-exited and mouse-entered events that it generates.
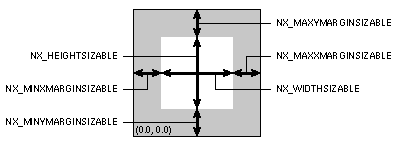
Window's setTrackingRect:inside:owner:tag:left:right: method sets a tracking rectangle: |
NXRect rect;
[aView getFrame:&rect];
[[aView superview] convertRect:&rect toView:nil];
[myWindow setTrackingRect:&rect
inside:YES
owner:aView
tag:3
left:YES
right:NO];
|
In this example, aView's frame rectangle is made the tracking rectangle, and aView itself is made the tracking rectangle's owner, the object responsible for handling the events the rectangle generates. The owner need not be a View, but it should be a Responder. When the Window receives mouse-exited and mouse-entered events, it dispatches mouseExited: and mouseEntered: event messages directly to the owner.
The convertRect:toView: message above transforms aView's frame rectangle to the correct coordinate system for making it a tracking rectangle. A tracking rectangle is specified in the base coordinate system for the window--here in myWindow's base coordinate system. Since a View records its frame instance variable in its superview's coordinate system, the message is sent to aView's superview. See "Converting Coordinates" later in the chapter for more on convertRect:toView: and similar methods.
The rectangle's tag distinguishes it from other tracking rectangles within the same window. The inside flag indicates whether the cursor starts out inside the rectangle (YES) or outside it (NO). If it's YES, the first event received for the rectangle will be a mouse-exited event, regardless of where the cursor is actually located. If NO, the first event will be be a mouse-entered event.
The last two arguments to setTrackingRect:inside:owner:tag:left:right: specify whether events are to be generated for the rectangle only if one or both of the mouse buttons is being held down. In this example, mouse-exited and mouse-entered events will be generated only while the left mouse button is down. This makes these events somewhat akin to left mouse-dragged events.
A tracking rectangle remains in effect until another rectangle with the same tag is set for the Window, or until it's removed by the discardTrackingRect: method: |
[myWindow discardTrackingRect:3];
|
Note: Don't assign negative tags to tracking rectangles. The Application Kit uses negative numbers to identify the tracking rectangles that generate cursor-update events.
Kit-Defined Events
The application-activated and application-deactivated subevents of the kit-defined event don't generate event messages. However, they do initiate becomeActiveApp and resignActiveApp messages to the Application object, and appDidBecomeActive: and appDidResignActive: messages to the Application object's delegate, as discussed under "The Active Application" above. You should respond to these subevents only by writing methods that can respond to these messages.
The subevents of the kit-defined event that concern the state of a window generate event messages to the Window object whose window number is listed in the event record. The Window class defines methods to respond to these messages.
Window-Moved
The windowMoved: method updates the Window's frame instance variable to record the new location of the window. It then informs the Window's delegate of the move by sending it a windowDidMove: message, if the delegate has a method that can respond. The delegate can use Window's getFrame: method to get the window's new location in screen coordinates: |
- windowDidMove:sender
{
NXRect rect;
[sender getFrame:&rect];
. . .
}
|
The location of a window is important to the Application Kit as it responds to user actions that manipulate windows, but it's generally of little use to an application. Most applications shouldn't care where the user places windows and won't need to do anything special when a window moves.
Window-Exposed
The windowExposed: method redisplays part (sometimes all) of the Window's contents. The area that's redisplayed is a rectangle calculated from the event record. The location of the rectangle is taken from the event record's location component and its size is taken from the data.compound.misc.L component.
After sending a display message, windowExposed: informs the Window's delegate with a windowDidExpose: message, if the delegate has a method that can respond.
Window-Resized
The windowResized: method redisplays the Views within a window in response to a window-resized subevent. However, this method isn't currently used. When the user resizes a window by dragging its resize bar, no window-resized subevents are generated. Instead, the Window's frame view, which contains the resize bar, resizes the Window and redisplays its Views. Applications are informed of the resizing, not by an event, but by notification messages sent to the Window's delegate (or, in the absence of a delegate, to the Window itself): |
|
|
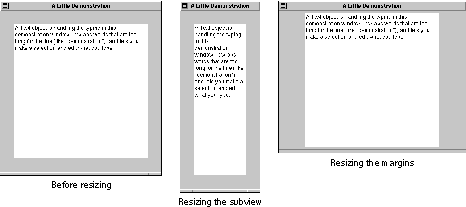
As the user drags an outline of the window, repeated windowWillResize:toSize: messages are sent to the delegate, if the delegate implements a windowWillResize:toSize: method. These messages give the delegate a chance to determine the new size of the window. The first argument to windowWillResize:toSize: is the id of the Window object. The second argument passes a pointer to an NXSize structure containing the proposed new width and height of the window. The delegate can alter these values to constrain the size of the window. It can be kept within maximum and minimum size limits, or be made to grow and shrink by defined amounts (as is the Workspace Manager's Directory Browser). The on-screen outline will reflect the altered values the delegate places in the NXSize structure. |
|
|
|
After the user releases the mouse button and just before the window is redisplayed in its new size, the delegate is informed with a windowDidResize: message, if it has a method that can respond. The argument passed in a windowDidResize: message is the id of the Window object, which can provide the new dimensions of the window in response to a getFrame: message. |
|
If a Window doesn't have a delegate, or its delegate doesn't respond to windowWillResize:toSize: and windowDidResize: messages, these messages will be sent to the Window instead--but only if the Window can respond. This means that you can implement windowWillResize:toSize: and windowDidResize: methods either in a Window delegate or in a Window subclass.
Application-Defined Events
If your application makes use of application-defined events, you must write the code to respond to them.
When it receives the event, the Application object sends itself an applicationDefined: event message. But its applicationDefined: method does nothing more than pass the same message on to its delegate, if the delegate can respond.
You can implement an applicationDefined: method either in a subclass of the Application class, or in a class definition for the Application object's delegate.
System-Defined Events
Most subevents of the system-defined event are handled internally by the Application Kit. Only one, the power-off subevent, results in event messages.
Power-off subevents are generated when the user presses the Power key on the keyboard. The Window Server broadcasts the event to every application with on-screen windows.
One of the applications that receives the event is the Workspace Manager. It puts up a panel that requires users to confirm the power-off instruction or cancel it. If the user doesn't rescind the instruction, the Workspace Manager sends each application it launched a powerOffIn:andSave: message. This is the same message it sends to its applications when the user wants to log out.
The powerOffIn:andSave: message is received by the Application object, which terminates the main event loop and sends its delegate an appPowerOffIn:andSave: message, if the delegate has a method that can respond. The first argument to both methods is the number of milliseconds before the power goes off. The second argument is currently meaningless and should be ignored.
The Application object's delegate can ask for more time by sending the Workspace Manager an extendPowerOffBy:actual: message. It should then save files and take whatever other steps are necessary to prepare for the shutdown.
Applications that are launched in the workspace ignore the power-off subevent and attend only to the messages received from the Workspace Manager. Applications that are launched from the command line won't get these messages and must respond to powerOff: event messages instead.
NXApp is the object that receives the powerOff: message. If the application was launched by the Workspace Manager, its powerOff: method does nothing. Otherwise it sends its delegate an appPowerOff: message, if the delegate can respond.
Cursor Coordinates
Methods that respond to mouse events may want to note the exact location of the cursor on-screen. The coordinates in the location component of the event record are given in the window's base coordinate system; they can be translated to the receiving View's local coordinates by the convertPoint:fromView: method. |
NXPoint where;
where = eventPtr->location;
[self convertPoint:&where fromView:nil];
|
This method transforms a point expressed in the coordinate system of its second argument to the receiving View's reference coordinate system. When the second argument is nil, as it is here, it's assumed that the point is expressed in the base coordinate system. convertPoint:fromView: alters the NXPoint structure referred to by its first argument and returns a pointer to the same structure.
Note that once the location component of the event record has been transformed from the base coordinate system, other objects in the view hierarchy will be unable to rely on it. For this reason, it's first assigned to the local variable where before being passed to convertPoint:fromView: in the example above.
Querying the Cursor
If the process of responding to an event takes some time and you need a more recent indication of the cursor's location, Window's getMouseLocation: method provides one: |
NXPoint where;
[myWindow getMouseLocation:&where];
|
This method places the current cursor location in the NXPoint structure referred to by its argument; it returns self. The point is specified in the receiving Window's base coordinate system and can be altered by the convertPoint:fromView: method illustrated above.
Testing the Cursor's Location
Methods that respond to events often must test whether the cursor is located in a particular View or in a particular region of a View, usually expressed as a rectangle. The function that makes the test is NXMouseInRect(). |
BOOL inside;
NXRect rect;
[myView getBounds:&rect];
inside = NXMouseInRect(&where, &rect, NO);
|
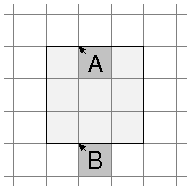
This function takes a pointer to the cursor location and a pointer to a rectangle, here myView's bounds rectangle, and returns whether the point is inside the rectangle. The third argument, NO in the example, is best explained by examining what's meant by the "location of the cursor."
The cursor's location, as reported in the event record or by getMouseLocation:, is, in fact, the location of just one point on the cursor, its hot spot. Since the cursor is an image, displayed with pixels, the hot spot corresponds visually to a particular pixel--in effect a "hot pixel." The pixel chosen by the hot spot is the one cursor pixel that users can't drag off-screen.
When testing whether the cursor is inside a rectangle, what we really want to know is whether the pixel corresponding to the hot spot is inside the rectangle.
The hot spot has no fractional coordinates, so it always lies on a corner where four pixels meet. On the MegaPixel Display, the pixel chosen by the hot spot is, in accord with the rules described under "Imaging Conventions" in Chapter 4, "Drawing," the one that lies below it and to its right. In Figure 7-4, small arrows point to the potential hot spots that would chose the "hot pixels" labeled "A" and "B". |
|
 |
|
Figure 7-4. Testing the Cursor's Location
In this diagram, pixel A lies inside the shaded rectangle and pixel B lies outside it, but both hot spots lie on the edge of the rectangle. To correctly determine which hot spot chooses a pixel inside the rectangle and which does not, NXMouseInRect() must know the polarity of the y-axis. When passed NO as the third argument, it assumes that y coordinate values increase from bottom to top, so hot spots with y coordinate values that match the minimum rectangle values are excluded from the rectangle. When passed YES, it assumes that the y-axis has been flipped, with coordinate values increasing from top to bottom, so hot spots with y coordinates equal to the maximum rectangle values are the ones excluded.
Flipped coordinate systems are described under "View Coordinate Systems" later in this chapter.
Event Messages in the Responder Chain
Every Window has its own responder chain of Views. When a View receives a keyboard or mouse event message that it can't handle, the message is passed to its next responder.
The chain is established as each View object has its nextResponder instance variable initialized to another object. As a default, and with the sole exception of the content view, a View's next responder is its superview. The content view's next responder is the Window. The Window ends the responder chain; its next responder is nil.
You can add other Responders into this default chain: |
[anotherResponder setNextResponder:[self nextResponder]];
[self setNextResponder:anotherResponder];
|
The mechanism for passing events along the chain is inherited from the Responder class. Responder has a default implementation for the methods that respond to keyboard and mouse event messages. Its methods don't take any action in response to the event; they simply send the same message on to the next responder: |
- keyDown:(NXEvent *)theEvent
{
[nextResponder keyDown:theEvent];
}
|
For an object to actually do anything with key-down events, it must be provided with a keyDown: method that overrides the Responder version.
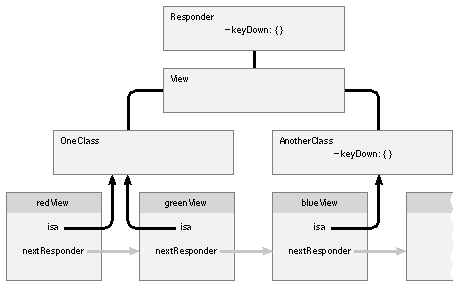
For example, suppose that a mouse-down event makes redView the first responder. The application then receives a key-down event that gets passed to redView in the form of a keyDown: message. However, redView isn't equipped to handle a key-down event; it doesn't have access to a keyDown: method that overrides the method defined in the Responder class. The Responder method passes the event--again as a keyDown: message--to redView's next responder, its superview.
Figure 7-5 illustrates how the chain works. It shows part of the inheritance hierarchy for redView and two other objects, greenView and blueView. When redView receives a keyDown: message, it applies the version of this method it inherits from the Responder class. As shown above, Responder's keyDown: method simply passes the message on to redView's next responder, greenView. greenView also applies Responder's version of keyDown:, passing the message on to its next responder, blueView. blueView's class defines a keyDown: method that overrides Responder's default. It applies this method and breaks the chain. |
|
 |
|
Figure 7-5. Responder Chain
By repeated iterations of the Responder method, an event message can be passed up the view hierarchy to the content view and Window. If it's passed all the way up the chain, and no object responds with a method that overrides Responder's default, the event won't be handled. It's the application's responsibility to respond to all the mouse and keyboard events it asks for.
Action Messages
Control objects give content to the user's mouse and keyboard actions. They translate the event messages they receive into more precise, application-specific action messages for other objects. A Control can be viewed as simply a tool that permits the user to give instructions to the application, a device that stands between the user and the object that will ultimately respond to the user's event.
The Control classes defined in the Application Kit--Button, Scroller, Slider, TextField, Matrix, and Form--are described in Chapter 9 under "Controls." Control itself is an abstract superclass; it defines a paradigm for inter-object communication--action messages--that its subclasses inherit and other objects emulate. You can define your own Control subclasses to take advantage of this paradigm.
Controls use ActionCell objects of various sorts to hold information about their internal state. The ActionCell superclass defines instance variables for the two elements essential to an action message: |
|
target |
The object that's responsible for responding to the user's action on the Control |
|
|
action |
The method that specifies what the target is to do |
|
The Control class defines an instance variable that can identify the sender of an action message: |
|
tag |
A number that the target can use to distinguish among Controls that send the same action messages |
|
Each ActionCell can also have its own tag.
A Control can send a different action message to a different target for each ActionCell it contains. Matrix and Form objects typically contain more than one ActionCell, but Buttons, Sliders, and TextFields are single-Celled. The content area of a Menu is filled by a Matrix of ActionCells. Scrollers aren't composed of Cells; they define their own target, action, and tag instance variables.
The Target
The target is the object that receives the action message. Setting a target |
[myControl setTarget:messageHandler];
[myMatrix setTarget:messageHandler at:rowSix :colZero];
|
ties the Control to a specific object that's expected to respond to all its action messages; no other object will ever have the opportunity to respond. Typically, the target is another View in the same Window as the Control, the Window's delegate, or an object of your own design.
The target method returns the Control's current target: |
id bullseye;
bullseye = [myControl target];
|
Some Controls can't be tied to a particular target. The Cut command in the Edit menu, for example, can delete material first in one window, then in another. The user selects the receiver of the Cut command's action message by picking the key window (and main window) and choosing the Window's first responder. The command deletes the selection owned by the first responder in the key or main window.
Controls like this have their targets set to nil. The mechanism for dispatching action messages finds an appropriate receiver for the message each time the message is sent. This mechanism is explained under "Action Messages in the Responder Chain" below.
The Action
The action instance variable names the method the target is asked to perform. It's a method selector, assigned with the Objective-C @selector() operator: |
[myControl setAction:@selector(doBehave:)];
[myMatrix setAction:@selector(doBeNice:) at:rowOne :colThree];
|
Action methods take a single argument, the id of the Control object that sends the message. This argument enables the receiver to ask the Control for more information, if it's needed. For example, a target receiving an action message from a Button might want to learn the Button's current state: |
- doReact:sender
{
int setting;
setting = [sender state];
. . .
}
|
Each Control dispatches action messages in response to a different set of user events: |
|
|
A Button generally sends action messages on a mouse-up event, if it also received the mouse-down event and the cursor is inside its frame rectangle when the mouse button goes up. |
|
|
|
A repeating Button sends action messages continuously, as long as the user holds the mouse button down and keeps the cursor inside its frame rectangle. |
|
|
|
A Slider also can send action messages continuously, as long as the mouse button is held down. |
|
|
|
A Slider that doesn't send continuous action messages can send them on a mouse-down event, on a mouse-up event, or for each mouse-dragged event that repositions its knob. |
|
|
|
A TextField sends action messages when the user presses Return after entering data in the field, but only if the data is acceptable. |
|
Although the ActionCell class provides for only one action selector, Control (and Cell) subclasses can define any number of other actions for special circumstances, and dispatch them when they want to. For example, a Control could send one message when it's clicked and another when it's double-clicked.
Some Controls may want to give their targets an opportunity to take action when the mouse button first goes down, and so may dispatch an action message on a mouse-down event. For example, a Button that caused its target to change shape might want the target to assume its altered shape, temporarily, on a mouse-down event so that the user can see what the Button does. The change would become permanent only on a mouse-up event.
The method that Controls use to send action messages is sendAction:to:. It takes the action selector and target object, which can be nil, as arguments. |
[myControl sendAction:@selector(doReact:) to:messageHandler];
|
If the selector for the action message is NULL, no message is sent.
Since both the target and the action are passed as parameters to sendAction:to:, Control subclasses are free to define multiple target objects and action selectors for special circumstances.
Action Messages in the Responder Chain
When the target of an action message is nil, the Control that's about to send the message must look for an appropriate receiver. It conducts its search in a prescribed order: |
|
|
It begins with the first responder in the current key window and follows nextResponder links up the responder chain to the Window object. After the Window object, it tries the Window's delegate. |
|
|
|
If the main window is different from the key window, it then starts over with the first responder in the main window and works its way up the main window's responder chain to the Window object and its delegate. |
|
|
|
Next, it tries the Application object, NXApp, and finally the Application object's delegate. NXApp and its delegate are the receivers of last resort. |
|
This search path is illustrated below in Figure 7-6. |
|
Figure 7-6. Search Path
The search stops as soon as an appropriate receiver is found for the action message. Most often, the first responder in the key or main window will handle it.
To end the search for a receiver, two things are required: |
|
|
An object must have a method that can receive the action message. |
|
|
The method must return a value other than nil. |
|
If an object has access to a method matching the action selector, the message is sent. If the object then returns a value other than nil, the search for a receiver is aborted.
By returning nil, a method permits objects farther along the search path to receive the same action message. This is useful when the first responder and all the Views above it in the view hierarchy should have a chance to react to the message. However, returning nil isn't typical. Most methods that handle action messages should return self to stop the message from going any farther.
This way of finding receivers for untargeted action messages serves a variety of different messages. It locates the receiver for: |
|
|
Action messages destined for the first responder, such as those sent from the Font panel or by the Cut, Copy, and Paste commands. |
|
|
|
Action messages destined for the key window or main window, such as those sent by the Miniaturize and Close commands. |
|
|
|
Action messages destined for the Application object, such as those sent by the Hide and Quit commands. |
|
You can take advantage of the fact that the Application object and its delegate end the search path by implementing default methods that respond to action messages in an Application subclass, or in the delegate's class.
Kit-Defined Action Methods
The Application Kit defines a number of methods that can respond to action messages; they each take a single argument, the id of the sender. Often the Kit-defined method doesn't do anything with the argument; it's there just so the method selector can be used in action messages.
The chart below lists, by class, some of the action methods defined in the Kit:
Application |
|
hide: |
Hides the application's windows for the Hide command. |
|
|
unhide: |
Unhides and activates the application. |
|
|
stop: |
Stops the main event loop without terminating the application. |
|
|
terminate: |
Terminates the application and exits for the Quit command. |
|
performClick: |
Simulates clicking the Button or ButtonCell. |
|
takeIntValueFrom: |
Resets receiver's int value to that of the sender. |
|
|
takeFloatValueFrom: |
Resets receiver's float value to that of the sender. |
|
|
takeDoubleValueFrom: |
Resets receiver's double value to that of the sender. |
|
|
takeStringValueFrom: |
Resets receiver's string value to that of the sender. |
|
selectAll: |
Selects all the Cells in the Matrix. |
|
|
selectText: |
Selects all the text in the first editable Cell of the Matrix (or in the last editable Cell if the message is the result of Shift-Tab). |
|
popUp: |
Puts the PopUpList on-screen under the cursor. |
|
selectText: |
Selects all the text in the TextField object. |
|
selectAll: |
Makes the Text object the first responder and selects all its text. |
|
|
selectText: |
Makes the Text object the first responder and selects all its text, just as selectAll: does. |
|
|
copy: |
Copies selected text to the pasteboard for the Copy command. |
|
|
paste: |
Retrieves text from the pasteboard and replaces the current selection with it, for the Paste command. |
|
|
delete: |
Deletes selected text (without putting it in the pasteboard) for the Delete command. |
|
|
cut: |
Copies selected text to the pasteboard and deletes it for the Cut command. |
|
|
changeFont: |
Dispatches a convertFont: message to the sender, allowing the sender to convert the font of the current selection (or of all the text if the Text object doesn't support multiple fonts). |
|
|
superscript: |
Raises the current selection above the baseline. |
|
|
subscript: |
Lowers the current selection below the baseline. |
|
|
unscript: |
Returns the current selection to the baseline. |
|
printPSCode: |
Prints the View, including all its subviews. |
|
miniaturize: |
Miniaturizes the Window. |
|
|
deminiaturize: |
Restores a miniaturized window to the screen. |
|
|
orderFront: |
Places the Window at the front of its tier on-screen. |
|
|
orderBack: |
Puts the Window at the back of its tier on-screen, but in front of the workspace window. |
|
|
orderOut: |
Removes the Window from the screen. |
|
|
makeKeyAndOrderFront: |
Makes the Window the key window and puts it on-screen at the front of its tier. |
|
|
performClose: |
Simulates clicking the close button for the Close command. |
|
|
performMiniaturize: |
Simulates clicking the miniaturize button for the Miniaturize command. |
|
|
printPSCode: |
Prints all the Views within the Window (including the frame view). |
|
|
smartPrintPSCode: |
Prints all the Views within the Window (including the frame view) and tries to intelligently format the pages. |
|
The Tag
Each Control can be assigned an arbitrary integer as a tag. |
[myControl setTag:34];
|
Each ActionCell in a multi-Celled Control can also be assigned a tag: |
[myMatrix setTag:14 at:rowOne :colFour];
|
The tag is a convenience for identifying the Control or Cell in the code you write. If a number of different Controls have the same target and the same action selector, the target can use the tag to distinguish among the Controls: |
- doReact:sender
{
switch( [sender tag] ) {
case 0:
. . .
break;
case 1:
. . .
break;
case 2:
. . .
break;
. . .
default:
break;
}
}
|
The Sender as an Argument
The method for dispatching action messages, sendAction:to:, is defined in the Control class and is therefore available only to Control subclasses.
Nevertheless, one crucial element of the action-message paradigm is emulated throughout the Application Kit and in many application programs: Many objects include their own ids in the messages they send. This serves to reduce the number of arguments that the message requires. Instead of passing every possible value that any receiver might need, each receiver can send messages back to the sender to get just the values it requires.
For example, when a Matrix object tells one of its cells to draw itself, it informs the cell which Matrix sent the message: |
[aCell drawSelf:&rect inView:self];
|
The first argument specifies the rectangle where the Cell is to draw; any other information the Cell may need, it can get from the Matrix.
If you define a method that requires information from the sender, it's a good idea to make the sender's id be the method's only argument. This both simplifies the calling sequence and makes the method's selector eligible to be used in action messages.
If you define a method that requires no arguments, it sometimes makes sense to add an object id as an argument anyway. Even though the method won't look at the id it's passed, it too will be eligible to respond to action messages.
Keyboard Alternatives
Most graphic objects respond when the user both presses and releases the mouse button as the cursor points to the object. Objects can be programmed to respond in an identical manner to a single keystroke (usually modified by the Command key), no matter where the mouse is pointing. By treating the keystroke as equivalent to a mouse click, they provide users with a keyboard alternative to the mouse.
From Key Down to Key Equivalent
Keyboard alternatives are implemented by translating a key-down event into a performKeyEquivalent: message. performKeyEquivalent: takes a single argument, a pointer to the event record of the key-down event. To implement a keyboard alternative, an object must look into the record to see which character was typed. If the character corresponds to the character cached by the object as its key equivalent, it returns YES; otherwise, it returns NO. For example: |
- (BOOL)performKeyEquivalent:(NXEvent *)theEvent
{
if ( theEvent->data.key.charCode == myKeyEquivalent ) {
[self doWhatAMouseClickWouldDo];
return( YES );
}
return( NO );
}
|
This method identifies the key equivalent by the character code in the event record; it ignores the character set and key code. The key equivalent is the character that was typed, not the key that was pressed. Uppercase "F" and lowercase "f" are different key equivalents, and both are distinct from Control-F. If the user changes the way keys are mapped to character codes, the key that must be pressed to activate a keyboard alternative may also change. The default keyboard mapping is given in the NeXT Technical Summaries manual.
The Button class implements a performKeyEquivalent: method much like the one shown above, so Buttons have a built-in ability to respond to keyboard alternatives. The Matrix class implements a more elaborate version that gives each ButtonCell (including each MenuCell) the opportunity to have its own key equivalent. You need only name the character. setKeyEquivalent: makes the assignment and keyEquivalent returns the current key equivalent: |
unsigned short theKey;
[myButton setKeyEquivalent:'f'];
theKey = [myButton keyEquivalent];
|
By default, all other event-handling objects (all Responders) return NO when sent a performKeyEquivalent: message. To have one of these objects respond to a key equivalent, you must override the default with a performKeyEquivalent: method of your own, like the one illustrated above.
Making sure that an object can respond to the appropriate keystroke (by setting its key equivalent or providing it with a performKeyEquivalent: method) is only the first step. You may also have to take some steps to ensure that performKeyEquivalent: messages reach the object.
Command Key-Down Events
The Application Kit interprets every key-down event as a potential keyboard alternative, if the Command key was pressed at the time of the event. It distributes the event in a way that's designed to initiate performKeyEquivalent: messages to Views that may have key equivalents.
The first step in this process is for the Application object to pass the event, in the form of a commandKey: message, to the Windows in its window list.
The second step is for a Window to translate the commandKey: message into a performKeyEquivalent: message to its Views.
The third step is to pass the performKeyEquivalent: message down the view hierarchy until it reaches the View that will respond.
commandKey: Messages
In the main event loop, the Application object checks every key-down event it receives from the Window Server to see whether the Command key flag is set. If it is, instead of dispatching the event like other key-down events, NXApp sends a commandKey: message to each Window in its window list, until one of the Windows returns YES. By default, a Window object does nothing more than return NO, causing NXApp to send the message to the next Window in the list.
In this way, a Command key-down event is distributed to all the Windows in the application, not just to those that would normally respond to keyboard events, and not just to those that are in the screen list. Hidden and miniaturized Windows also get the message.
Initiating performKeyEquivalent: Messages
By simply returning NO, a Window effectively prevents the objects within its view hierarchy from responding to the event. If there are Views within the Window that might want to handle the key equivalent, its commandKey: method must give them a chance to respond before returning.
The Panel class implements a version of commandKey: that translates the message to a performKeyEquivalent: message for its contentView: |
- (BOOL)commandKey:(NXEvent *)theEvent
{
return [contentView performKeyEquivalent:theEvent];
}
|
This method returns the same value that's returned to it by performKeyEquivalent: If performKeyEquivalent: returns YES, commandKey: returns YES to terminate the search for an object that can handle the key equivalent. If performKeyEquivalent: returns NO, commandKey: also returns NO, and the commandKey: message is passed to the next Window in the window list.
Passing performKeyEquivalent: Messages
View objects inherit a version of performKeyEquivalent: that recursively passes the message down the view hierarchy from subview to subview, stopping only when a subview accepts the key equivalent and returns YES. This default doesn't enable a View to respond to a key equivalent, but it lets the message reach the lowest branches of the view hierarchy, where the Control objects most likely to respond are located.
If a Window knows exactly which of its Views might respond to the Command key-down event, it can send the performKeyEquivalent: message directly to them. If not, it can send the message to its contentView and rely on View's default method to pass the message down the view hierarchy. The Panel method illustrated above does just that.
Unhandled Messages
Through the combination of commandKey: and performKeyEquivalent: messages described above, a Command key-down event can make its way down the entire window list in search of a View that can respond to the character that was typed. Once that View is found, YES is returned up the chain to the Application object, which originated the commandKey: message. Since a Responder has been found for the key-down event, the Application object does nothing more.
However, if no View is found to handle the Command key-down event, the Application object receives NO in return. Since no object has yet responded to the event, NXApp dispatches it like any other key-down event; it sends the event to the key window, which dispatches a keyDown: message to its first responder.
View Methods
Any View can originate performKeyEquivalent: messages based on the ordinary key-down events it receives. Key-down events are normally passed to the key window's first responder as keyDown: messages. To handle the event as a keyboard alternative, the first responder must translate it to a performKeyEquivalent: message: |
- keyDown:(NXEvent *)theEvent
{
if ( theEvent->flags & NX_COMMANDMASK )
[self performKeyEquivalent:theEvent];
return( self );
}
|
In this example, the first responder doesn't do anything with key-down events except treat them as potential keyboard alternatives. It checks to be sure the Command key was pressed at the time of the event and, if it was, initiates the performKeyEquivalent: message.
You may sometimes want objects to respond to keyboard alternatives without the Command key. For example, if you display a graphic keypad on the screen, with a numbered Button for each of the keys, you'd probably want the user to be able to simply press the numbered keys on the keyboard to operate the keypad. You probably wouldn't want to force the user to press the Command key to get the key equivalents to work. In this case the keyDown: method can be simplified: |
- keyDown:(NXEvent *)theEvent
{
[self performKeyEquivalent:theEvent];
}
|
Assuming that the first responder in the example above doesn't implement its own version of performKeyEquivalent:, the View version would pass the performKeyEquivalent: message to its first subview, then to each of the subview's subviews, then on to their subviews. If none of them recognized the key equivalent as its own, the message would be passed to the first responder's second subview, and so on, until a View responded YES or the subviews list was exhausted.
If an object has a key equivalent and it also has subviews with their own key equivalents, its version of performKeyEquivalent: should perform the View method so that its subviews can have a chance to respond in case it can't: |
- (BOOL)performKeyEquivalent:(NXEvent *)theEvent
{
if ( theEvent->data.key.charCode == myKeyEquivalent ) {
[self doWhatAMouseClickWouldDo];
return( YES );
}
return( [super performKeyEquivalent:theEvent] );
}
|
Changing the Cursor
The cursor, usually a small diagonal arrow, sometimes changes to another image. It changes for two very different reasons: |
|
|
When the cursor is over a particular area of the key window, it may change to indicate the type of operation that's permitted within that area. For example, the cursor changes to an I-beam when it's over selectable text in the key window. |
|
|
|
When the active application is busy and unable to accept events, the cursor may change to the "wait cursor" image. |
|
This section explains how to use the Application Kit to change the cursor image.
Defining a Cursor
A Cursor is a kind of Bitmap object. For the MegaPixel Display, it should be a bitmap 16 pixels wide by 16 pixels high. Cursors are generally opaque images surrounded by transparent pixels. When it's placed on-screen (by a Sover compositing operation), you see only the irregular opaque shape.
The Application Kit provides three ready-made Cursor objects for commonly used cursor images: |
|
|
NXArrow is the standard arrow cursor. |
|
|
NXIBeam is the I-beam used for selectable text. |
|
|
NXWait is the "wait cursor" that indicates that the application is busy. |
|
You can create your own Cursor object just as you would any other Bitmap. The example below creates an "X" cursor and puts the hot spot (the point that's aligned with the mouse) where the two lines cross.
First a function that draws a small "X" on a transparent background is defined: |
defineps drawX()
0 0 16 16 Clear compositerect
1 setalpha
0 setgray
1 setlinewidth
newpath
2 2 moveto 15 15 lineto stroke
15 2 moveto 2 15 lineto stroke
endps
|
Next, the function is used to create the Cursor bitmap: |
id myImage;
myImage =[Cursor newSize:16.0 :16.0 type:NX_ALPHABITMAP];
[myImage lockFocus];
drawX();
[myImage unlockFocus];
|
Finally, the hot spot is set at the upper left corner of the pixel at the center of the image. By default, Cursors are drawn in a flipped coordinate system, with y coordinate values increasing from top to bottom, so that point is (8.0, 8.0): |
NXPoint mySpot;
mySpot.x = mySpot.y = 8.0;
[myImage setHotSpot:&mySpot];
|
Cursors can also be created from TIFF files, by imaging bitmap data, or by using any of the other variety of methods provided in the Bitmap class.
Cursor Rectangles
If you associate a cursor image with a rectangular area within a window, the Application Kit will change the cursor to that image whenever the window is the key window and the cursor is over the rectangle. For example, if you provide a little scratch pad in a window where the user can doodle, you could change the cursor to a pencil when it's over the pad.
The actual work of changing the cursor is handled by the Kit. Your application need only define a cursor rectangle and associate it with a particular Cursor object. When the cursor passes into the rectangle, it will be changed to the image defined by the object. When it moves out of the rectangle, it will revert to the previous image.
Cursor rectangles are implemented as specially marked tracking rectangles. Mouse-entered and mouse-exited events for the rectangles are translated into cursor-update events. The Kit receives these events and changes the cursor as required; your application should never need to look at them.
Note: Because cursor rectangles are based on tracking rectangles, a window must permit mouse-entered and mouse-exited events in its event mask for automatic cursor updating to work. It doesn't matter whether or not the mask also contains cursor-update events.
A window can have more than one cursor rectangle, but if any two intersect, one of them must be totally inside the other. Cursor rectangles can be nested or they can cover independent areas within the window, but they can't partially overlap.
Cursor rectangles exist only when the window is the key window. When a window ceases to be the key window, its cursor rectangles are discarded. When it becomes the key window again, they're reestablished. The Window object keeps a record of all its cursor rectangles so that it can discard them and reestablish them again--without any help from the application--as it loses and regains key window status.
Registering and Resetting Cursor Rectangles
Although cursor rectangles are recorded and maintained by Windows, they're established by Views. Often a View uses its own frame rectangle as a cursor rectangle, or perhaps the frame rectangles of its subviews or Cells.
A Window's set of cursor rectangles is therefore apt to change as its Views change. Any number of circumstances can invalidate a Window's cursor rectangles, including these: |
|
|
A View is resized. |
|
|
|
The window is resized, causing the Views inside it to be resized or to adjust their locations. |
|
|
|
The contents of a View are scrolled. |
|
|
|
The Window's view hierarchy is rearranged. |
|
For example, if a View is removed from the view hierarchy, some cursor rectangles might need to be removed with it. Scrolling a View that contains a cursor rectangle could relocate the rectangle. If the rectangle is scrolled completely out of view, it should be removed from the Window's record of cursor rectangles. If it's partly in view and partly out, it should be updated to reflect only the part that's visible. If the rectangle stays in view, but shifts its position, the Window should record its new location.
It's therefore not enough for a View to register its tracking rectangles just once. It must be prepared to reregister them whenever the need arises.
Before getting an event in the main event loop (or in a modal loop for an attention panel), the Application Kit checks whether the key window's cursor rectangles remain valid. Any of the circumstances listed above might invalidate them. They can also be explicitly invalidated by the application: |
[myWindow invalidateCursorRectsForView:myView];
|
If any rectangles are invalid, they're discarded and resetCursorRects messages are initiated to reregister the correct rectangles. Each View should define its own version of the resetCursorRects method. Because a new Window is flagged as having invalid cursor rectangles, this method will not only respond to periodic resetCursorRects messages as the application runs, it will also set up the View's cursor rectangles in the first place. To make automatic cursor updating work for your application, all you need to do is implement a resetCursorRects method for any View you want associated with a special cursor.
A resetCursorRects method should contain one or more addCursorRect:cursor: messages to register the View's cursor rectangles with the Window. Each message associates a Cursor object with a particular rectangle. In the example below, resetCursorRects sets up a cursor rectangle equal to the receiving View's bounds rectangle and associates it with the "X" cursor defined above. |
- resetCursorRects
{
[self addCursorRect:&bounds cursor:myImage];
return self;
}
|
The Matrix, Form, and TextField classes use this mechanism to display an I-beam cursor over editable text. You don't have to register these cursor rectangles yourself.
The removeCursorRect:cursor: method removes a cursor rectangle from the Window's record and discardCursorRects removes all the cursor rectangles registered for the View. |
[myView removeCursorRect:&bounds cursor:NXIBeam];
[otherView discardCursorRects];
|
The Window class defines a matching set of methods for adding and removing cursor rectangles. For example: |
[myWindow addCursorRect:&someRect
cursor:myImage
forView:myView];
|
But the Window methods expect the rectangles to be specified in the base coordinate system. For this reason, the View methods are generally easier to use.
Wait Cursors
The wait cursor informs users that the active application is busy and will therefore be unresponsive. Its disappearance lets users know that the application is again ready to receive events.
When the wait cursor is removed from the screen, the cursor should revert to whatever image is appropriate for its location and the current state of the application. This is done automatically when a push message is used to set the wait cursor image and a pop message is used to remove it. These messages should bracket the code that the user must wait for: |
[NXWait push];
/* code for a task that may take some time to execute */
[NXWait pop];
|
The wait cursor should remain on-screen for comparatively short periods of time. To inform users that the application will be busy for an extended period of time, don't rely on the wait cursor, but use an attention panel instead. See "Modal Sessions" under "Modal Event Loops" below.
Modal Event Loops
Part of an object's response to an event can be to get another event directly from the Application object: |
NXEvent *myEvent;
myEvent = [NXApp getNextEvent:myMask];
|
This procedure short-circuits the main event loop, enabling an object to retrieve and respond to an expected event more quickly. When breaking into the main event loop, objects generally set up their own temporary, modal event loops for short periods of time.
getNextEvent: takes an argument, an event mask that limits the types of events it will return. The argument doesn't affect the events sent to the application by the Window Server--that is, it doesn't change any window's event mask. If the next event in the queue isn't one you want getNextEvent: to return, it skips over the event and continues checking until it finds one that matches the mask. Each time getNextEvent: checks for a new event, it begins at the beginning of the event queue and picks the first event matching its mask. The main event loop will pick up any skipped-over events.
When your program breaks into the main event loop to get events on its own, it enters a mode, a period of time when the user's actions are interpreted only by the object getting the events. The object getting the events usually sets up its own event loop as a subloop under the main event loop. The program stays in the mode until the user takes the required action to break out of the loop.
Setting up a modal event loop should be limited to cases where you can be fairly certain that the next event belongs to a limited set. You'd most often do it in response to a mouseDown:, keyDown:, or flagsChanged: message: |
|
|
When a View receives a mouse-down event, a mouse-dragged or mouse-up event is likely to be the next event of interest. A mouse-up event breaks the loop, so the mode lasts only while the mouse button is held down. |
|
|
|
When a View receives a key-down event and there's reason to believe the user has started typing, a key-up event or another key-down event is likely to follow. Any other event type serves to break the loop and end typing mode, so it won't appear to be a mode at all from the user's point of view. |
|
|
|
When the application receives a flags-changed event indicating that the user has pressed a modifier key, it can enter a mode until another flags-changed event indicates that the key has been released. |
|
Since the Text, TextField, and Form objects can handle the typing needs of most applications, you generally won't need to set up a modal loop to handle keyboard events. Spring-loaded modes triggered by a modifier key are similarly rare.
Coordinating Mouse Events
Mouse-down and mouse-up events often need to be coordinated: |
|
|
Views shouldn't normally respond to a mouse-up event unless they've also received the mouse-down event that preceded it. |
|
|
|
Views receiving a mouse-down event should generally wait until the mouse-up event before committing themselves to an irreversible action. Users are allowed to change their minds after pressing a mouse button. If they move the cursor from the View before releasing the button, the View shouldn't respond. This is especially true of Views that respond in the control-action paradigm of the user interface. |
|
Coordinating mouse-down and mouse-up events is easier if the mouse-up event is received as part of the response to the mouse-down event. When a mouseDown: method breaks into the main event loop to get the next mouse-up event, the application's response to both events is systematically integrated.
There are also reasons why mouse-dragged events are best bracketed by mouse-down and mouse-up events in a modal event loop: |
|
|
An application shouldn't ask for mouse-dragged events until it's ready to process them, and it should stop asking for them when it no longer needs them. A mouse-down event signals when it's appropriate to start receiving mouse-dragged events; the succeeding mouse-up event signals when it's appropriate to stop. |
|
|
|
As it waits for the mouse-up event it's interested in, an object may want to keep track of the position of the cursor, so that it can respond appropriately if the user stops pointing at the object that received the mouse-down event. For this reason, it might ask for mouse-dragged (or mouse-exited and mouse-entered) events in addition to mouse-up events. |
|
The following example shows how a mouseDown: method can set up an event loop for mouse-dragged and mouse-up events. |
- mouseDown:(NXEvent *)thisEvent
{
register int inside;
int shouldLoop = YES;
int oldMask;
NXEvent *nextEvent;
[self doMyOwnHighlight];
oldMask = [window addToEventMask:NX_LMOUSEDRAGGEDMASK];
while (shouldLoop) {
nextEvent = [NXApp getNextEvent:(NX_LMOUSEUPMASK |
NX_LMOUSEDRAGGEDMASK)];
inside = NXMouseInRect([self convertPoint:
&nextEvent->location
fromView:nil],
&bounds,
[self isFlipped]);
switch (nextEvent->type) {
case NX_LMOUSEUP:
shouldLoop = NO;
if ( inside ) {
[self doMyOwnHighlight];
[self doMyOwnThing];
}
[self doMyOwnUnhighlight];
break;
case NX_LMOUSEDRAGGED:
if ( inside )
[self doMyOwnHighlight];
else
[self doMyOwnUnhighlight];
break;
default:
break;
}
}
[window setEventMask:oldMask];
return(self);
}
|
This method first declares its local variables and highlights the View in response to the mouse-down event. It then resets the window's event mask to include left mouse-dragged events. (Mouse-up events are included in every window's default event mask; they shouldn't be added to the event mask at the time of the mouse-down event.) But before changing the mask, it stores the window's old event mask in a local variable (oldMask) so that it can be reset later.
Next, the method enters an event loop, looking only for mouse-up and mouse-dragged events. As it receives each event, the location of the mouse is translated to the View's own coordinates (by the convertPoint:fromView: method) and is tested against its bounds rectangle (by the NXMouseInRect() function) to see whether or not it lies inside the View.
The loop continues until the mouse button is released. If it's released while the mouse is pointing to the View, the View performs its doMyOwnThing method. In any case, the loop exits, leaving the Application object's event loop as the only one operating.
As the modal loop waits for a mouse-up event, mouse-dragged events keep track of the location of the mouse. As long as it's pointing within the View, highlighting continues. If it leaves the View, highlighting ends.
After the modal loop exits, the mouseDown: method resets the event mask to make sure that mouse-dragged events will no longer be sent to the Window.
This example is more an outline than an excerpt from a real program. You would need to fill in the details to turn it into a useful method for your application.
Getting and Peeking at Events
The getNextEvent: method mentioned above is just one of a set of five methods that you can use to read events from the event queue. All five take an event mask specifying which events they're to return, and all five skip over any events in the queue that don't match the mask.
Some of the methods "get" the event by copying it to NXApp's currentEvent instance variable and removing it from the queue. getNextEvent: is one of those methods: |
NXEvent *eventPtr;
eventPtr = [NXApp getNextEvent:(NX_KEYDOWNMASK | NX_KEYUPMASK)];
|
Other methods simply "peek" at the event. They leave it in the queue but copy it to memory provided by the application. Here the event is read into the thisEvent structure: |
NXEvent thisEvent, *eventPtr;
eventPtr = [NXApp peekNextEvent:NX_ALLEVENTS into:&thisEvent];
|
Peeking at an event is appropriate, for example, in modal event loops that handle key-down and key-up events. Since any other event type breaks the loop, the procedure that gets keyboard events must first peek at the next event to make sure it is, in fact, a keyboard event. If it is, the getNextEvent: method can be used to get it. If it's not, it should be left in the queue for another procedure to handle. Always be certain that you can respond to an event before getting it from the queue.
All five methods that read events from the queue return a pointer to the event. After the peekNextEvent:into: message is sent in the example above, eventPtr points to thisEvent. The pointer returned by getNextEvent: is the same one that currentEvent returns: |
eventPtr = [NXApp currentEvent];
|
These two "get" and "peek" methods differ in one other respect: If there is no event in the queue (at least none matching the mask passed to the method), getNextEvent: waits for one, but peekNextEvent:into: doesn't wait. It immediately returns a NULL pointer.
A third method, peekAndGetNextEvent:, gets events like getNextEvent:, but, like peekNextEvent:into:, returns immediately if there's no matching event in the queue: |
eventPtr = [NXApp peekAndGetNextEvent:NX_ALLEVENTS];
|
There are also "get" and "peek" methods that let you specify how long they should wait for the next event: |
NXEvent thisEvent, *eventPtr;
eventPtr = [NXApp getNextEvent:NX_APPDEFINEDMASK
waitFor:10.0
threshold:NX_BASETHRESHOLD];
eventPtr = [NXApp peekNextEvent:NX_ALLEVENTS
into:&thisEvent
waitFor:10.0
threshold:NX_BASETHRESHOLD];
|
The time is specified in seconds; in the examples above, getNextEvent:waitFor:threshold: and peekNextEvent:into:waitFor:threshold: will both wait for 10 seconds before returning NULL. If an event which matches the mask is queued before the 10 seconds are up, they'll return with the event immediately.
The last argument to both of these methods is a priority threshold that's explained in the next section.
Scheduling
While your application is responding to an event, it can't be doing anything else. Between events, however, it can turn to other tasks. It could: |
|
|
Execute a timed entry, if one is due. |
|
|
Respond to a message from another application, if one has been received. |
|
|
Read data from a file descriptor, if there's any data to read. |
|
Whenever the application is ready to get (or peek at) another event, it can call timed entries, procedures to handle messages received at a port, and procedures to read data received at a file descriptor. To be eligible, a procedure must be registered using the appropriate method in the Display PostScript client library: |
|
|
DPSAddTimedEntry() |
|
|
DPSAddPort() |
|
|
DPSAddFD() |
|
A procedure is called only if there's work for it to do--the timed entry must be due, a message must have been received at the port, data must be ready at the file descriptor--and only if it's scheduled.
Whether or not a procedure is scheduled depends largely on its priority level. The priority is an integer between 0 and 30, with 30 as the highest possible priority and 0 as the lowest. The priority of a procedure is set when it's first registered (with the DPSAddTimedEntry(), DPSAddPort(), and DPSAddFD() functions).
Whenever an application gets (or peeks at) the next event, it specifies a priority threshold. Procedures with priorities lower than the threshold are screened out; all those with equal or higher priorities are checked at least once to see whether they should be called before the "get" or "peek" method returns. If the method doesn't return immediately but waits for an event to arrive in the queue, it's possible for a procedure to be checked and called many times over. Even if the method returns without waiting, it's guaranteed that each procedure at or above the threshold will be checked once.
The Application Kit makes use of three priority thresholds and defines a constant for each: |
|
10 |
NX_MODALRESPTHRESHOLD |
|
5 |
NX_RUNMODALTHRESHOLD |
|
1 |
NX_BASETHRESHOLD |
|
The main event loop gets events at the lower priority threshold of 1; it's very permissive about what procedures can be called between events. But when a Control, Text object, or other Responder sets up a modal event loop to get its own events, it gets (or peeks at) them at the higher priority threshold of 10. Since its purpose is to narrow the application's focus for a short period of time, a modal loop is more restrictive than the main event loop.
Attention panels also set up modal event loops, but at the less restrictive threshold of 5. These event loops are discussed below under "Modal Windows" and "Modal Sessions."
A Listener object registers the application's port for receiving messages at the base priority of 1; the application can respond to messages from the Workspace Manager or other applications while it's getting events in the main event loop, but not while it's in a modal event loop. On the other hand, the Text object registers a timed entry to blink the caret at a priority level of 5; the caret will blink even in an attention panel, but not while the Text object is in its modal loop getting and responding to keyboard events, and not while a Button or Slider in the same window is responding to the user's mouse events.
The getNextEvent:, peekNextEvent:into:, and peekAndGetNextEvent: methods discussed earlier all specify a threshold of 10; they're designed for modal event loops.
The remaining two "get" and "peek" methods allow you to specify the threshold: |
NXEvent *eventPtr;
eventPtr = [NXApp getNextEvent:NX_ALLEVENTS
waitFor:NX_FOREVER
threshold:NX_BASETHRESHOLD];
NXEvent thisEvent, *eventPtr;
eventPtr = [NXApp peekNextEvent:NX_MOUSEUPMASK
into:&thisEvent
waitFor:0.0
threshold:NX_BASETHRESHOLD];
|
Although the highest priority level is 30, the highest threshold that you can specify is 31. This threshold blocks all procedure calls between events.
At the other extreme, assigning a procedure a priority level of 0 effectively blocks it from ever being called between events; the main event loop runs at a threshold of 1.
Note: The priority level of a procedure is compared only to the threshold, not to the priorities of other procedures. If two procedures have priorities at or above the threshold, it doesn't matter that one may have a priority of 29 and the other a priority of 10. Both will be scheduled equally.
Using Timer Events
The modal mouseDown: method illustrated under "Coordinating Mouse Events" at the beginning of this section reacted whenever a mouse-up or mouse-dragged event was received. Between events it did nothing, except wait for the next event.
On occasion, however, a modal event loop needs to react even when no event has been received from the Window Server. The absence of an event may indicate that the user is still in the midst of an action, one that generated an earlier event but hasn't produced any new ones. Typically, this occurs while the user is keeping the mouse stationary and holding a mouse button down in order to: |
|
|
Press an object (such as a button) that has a repeating or continuous action. |
|
|
Automatically scroll the contents of a View after dragging outside it. |
|
Because the mouse isn't moving and the mouse button isn't going up or down, these actions don't generate events. Nevertheless, the modal event loop must continue to respond to the action as if events were being received. It does this by making sure that it will continue to get a stream of events even if none are being generated by the Window Server. The events it arranges for are called timer events because they come at regular intervals.
The NXBeginTimer() function starts up a timed entry that puts timer events in the event queue at specified intervals. In the example below, it asks for timer events every 0.05 seconds after a delay of 0.1 second: |
NXTrackingTimer myTimer;
NXBeginTimer(&myTimer, 0.1, 0.05);
|
The first argument to NXBeginTimer() is a pointer to an NXTrackingTimer structure, defined in the Application Kit's timer.h header file. This structure is for the internal use of the timed entry; you don't have to initialize it. If you pass a NULL pointer, memory will be allocated for the structure. Since timer events are usually needed only within a modal event loop, it's generally better to declare the structure as a local variable on the stack as shown above. This avoids the expense of calling malloc() to get memory for it.
NXEndTimer() stops the flow of timer events: |
NXEndTimer(&myTimer);
|
NXBeginTimer() returns a pointer to the NXTrackingTimer structure it uses, so even if you pass it a NULL pointer, you'll have access to the pointer required by NXEndTimer().
Timer Example
The following code shows how the earlier mouseDown: example would change to include timer events. That example focused on highlighting and unhighlighting an object depending on the location of the cursor. This example focuses on autoscrolling the contents of a View when the user drags outside it. |
- mouseDown:(NXEvent *)thisEvent
{
int shouldLoop = YES;
int oldMask;
NXTrackingTimer myTimer;
NXEvent *nextEvent, *lastEvent;
oldMask = [window addToEventMask:NX_LMOUSEDRAGGEDMASK];
lastEvent = thisEvent;
NXBeginTimer(&myTimer, 0.05, 0.05);
while (shouldLoop) {
nextEvent = [NXApp getNextEvent:(NX_LMOUSEUPMASK
| NX_LMOUSEDRAGGEDMASK
| NX_TIMERMASK)];
switch (nextEvent->type) {
case NX_LMOUSEUP:
shouldLoop = NO;
break;
case NX_LMOUSEDRAGGED:
lastEvent = *nextEvent;
break;
case:NX_TIMER:
[self autoscroll:&lastEvent];
break;
default:
break;
}
}
NXEndTimer(&myTimer);
[window setEventMask:oldMask];
return(self);
}
|
It isn't necessary to change the Window's event mask to get timer events, since they're not sent across the connection from the Window Server. You do have to include them in the mask given to getNextEvent:, however.
The autoscroll method only scrolls when the cursor is outside the receiving View's frame rectangle. It finds the location of the cursor from the event record of the mouse event passed as an argument. Since autoscroll messages are sent in response to timer events, the last true mouse event is cached in the lastEvent variable.
Avoiding Spin Loops
With timer events, you can write modal event loops that respond only to events; between events, the loop gives up control of the CPU to other applications. This is exactly the behavior required by a multitasking environment.
In a multitasking environment, each application must cooperate with other applications and share processing time with them. You should never write a modal loop that constantly executes instructions without pause, if those instructions do no useful work. For example, a loop that repeatedly peeked for the next event without waiting for one to appear in the queue would spin uselessly between events. As it spins, the loop would arrogate to itself system resources that may be in demand by other tasks. All applications suffer when this happens, including the spinning application.
A modal loop that spins without pause is also at the mercy of the processor it's being run on. On a fast processor, the loop will be executed quickly; on a slower processor it will take more time. A timer event, on the other hand, paces the application's response to a steady user action at the same rate on all processors.
Modal Windows
Sometimes an application needs to set up a modal event loop at the Window level, one step removed from the objects that are actually responding to the events. This can be done through the runModalFor: method: |
[NXApp runModalFor:myWindow];
|
The Window, myWindow, should be an attention panel, and it must have an event mask that accepts key-down events (so that it can become the key window).
The runModalFor: method puts the panel on-screen, in front of even the main menu, and makes it the key window. It then sets up an event loop that filters the events the Application object receives from the Window Server. It distributes mouse events only if they're associated with the panel; other mouse events are removed from the queue and don't generate event messages. This means that the user can't use the mouse to select any other window in the application (though it can be used to move windows and activate another application).
In this way the panel can command the user's attention until some condition is met--usually the user clicking on one of the panel's buttons.
Breaking the Loop
The modal loop that runModalFor: begins can be terminated by sending the Application object a stopModal message: |
[NXApp stopModal];
|
It can also be terminated with an abortModal message: |
[NXApp abortModal];
|
If the response to an event includes a stopModal message, the Window's event loop will be broken. The runModalFor: method won't attempt to get another event, but it will finish responding to the current one. In contrast, an abortModal: message breaks the event loop immediately. Without returning, it raises an exception that causes the runModalFor: method to return at once.
Use abortModal rather than stopModal to break the loop from within code that executes between events--such as a timed entry or a method that responds to a remote message. In these cases, stopModal won't work, because runModalFor: will check the exit condition only after getting and responding to one more event.
Return Codes
It's often necessary to know why a Window's modal loop has ended. For example, if an attention panel displays three different buttons, any of which can dismiss the panel, the function or method that placed the panel on-screen may want to know which button the user clicked. By using a third method to break the event loop, stopModal:, you can pass a return code that identifies the reason why the modal loop is being terminated. Usually the code is an arbitrary integer that identifies the button that was clicked: |
[NXApp stopModal:2];
|
This integer is passed to and returned by the runModalFor: method. |
int why;
why = [NXApp runModalFor:myWindow];
|
When the modal loop is terminated by an abortModal message, runModalFor: returns an integer identified by the NX_RUNABORTED constant. When stopModal (without a colon) terminates the loop, runModalFor: returns NX_RUNSTOPPED.
Only the stopModal: method (with a colon) permits you to specify your own return codes. The code should be an integer above -1000; integers less than -999 are reserved by NeXT.
Modal Sessions
On occasion, applications need to carry out time-consuming operations that are not responsive to events--an extensive calculation, perhaps, or moving a large amount of data from one location to another. From the point of view of the user interface, these operations can be divided into three categories: |
|
|
Those that prevent the user from doing anything else, but that might be interrupted, aborted, or otherwise controlled by the user. |
|
|
|
Those that prevent the user from doing anything else and cannot be interrupted or aborted. |
|
|
|
Those that shouldn't prevent the user from carrying out other tasks. |
|
Operations in the third category should be placed in a separate Mach thread and performed in the background. Those in the first two categories require you to run an attention panel while carrying out the operation. For the first category, the panel would give the user some control over the operation--notably the ability to terminate it. For the second category, the panel would let the user know what was happening, but would offer no opportunity to abort it.
The runModalFor: method can't run this type of panel. Since the modal event loop it sets up controls all the application's activities, it would be impossible to carry out the concurrent operation.
Instead, the application must carry out the operation within a modal session bracketed by beginModalSession:for: and endModalSession: messages to the Application object. While in the session, a modal event loop--similar to the one set up by runModalFor:--is run repeatedly for short periods of time. The rest of the time is available for the concurrent operation. The method that runs the loop, runModalSession:, gets events as long as there are any in the event queue, and then returns. An application should send runModalSession: messages often enough, at least two or three times a second, to be responsive to the user.
A modal session is identified by an NXModalSession structure. A pointer to the structure is passed as an argument to all three methods mentioned above. The structure isn't one that you need to initialize. If you pass a null pointer to beginModalSession:for:, it will create the structure for you and return a pointer that you can pass to runModalSession: and endModalSession:. However, it's more efficient to declare the structure as a local variable and avoid the necessity of allocating memory for it.
An example of how these methods might be used is given below: |
NXModalSession theSession;
[NXApp beginModalSession:&theSession for:myWindow];
while ( someCondition ) {
if ( [NXApp runModalSession:&theSession] == NX_RUNSTOPPED )
break;
/* code that performs the concurrent operation */
}
[myWindow orderOut:self];
[NXApp endModalSession:&theSession];
|
As the example shows, runModalSession: returns the codes set by stopModal:, stopModal, and abortModal, just as runModalFor: does. However, runModalSession: usually returns when there are no more events to process, not because the loop has been broken. When it returns without being stopped or aborted, its return value is NX_RUNCONTINUES.
Periodic runModalSession: messages are required even if the panel isn't one that accepts the users events--for example a panel without buttons that simply informs the user of a lengthy operation that can't be aborted. The messages have three purposes in addition to allowing users to manipulate controls within the panel. |
|
|
They clear unwanted events out of the event queue. |
|
|
|
They permit the application to respond to system-defined and kit-defined events, including application-deactivated and window-moved subevents. They thus keep the application responsive to the user. |
|
|
|
They permit the application to receive and respond to remote messages and to execute timed entries. |
|
Drawing in the View Hierarchy |
|
An application draws through its View objects. Each View has: |
|
|
An area of the screen, a frame rectangle, where it can draw |
|
|
A coordinate system within which it can draw |
|
|
A method, drawSelf::, that does the drawing |
|
To get a View to draw, you send it a message to display itself. For example: |
[myView display];
[myView display:&rect :1];
|
Under certain circumstances (described later in this section), the Application Kit generates its own display messages to Views.
The display message brings the View into focus by constructing a PostScript clipping path around its frame rectangle and making its coordinate system the current coordinate system for the application. It then has the View perform its drawSelf:: method. The display method repeats these steps for each of the View's subviews. The display and display:: messages in the example above would each display myView and all the Views below it in the view hierarchy.
Objects that are displayed only through their subviews perform an empty version of drawSelf:: inherited from the View class. Objects that do any of their own drawing implement a version of drawSelf:: that overrides the default. drawSelf:: is always performed indirectly, in response to a display message; it should never appear in a direct message to a View.
The drawSelf:: method defines a View's static appearance on the screen. Views can also add other methods for dynamic drawing in response to the user's actions. These methods might be used to highlight the View, drag it from one place to another, or animate it. They draw outside the display mechanism outlined above. You must first bring the View into focus with a lockFocus message, then send it a message to perform the dynamic-drawing method.
The following sections describe focusing, View coordinate systems, drawSelf::, lockFocus, the display methods, and other aspects of drawing on the NeXT computer.
View Coordinate Systems
As discussed under "View" in the previous chapter, each View's coordinate system is tied to the location and orientation of its frame rectangle: |
|
|
The point that locates the View in its superview's coordinate system, frame.origin, becomes the origin of the View's own default coordinate system. When the View is brought into focus, this point is made the origin of the current coordinate system. |
|
|
|
The x- and y-axes of the View's default coordinate system are parallel to the sides of its frame rectangle. If the frame rectangle has been rotated, its default coordinate system rotates with it. When the View is brought into focus, the current coordinate system is rotated around frame.origin so that it matches the rotation of the frame rectangle. |
|
Tying the View's coordinate system to the location and orientation of its frame rectangle has some far-reaching consequences for how Views are displayed. Three of the most important are listed below: |
|
|
Each View's coordinate system is a transformation of its superview's. This follows from frame being defined in the superview's coordinates. |
|
|
|
None of a View's drawing instructions (in drawSelf:: or the dynamic-drawing methods) need to be aware of the View's location or orientation. Since coordinate values are interpreted relative to the View frame rectangle, a View doesn't compensate for its movement or rotation on the screen when it draws. |
|
|
|
Changes in a superview's coordinate system are passed through to its subviews. If a View scales its drawing coordinates, for example, all its subviews will grow or shrink accordingly. |
|
The default coordinate system was illustrated in Figure 6-8, "Default Coordinates," in the previous chapter. Figure 7-7, below, illustrates it in an even more diagrammatic way. It shows that frame.origin becomes (0.0, 0.0) in the View's default bounds rectangle. |
|
 |
|
Figure 7-7. Default Coordinates of an Unrotated View
The bounds rectangle expresses the View's location and size in its own drawing coordinates. In Figure 7-7 above, the bounds and frame rectangles enclose exactly the same area. The only difference is that bounds records the rectangle in the reference coordinate system that the View uses for drawing inside the rectangle, and frame records values that define the rectangle in the superview's coordinate system. In this diagram, and similar ones that follow, bounds values are placed inside the subview's frame rectangle, where the subview will draw; frame values are placed outside the subview's frame rectangle, in the environment provided by the superview.
The default coordinate system illustrated in Figures 6-8 and 7-7 can be altered through methods that translate, scale, and rotate it, or that flip the polarity of its y-axis.
Flipping the Coordinate System
By default, Windows and Views inherit the orientation of the screen coordinate system; the positive x-axis extends rightward and the positive y-axis extends upward. Views (but not Windows) can opt to flip this coordinate system so that the positive y-axis extends downward. |
[myView setFlip:YES];
|
The frame instance variable of a flipped View is no different from that of a View that isn't flipped: The width and height of the View are expressed by positive values, and the point locating the View in its superview's coordinates is the one with the smallest x and y values.
The bounds instance variable of a flipped View also remains the same: Its width and height are expressed by positive values, and it records the rectangle corner with the smallest x and y values in the View's reference coordinate system. Because the polarity of the y-axis is flipped, this corner will (barring rotation) be the upper left corner of the View, rather than the lower left corner.
Figure 7-8 illustrates the same two Views as Figure 7-7, except that here the subview's coordinate system has been flipped. |
|
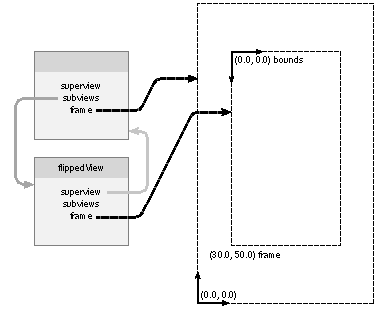 |
|
Figure 7-8. Flipped Coordinates
Note that the frame rectangle continues to locate the View in its superview's unflipped coordinate system, but the bounds rectangle in which the View draws has been flipped. frame.origin and bounds.origin are no longer located at the same point.
Flipped coordinates are an inherent property of the View, not a transient feature that can be turned on and off. A View should receive only one setFlip: message during its life, before it's first displayed, preferably in the class method that creates it. All of the View's drawing should assume its flipped coordinates.
The isFlipped method returns whether or not the receiving View is flipped: |
BOOL flipState;
flipState = [myView isFlipped];
|
Transitivity
Flipped coordinates are an exception to the rule stated above, that transformations of a superview's coordinate system carry over to its subviews. Flipping a parent View doesn't flip its subviews. A View won't become flipped when it's made the subview of a flipped View, and a flipped View won't flip again, back to the original orientation, if it's made the subview of another View with flipped coordinates. A View has flipped coordinates only if it receives a setFlip: message with YES as the argument.
Unflipping
The argument passed to setFlip: is almost always YES. Passing NO as the argument would unflip the View, but Views are unflipped by default, and once a View has been flipped, it should stay that way.
There's just one situation where NO is an appropriate argument to setFlip:. If you define a subclass and inherit a class method that includes a setFlip: message to flip the instances it creates, you'll need to cancel that message with another setFlip: message to make objects belonging to the subclass unflipped.
For example, if this is the superclass method, |
+ newView
{
self = [super new];
[self setFlip:YES]; /* flips its coordinates */
. . .
}
|
the subclass method might look like this: |
+ newView
{
self = [super newView]; /* inherits the flip */
[self setFlip:NO]; /* cancels it */
. . .
}
|
Drawing Text
Flipped coordinates are mainly useful to objects that draw multiple lines of text. Coordinate values increase, rather than decrease, as more lines are added from the top of the View to the bottom. In the Application Kit, the Text and TextField objects both use flipped coordinates, as do Matrices, Forms, Buttons, Sliders, Scrollers, and ScrollViews. (But a View doesn't have to be flipped to be scrollable.)
When drawing text in a View with flipped coordinates, you must use a font with a matrix that flips the y-axis of the characters that are drawn. Fonts have higher y-coordinate values at the top of the character outline and lower y-coordinate values at the bottom (with values of exactly 0.0 at the baseline). Unless the font matrix flips this polarity to match the flipped View, the characters will be displayed upside down.
A flipped matrix is specified when first setting the font through the newFont:size:style:matrix: method: |
id myFont;
myFont = [Font newFont:"Courier-Bold"
size:12.0
style:0
matrix:NX_FLIPPEDMATRIX];
|
The constant NX_FLIPPEDMATRIX is defined in the interface file for the Font class. It specifies a font matrix with these six values: |
1.0, 0.0, 0.0, -1.0, 0.0, 0.0
|
An unflipped matrix is specified by another constant, NX_IDENTITYMATRIX. An identity matrix has only positive values: |
1.0, 0.0, 0.0, 1.0, 0.0, 0.0
|
If the text you draw appears upside down, the culprit is likely to be the wrong matrix.
Notifying Superviews
Sometimes a View needs to let its ancestors know that it's flipped so they can adjust the display accordingly. (In the Application Kit, this is important mainly to the ClipView that contains a scrollable document View.)
If a View receives a notifyWhenFlipped: message with YES as the argument, |
[myView notifyWhenFlipped:YES];
|
it will send its superview a descendantFlipped: message when setFlip: flips its coordinates. The default implementation of descendantFlipped: simply passes the message on to the receiver's superview, so the message will simply climb the view hierarchy until it runs out of Views. A View that needs to know whenever one of its descendants is flipped can override the default to do whatever is necessary. The argument passed in descendantFlipped: messages identifies the flipped View.
Modifying Default Coordinates
A View can alter its coordinate system with methods that parallel the standard PostScript transformations: |
NXCoord x, y, width, height;
float angle;
[myView translate:x :y];
[myView scale:width :height];
[myView rotate:angle];
|
|
translate:: moves the View's coordinate origin to (x, y). |
|
|
|
scale:: makes the View's x-coordinate unit equal to width, and its y-coordinate unit equal to height. |
|
|
|
rotate: turns the View's coordinate axes by angle from their present angle of orientation. |
|
Like the PostScript operators, these methods affect the coordinate system incrementally. If a View is sent a message to rotate 60°, sending it another message to rotate 60° turns it 120° from its original orientation.
Unlike the PostScript operators, however, they don't have an immediate effect on the current coordinate system. Alterations to a View's coordinate system take effect only when it's next brought into focus.
Three other methods modify a View's coordinate system to a more absolute specification: |
[myView setDrawOrigin:x :y];
[myView setDrawSize:width :height];
[myView setDrawRotation:angle];
|
|
setDrawOrigin:: translates the View's coordinate system so that (x, y) designates the same point on-screen as frame.origin. |
|
|
|
setDrawSize:: scales the View's coordinate system so that width and height describe the size of the frame rectangle. |
|
|
|
setDrawRotation: rotates the View's coordinate system so that angle is the difference between its frame and the coordinate axes it uses for drawing. |
|
These three methods are not incremental. If a View is sent a setDrawRotation: message to rotate 60°, sending it the same message again would leave its coordinate system at the same angle of orientation, just 60° from the angle of orientation of its frame.
The six methods listed above affect only the coordinate system used for drawing; they don't affect the location, size, or rotation of the View's frame rectangle.
Rotated Bounds
Although scaling and translating a View's coordinate system affect the values stored in its bounds instance variable, the area covered by the bounds rectangle remains identical to the area covered by the frame rectangle. Rotating a View's coordinates, on the other hand, can change the orientation of the bounds rectangle so that it no longer matches the frame rectangle. Unless the rotation is an exact multiple of 90°, the bounds rectangle will be somewhat larger than the frame rectangle. This is illustrated in Figure 7-9. |
|
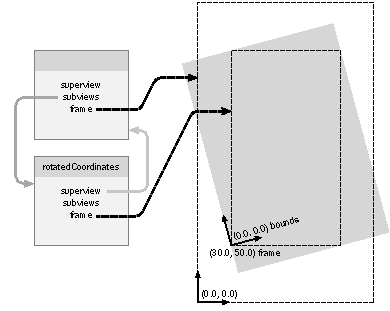 |
|
Figure 7-9. Rotated Bounds Rectangle
Figure 7-9 shows a View whose drawing coordinates have been rotated counterclockwise 15°. The bounds rectangle is defined in the rotated coordinates; the sides of the rectangle are parallel to the rotated x- and y-axes. This rectangle must be larger than the frame rectangle for it to encompass all of the View.
The boundsAngle method returns the rotation of the bounds rectangle relative to the frame rectangle. For the example in Figure 7-9, it would return 15.0 degrees. |
float rotation;
rotation = [myView boundsAngle];
|
The setDrawOrigin:: and setDrawSize:: methods specify values that describe a View's frame rectangle in the View's own coordinate system. They therefore usually set the values in the bounds instance variable, since the bounds rectangle usually designates the same area as the frame rectangle. However, if the View has a rotated coordinate system, the bounds rectangle won't match the frame rectangle, so bounds won't have the values set by these methods.
Since the visible rectangle and the bounds rectangle are both stated in the View's reference coordinate system, the visible rectangle rotates with the bounds rectangle. This is illustrated in Figure 7-10. |
|
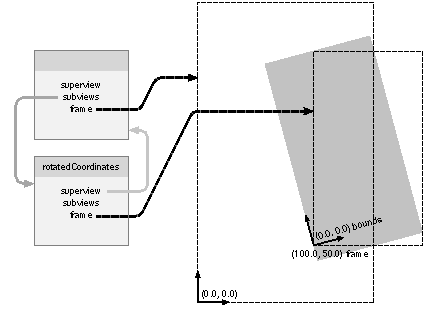 |
|
Figure 7-10. Rotated Visible Rectangle
For a rotated rectangle to enclose all the visible area of a View, it must also contain some areas that are not visible and some that may not even be in the View. Considerations of efficiency would therefore recommend against rotating the reference coordinate system for a View, but to do any rotation necessary within the View's drawing code.
Transitivity
Modifications to a View's coordinate system can affect the size and placement of its subviews. They can also affect the coordinate system that a subview draws in.
By default, subview coordinate systems reflect the superview's rotation and scaling. But because each subview's default coordinate system is translated to the point designated by frame.origin, the subview overrides any translation done by the superview.
Two methods let you know whether a View's coordinate system has been rotated or scaled, either directly or through any ancestor Views above it in the view hierarchy: |
BOOL rotated, modified;
rotated = [myView isRotatedFromBase];
modified = [myView isRotatedOrScaledFromBase];
|
If these methods return NO, the View has the orientation and scaling of the base and screen coordinate systems.
Basic and Temporary Coordinate Systems
setFlip: and the six methods that transform a View's coordinate system should be used only to set up the basic coordinate system for the View, the one that's the starting point for the drawing instructions in the View's drawSelf:: method.
It's typical, while drawing in the PostScript language, to alter the coordinate system repeatedly for temporary effects--to scale it to draw an oval, to rotate it to draw text at an angle, or to repeatedly translate it so that a single procedure can draw a figure in more than one position. These temporary changes to the coordinate system should be done directly in PostScript code, through pswrap-generated functions called by drawSelf:: (or by the dynamic drawing methods). They shouldn't be done through View methods. See "Drawing Methods," below, for more on how drawing methods like drawSelf:: can change the graphics state.
Converting Coordinates
Because each View has its own coordinate system, it's often necessary to convert a point or an area specified in one View's coordinate system to the coordinate system of another View. The View class defines methods that can convert NXPoint, NXSize, and NXRect structures from one View to another: |
[myView convertPoint:&point toView:anotherView];
[myView convertSize:&size toView:anotherView];
[myView convertRect:&rect toView:anotherView];
|
These methods assume that the first argument refers to a structure with values in the receiving View's (myView's) coordinate system. They alter those values to the coordinate system of the second argument (anotherView), provided the two Views belong to the same window. If the second argument is nil, the conversion is to the window's base coordinate system. On-screen locations and areas aren't altered, only the coordinate systems that they're expressed in.
Three other methods convert in the opposite direction, from the coordinate system of a specified View to the coordinate system of the receiver: |
[yourView convertPoint:&point fromView:secondView];
[yourView convertSize:&size fromView:secondView];
[yourView convertRect:&rect fromView:secondView];
|
If the View specified in the second argument is nil, the three methods above convert the NXPoint, NXSize, or NXRect structure from the base coordinate system to the receiving View's coordinate system.
There are also methods that optimize for the special case when one View is the other View's superview: |
[myView convertRectFromSuperview:&point];
[myView convertRectToSuperview:&rect];
[yourView convertPointFromSuperview:&point];
[yourView convertPointToSuperview:&rect];
|
The Window class defines methods for converting an NXPoint structure from the base coordinate system to the screen coordinate system, and from the screen coordinate system to the base coordinate system: |
[myWindow convertBaseToScreen:&point];
[myWindow convertScreenToBase:&point];
|
Focusing on a View
Before a View draws, it's necessary to lock the focus on it: |
[myView lockFocus];
|
After it's finished drawing, the focus should be unlocked: |
[myView unlockFocus];
|
Locking the focus ensures that the View draws in the correct window, place, and coordinate system. It makes the View's reference coordinate system the current coordinate system for the application. Unlocking the focus returns to the coordinate system of the View that was previously in focus.
The isFocusView method returns whether the focus is currently locked on the receiving View: |
BOOL canDraw;
canDraw = [myView isFocusView];
|
The Application object's focusView method returns the last View that was brought into focus: |
id currentView;
currentView = [NXApp focusView];
|
If a View draws through the display mechanism, you don't have to explicitly lock and unlock the focus; the display methods perform lockFocus and unlockFocus for you. For dynamic drawing that's done outside of the display mechanism, however, explicit lockFocus and unlockFocus messages are required. The display methods are discussed in a later section of this chapter.
How Focusing Works
The Application Kit takes the following steps to bring a View into focus: |
|
1. |
It constructs a clipping path around the View. This ensures that the View won't draw outside its frame rectangle. |
|
|
2. |
It makes the View's coordinate system the current coordinate system for the application, as recorded in the current transformation matrix (CTM) of the current graphics state. |
|
Views are brought into focus by working down the view hierarchy, from superview to subview. Since each View keeps track of its own coordinate system as a modification of its superview's, a View can be brought into focus only after its superview. To focus on the superview, the superview's superview might first have to be brought into focus, and so on all the way up to the View at the root of the view hierarchy (the frame view). If a View must be focused from scratch, the Application Kit begins with the base coordinate system of the window and frame view, brings the content view into focus, then brings a subview of the content view into focus, and continues to work down the hierarchy to the target View.
The Application Kit doesn't take these steps if they're unnecessary; the focusing mechanism has been optimized and is quite efficient. Focusing begins with the window's base coordinate system only if there's no View with a determinate coordinate system closer to the target View. Usually there is, either the View that's currently in focus or a View with a coordinate system specified by its own graphics state object. (Assigning graphics state objects to Views is discussed below under "Drawing Methods.")
Because each View is clipped to its frame rectangle, focusing down the view hierarchy means that a subview can't draw outside the area allotted to its superview. In the PostScript language, each additional clipping path only further constrains the area where images can appear, so if a subview lies outside the frame rectangle of any ancestor View, it won't be displayed.
Clipping
Of the steps that are taken to bring a View into focus, clipping to its frame rectangle is perhaps the most time-consuming. A View that doesn't require a clipping path to ensure that it won't draw outside its allotted area can skip this step by sending itself a setClipping: message with NO as the argument: |
[self setClipping:NO];
|
As the Application Kit focuses from superview to subview down the view hierarchy, whenever it encounters a View that has received this message, it skips the step that constructs a clipping path around the View's frame rectangle.
A View should avoid clipping only if it can be assured that it and all its subviews won't attempt to draw outside its frame rectangle. Many of the View subclasses defined in the Application Kit--Button, Text, Scroller, and ScrollView--don't clip.
The doesClip method returns whether the receiver will be clipped during focusing: |
BOOL clips;
clips = [myView doesClip];
|
Like setFlip:, setClipping: determines a permanent property of a View. A View should receive the setClipping: message before it draws or modifies its coordinate system; it's best to include it in the class method that creates the View. Once clipping has been turned off, it shouldn't be turned back on again.
However, if you define a subclass and inherit a class method with a setClipping: message that turns clipping off, you can cancel that message by sending another setClipping: message in the subclass's method, this time with YES as its argument. |
+ newView
{
self = [super new]; /* the new method that prevents clipping */
[self setClipping:YES];/* the remedy */
. . .
}
|
Using the Superview's Coordinates
A View can opt to use the same coordinate system as its superview: |
[myView drawInSuperview];
|
This avoids the overhead of transforming the superview's coordinate system to focus on the View. It also makes the View's bounds instance variable identical to frame, as shown in Figure 7-11. |
|
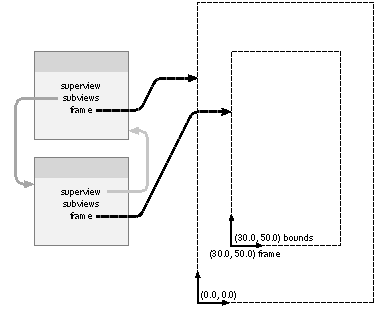 |
|
Figure 7-11. Drawing in the Superview's Coordinates
Because its superview's coordinate system doesn't have to be transformed to bring the View into focus, less PostScript code is sent to the Window Server. A View that receives both drawInSuperview and setClipping: messages can avoid both steps that are taken to focus on it from its superview, the clipping path and coordinate transformations.
After receiving a drawInSuperview message, a View's drawing instructions must take into account the View's location within its superview (bounds.origin) and the width and height of its frame rectangle (bounds.size).
Like setFlip: and setClipping:, drawInSuperview establishes an inherent attribute of the View, one that should be set as soon as the View is created and shouldn't be changed thereafter. In particular, a drawInSuperview message shouldn't be sent to a View that also receives messages to transform its default coordinate system.
The Text object is the only object defined in the Application Kit that draws in its superview's coordinate system.
Modifying drawInSuperview Coordinates
If a View receives a drawInSuperview message after its coordinate system has been scaled or rotated, the message will have no effect. If it receives the message after it has been translated (but not scaled or rotated), the message will have no effect until the translation is reversed.
The sole purpose of a drawInSuperview message is to avoid the overhead of having to focus on the View independently of its superview. Once it has been translated, scaled, or rotated, a View has its own coordinate system; there's no point in sending it a drawInSuperview message.
Nevertheless, if messages to modify the View's coordinate system are sent after the drawInSuperview message, they modify the coordinate system that drawInSuperview established for the View. (Despite the fact that the View was using its superview's coordinate system, the modifications affect only the View itself, not its superview.)
Flipping drawInSuperview Coordinates
A View can both draw in its superview's coordinates and be flipped: |
[myView drawInSuperview];
[myView setFlip:YES];
|
The Text object is such a View.
The setFlip: message affects only the View that receives it, not its superview. Flipping the coordinates in this way doesn't negate all the effects of drawInSuperview; reversing the polarity of the y-axis is the only transformation that's needed to focus on the View independently of its superview.
Similarly, if a View draws in its flipped superview's coordinates, it won't itself automatically be flipped. Although the drawInSuperview message makes the bounds and frame instance variables identical, bounds.origin and frame.origin will refer to two different points. This is illustrated in Figure 7-12. |
|
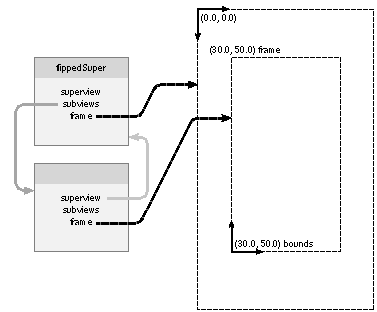 |
|
Figure 7-12. Drawing in a Flipped Superview
A View is flipped only if it receives a setFlip: message; it can't inherit this feature from its superview, even if it draws in its superview's coordinates. Therefore, to have a subview draw in exactly the same coordinate system as its flipped superview, it must receive both a drawInSuperview message and a setFlip: message, as illustrated above. This avoids any and all coordinate transformations to focus on the View.
Locking and Unlocking the Focus
A lockFocus message makes the receiving View's coordinate system the application's current coordinate system. Each lockFocus message must be paired with an eventual unlockFocus message to the same View, after the View has finished drawing: |
[myView lockFocus];
/* drawing code goes here */
[myView unlockFocus];
|
If a View is already in focus when a lockFocus message is sent, lockFocus saves the current graphics state (with the PostScript gsave operator) before bringing the receiving View into focus. The unlockFocus message later restores the saved graphics state (with the PostScript grestore operator). This returns the focus to the View that had it before the lockFocus message.
An unlockFocus message can balance only one previous lockFocus.
Matching lockFocus and unlockFocus messages must bracket all the drawing that a View does. Like braces in C code, they can be nested. In the example below, the doDynamicDrawing method locks the focus on the receiver (self), then locks and unlocks the focus on a companion View before unlocking the focus on the receiver. |
- doDynamicDrawing
{
[self lockFocus];
[self drawFirstPart];
if ( companionView ) {
[companionView lockFocus];
[companionView doOtherDrawing];
[companionView unlockFocus];
}
[self drawSecondPart];
[self unlockFocus];
}
|
When the companion View receives an unlockFocus message, the focus immediately returns (through grestore) to self.
It's possible to focus repeatedly on the same View, without intervening unlockFocus messages. Successive lockFocus messages to the same View don't generate any additional PostScript code (except for gsave); since the View is already in focus, it doesn't have to be brought into focus again. However, if something in the graphics state has changed or the View has altered its frame rectangle, it will be refocused.
The lockFocus method returns boolean YES if it doesn't need to do anything to bring the receiving View into focus. This lets the drawing method know that it has the same graphics state as before, so that it can avoid reinitializing graphics state parameters.
Drawing Methods
The method that draws a View is drawSelf::. drawSelf:: messages are generated when the View, or one its ancestors in the view hierarchy, receives a display message. You must implement a drawSelf:: method for each custom View that you want to draw according to your own specifications, but you should rely on display messages to perform the method.
Since display messages are often generated by the Application Kit in response to user actions, drawSelf:: must be able to reach all the code necessary to render the View. Typically, drawSelf:: calls pswrap-generated functions to send PostScript code to the Window Server. It may also send messages to Bitmap objects to composite source images stored in off-screen windows. If a View uses a Cell to do any of its drawing, drawSelf:: will send messages to perform the Cell's drawing methods, drawSelf:inView: and drawInside:inView:.
The drawSelf:: method draws the neutral, static appearance of a View. It can be matched by dynamic drawing methods that temporarily alter the View's appearance in response to events. Messages to perform dynamic drawing methods should be generated within the event-handling code you write.
drawSelf:: and the dynamic drawing methods operate in an environment specific to a View. The View determines the window, the area within the window, and the initial coordinate system for drawing. Focusing on the View makes the current graphics state reflect the View's attributes: |
|
|
The current window is the window where the View is located. |
|
|
|
The current clipping path enforces the restricted area within the window where the View can draw. |
|
|
|
The current transformation matrix (CTM) records the View's initial coordinate system for drawing. |
|
These View-specific factors aren't the whole story, however. The current graphics state includes other parameters, such as line width and halftone screen, and there may be further restrictions on where it's appropriate for the View to draw. The sections below discuss the factors that define the drawing environment.
Drawing Rectangles
The two arguments passed to drawSelf:: indicate how much of the View needs to be drawn. The first argument is a pointer to an array of rectangles (NXRect *) specified in the View's reference coordinate system, and the second argument (an int) indicates how many rectangles are in the array.
Usually there's just one rectangle in the array, but there may be three. When there are three, the first rectangle is the union of the second and third--that is, it's the smallest rectangle that completely encloses the other two. Specifying the area that needs to be displayed as the sum of two rectangles is a natural consequence of some user actions, such as resizing a window so that it's larger or scrolling a View at an angle. In Figure 7-13, the two rectangles that need to be displayed after the user has scrolled are shown in white. Their union, the first rectangle in the array, would be a rectangle as large as the View. |
|
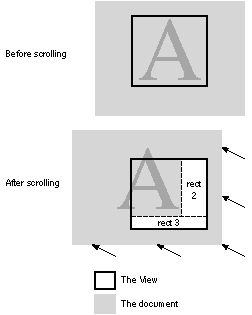 |
|
Figure 7-13. Update Rectangles
The drawing rectangles specify an area that, at its largest, is identical to the View's visible rectangle. They often specify an area smaller than the visible rectangle, but in no case do they specify any area falling outside the visible rectangle. Just as the bounds rectangle defines the largest area on the screen that a method should attempt to draw in, the drawing rectangles define the minimal area that should be redrawn. A drawSelf:: method should be sure to cover at least the area specified in the drawing rectangles it's passed.
A View that's not scrolled and that almost certainly lies within the frame rectangles of all its ancestors can safely ignore the drawing rectangles and draw everything within its bounds rectangle. However, considerations of efficiency require most Views to limit their drawing to the smallest possible area. It's wasteful to redraw areas that don't require updating or to send drawing code to the Window Server if it won't be rendered. Views that are scrolled, especially large Views, should stay as close to the drawing rectangles as possible.
Dynamic drawing methods aren't passed an array of drawing rectangles by the Application Kit. These methods should use information from the event record and the visible rectangle to determine where to draw. The getVisibleRect: method supplies the visible rectangle: |
BOOL isVisible;
NXRect drawingArea;
isVisible = [myView getVisibleRect:&drawingArea];
|
getVisibleRect: determines how much of the receiving View's bounds rectangle lies within the frame rectangles of all its ancestor Views. If none of the receiving View lies within its ancestors, none of it is visible and getVisibleRect: returns NO. Otherwise, getVisibleRect: returns YES and places the View's visible rectangle in the structure referred to by its argument.
Graphics State Parameters
All of a View's drawing methods, including drawSelf:: and the methods used to do dynamic drawing, assume the View's coordinate system as a starting point. They also assume other aspects of the graphics state--such as the halftone screen, line cap, and clipping path. A drawing method is free to change any graphics state parameter as long as it restores the original value when it's finished. Failure to do so may mean that other drawing methods won't function properly. This can adversely affect the methods defined in Application Kit classes such as Text, Button, and Scroller, as well as the methods you define in View subclasses.
However, not all graphics state parameters have a presumed value. Some--such as the current path, line width, and color--are altered so frequently by Views that there's no point in defining a default value. A drawing method can't rely on an initial value for these parameters; it must be careful to set them to their required values before drawing. It also has no responsibility for restoring their initial values later.
The chart below lists the parameters of the graphics state and their assumed values in the Application Kit. |
|
Parameter |
Presumed Value |
|
current transformation |
The reference coordinate system for the View matrix (CTM) |
|
|
color |
No presumed value |
|
|
position |
No presumed value |
|
|
path |
No presumed value |
|
|
clipping path |
A path that's constructed around the frame rectangle and the drawing rectangles, as instructed by setClipping: and display::: messages sent to the View and its superviews |
|
|
font |
No presumed value |
|
|
line width |
No presumed value |
|
|
line cap |
The initial PostScript value, 0, for a square butt end |
|
|
line join |
The initial PostScript value, 0, for mitered joins |
|
|
halftone screen |
A device-dependent, type 3 halftone dictionary |
|
|
flatness |
The initial PostScript value, 1.0 |
|
|
miter limit |
The initial PostScript value, 10 |
|
|
dash pattern |
The initial PostScript value, a normal solid line |
|
|
device |
The current window |
|
|
stroke adjustment |
True |
|
|
alpha |
1.0 (opaque) |
|
|
instance drawing mode |
False |
|
Note: The last two items on this list are NeXT additions to the graphics state. Stroke adjustment is an addition of the Display PostScript system.
There are two recommended ways to restore a value that's been changed. The first is to save the current graphics state before drawing and restore it when you're through: |
|
gsave
PostScript code that changes graphics state parameters
grestore |
|
The second is to put the current value of the parameter that will change on the operand stack before you start and restore it when you're done: |
|
currentlinecap % Puts it on the operand stack
PostScript code that changes the line cap
PostScript code that adjusts the stack
setlinecap % Uses the value on the stack |
|
To save and restore the halftone screen, use the currenthalftone and sethalftone operators (or gsave and grestore) instead of currentscreen and setscreen.
The Display Methods
Five methods can be used to display a View and its subviews: |
[myView display];
[myView display:&bounds :1];
[myView display:&bounds :1 :NO];
[myView displayIfNeeded];
[myView displayFromOpaqueAncestor:&bounds :1 :NO];
|
Collectively, these five methods are referred to as the "display methods." The first three are standard, general purpose methods. They're at the heart of the View display mechanism. The second two methods are more specialized. They're used in common, but quite specific situations.
The first three messages shown in the list above are all equivalent. Although the first two methods are the ones most commonly used, they're each simplified versions of the third method; display and display:: both work by sending a display::: message to self. |
|
|
The display:: method passes its two arguments on to display::: and adds NO as the third argument. |
|
|
|
The display method is the same as display::: with a pointer to the receiving View's visible rectangle as the first argument, 1 as the second argument, and NO as the third argument. |
|
The precise meaning of each argument is discussed in the section titled "Display Method Arguments" below. Most programs can ignore the arguments and safely use display in all situations.
The fourth method, displayIfNeeded, is like display, but it displays only those Views and subviews that have changed since they were last drawn on-screen and therefore need to be redisplayed. It's discussed in the next section, "Managing a Window's Display."
The fifth method, displayFromOpaqueAncestor:::, is similar to display:::, but it ensures that any Views that draw in the background of the receiving View are also displayed. It's discussed in the section titled "Displaying Background Views" below.
No matter which display method is used, the essential work is done in four steps: |
|
1. |
The focus is locked on the receiving View. |
|
2. |
A message is sent for it to perform its drawSelf:: method. |
|
3. |
Its subviews are displayed. |
|
4. |
The focus is unlocked. |
|
The third step makes the display process recursive. If the receiving View has any subviews, the focus is locked on each subview in turn and a message is sent for the subview to perform its drawSelf:: method. If the subview has subviews of its own, the focus is locked on each of them and they perform their own drawSelf:: methods. Subviews are picked in the order that they appear in the View's subviews list, which usually reflects the order in which they were made subviews of the View. A View is sent an unlockFocus message only after all of its descendants have been displayed.
Order of Display
These steps are significant; they mean that Views draw in a particular order: |
|
|
Subviews draw on top of (after) their superviews. |
|
|
|
A subview that's further down in the subviews list draws on top of (after) sibling subviews that are earlier in the list. |
|
Note that the order in which hitTest: attempts to associate mouse-down events with subviews is exactly opposite to the order of display. Displaying starts at the beginning of the subviews list; hitTest: starts at the end. If two sibling subviews overlap on the screen and a mouse-down event occurs in the overlapped area, the subview that draws on top will get the event.
Views can be reordered in the subviews list by methods defined in the View class and described under "The Core Framework" in the previous chapter.
Display Method Arguments
The two arguments to display:: (the first two arguments to display::: and displayFromOpaqueAncestor:::) limit the amount of drawing code that's sent to the Window Server. The first argument is a pointer to an array of rectangles (NXRect *) that specify the areas to be displayed; the second argument (an int) indicates how many rectangles are in the array. With some modifications, the display methods pass these arguments on to the View's drawSelf:: method.
It's assumed that the rectangles are specified in the same coordinate system as the View that receives the display message. There can be 0, 1, or 3 rectangles in the array. If it's 3, the first rectangle should be the union of the second and third, as described under "Drawing Rectangles" above.
If the rectangle pointer (the first argument) is NULL or the number of rectangles (the second argument) is 0, the display methods substitute a pointer to the visible rectangle for the first argument and 1 for the second. The visible rectangle encloses the smallest area that needs to be displayed to guarantee that everything visible in the View is drawn.
If any rectangles are passed to a display method, the method intersects each of them with the View's visible rectangle to ensure, to the extent possible, that they designate only areas lying within the View. The display methods then use the array of rectangles in three ways: |
|
|
They pass the rectangles on as arguments to the View's drawSelf:: method. drawSelf:: can ignore the arguments or use them to optimize the drawing it does. |
|
|
|
They don't display any subviews that lie entirely outside the areas that need to be displayed. If there's one rectangle in the array, only subviews that lie partially or wholly within the rectangle will be displayed. If there are three rectangles, only subviews that fall partially or wholly within the second or third rectangles will be displayed. The display methods do nothing with the first rectangle in the array, the union of the other two. |
|
|
|
display::: constructs a clipping path around the rectangles if requested to do so in its third argument. This clipping is in addition (and prior) to the clipping done when focusing on the View. Only the View that receives the initial display::: message is clipped in this way; its subviews are not. |
|
Before each subview is recursively displayed, the display methods intersect each of the rectangles with the subview's frame rectangle and translate the results to the subview's coordinate system. Each View that's displayed is guaranteed to be passed drawing rectangles that: |
|
|
Are in its own coordinate system. |
|
|
|
Designate no areas outside of its visible rectangle. The drawing rectangles may designate an area to draw in that's smaller than the visible rectangle, however. |
|
See "Drawing Rectangles" above for information on how to use these rectangles in a drawSelf:: method.
Displaying Background Views
When a View surrenders a portion of a window--either because it becomes smaller or because it moves to a new location--it isn't enough that it just display itself again. Any Views that it covered in the areas it abandoned must also be given a chance to redisplay themselves. A display::: message to its superview gives the superview and any sibling subviews this chance: |
[superview display:&myOldFrame :1 :NO];
|
The message above is appropriate for a View that shrank. If it had moved, it would have passed an array of its old and new frame rectangles (and their union).
For a similar reason, when a View draws against a background provided by another View, it's not enough that it send just itself a display message. The View that provides the background must also be given the opportunity to redisplay itself. In fact, any View that doesn't erase or redraw everything within the drawing rectangles should make sure that the Views behind it are redisplayed. Instead of sending itself a display::: message, it should use the displayFromOpaqueAncestor::: method: |
[self displayFromOpaqueAncestor:&bounds :1 :NO];
|
The three arguments to displayFromOpaqueAncestor::: are identical to the three arguments to display:::. The first is an array of rectangles specifying the area to be redisplayed; the second is the number of rectangles in the array. The third indicates whether to construct a clipping path around those rectangles.
The displayFromOpaqueAncestor::: method treats its arguments a bit differently than display:::, however. It first searches up the view hierarchy for the nearest ancestor View that guarantees that it will cover all the pixels within its frame rectangle with a fresh coat of opaque paint. displayFromOpaqueAncestor::: then translates the drawing rectangles to this View's coordinate system and sends it a display::: message. If no View lower in the hierarchy meets the requirement, the display::: message is sent to the frame view at the root of the view hierarchy (the content view's superview). The frame view erases the content area to the Window's background color.
If the receiving View itself guarantees that it draws all its pixels in opaque paint, displayFromOpaqueAncestor::: is no different than display:::.
This procedure ensures that the areas that need to be updated are completely redrawn. The View that received the displayFromOpaqueAncestor::: message will get a message to display itself after the Views behind it have been displayed.
Registering as an Opaque View
If a View paints all the pixels within its frame rectangle with opaque paint, it should be registered as an opaque View: |
[myView setOpaque:YES];
|
A NO argument to setOpaque: would unregister the View. The isOpaque method returns whether or not the receiver is currently registered: |
BOOL erases;
erases = [myView isOpaque];
|
Once it's registered as opaque, the View becomes a potential recipient of a display message from displayFromOpaqueAncestor:::.
Views are generally opaque because they erase before drawing, perhaps using the NXRectFill() or NXEraseRect() functions to fill their entire frame rectangles with a solid color before drawing detailed images. Box, ScrollView, and the Window's frame view are the principal opaque Views. A Text object becomes an opaque View after it receives a setOpaque: message with YES as the argument.
By displaying itself through the displayFromOpaqueAncestor::: method, a View can rely on other Views to erase for it.
Finding the Background View
The opaqueAncestor method returns the receiver, if it's opaque, or the nearest opaque View above it in the view hierarchy: |
id backgroundView;
backgroundView = [myView opaqueAncestor];
|
In other words, opaqueAncestor returns the View that displayFromOpaqueAncestor::: would send a display::: message to. You can bypass displayFromOpaqueAncestor::: by sending your own display messages to the opaque View.
opaqueAncestor may return the frame view: |
BOOL isFrameView;
isFrameView = ![[self opaqueAncestor] superview];
|
While you can send the frame view display messages, you should be careful not to alter it in any way.
Window's Display Methods
In addition to the display methods defined in the View class, Window has two display methods: |
[myWindow display];
[myWindow displayIfNeeded];
|
Both methods pass display messages on to the Views in the Window's view hierarchy. The display method displays all the Views in the view hierarchy, from the frame view on down. It's usually used to set up the Window's initial display. The displayIfNeeded method displays just those Views that need to be redisplayed. It's discussed under "Managing a Window's Display" below.
Automatic Display Messages
An application can send display messages to its Views at any time, but display messages are also initiated automatically, either as the result of a user action or as a corollary to some change in the View. |
|
|
After it has been resized by the user, a Window sends a display message to its frame view. Every View in the view hierarchy will redisplay itself to fit the window's new size. |
|
|
|
When a Window receives a window-exposed subevent (of the kit-defined event), it sends a display:: message to its frame view. The message specifies a single rectangle enclosing just the areas of the Window that need to be redrawn. |
|
|
|
When a View is scrolled, the Application Kit copies the portions of the display that remain in view to their new locations. It then sends the View a display:: message to have it redraw the update areas (as illustrated above in Figure 7-13, "Update Rectangles"). If the user scrolls the contents of a View vertically or horizontally, there will be a single area to be updated. If the user scrolls the View at an angle, there will be two update rectangles in the array. |
|
|
|
When a View attribute changes, the View may send itself a display message to make the change visible. See "Updating Views" in the section below. |
|
|
|
Whenever a Window is updated automatically, it may respond by sending its Views display messages. See "Updating Windows" below. |
|
|
|
When a Window receives a display message, every View in its hierarchy is displayed. |
|
Because a View must be prepared to redisplay itself at any time in response to automatic display messages, all the code necessary to completely redraw the View should be contained in (or called by) its drawSelf:: method.
Managing a Window's Display
The Window and View classes define some methods to help applications keep their on-screen displays current and make more efficient use of the display mechanism. They include: |
|
|
Methods for updating a Window automatically |
|
|
|
A convention for automatically displaying Views when they change, and methods for temporarily suspending the automatic display |
|
|
|
A way of temporarily suspending the display mechanism within a Window |
|
|
|
A way of temporarily suspending the part of the display mechanism that automatically flushes a window buffer to the screen |
|
The sections below discuss each of these topics.
Updating Windows
Just before an off-screen Window is moved on-screen, it's sent an update message so that it can bring its display up-to-date with the current state of the application.
Window's default version of the update method simply returns self. A subclass can implement its own version to keep its display current. Menus use update messages to modify commands (from "Undo" to "Redo," for example), and to disable and reenable them, as appropriate.
On-Screen Windows
The automatic update message lets an off-screen Window alter its display before becoming visible. But Windows that are already visible also need to be updated periodically; the main menu, for example, is always on-screen. The Application object's updateWindows method fills this need by sending every on-screen Window in the window list an update message. |
[NXApp updateWindows];
|
You can send NXApp an updateWindows message at appropriate times for your application, or you can arrange to have it performed automatically after every event: |
[NXApp setAutoupdate:YES];
|
If NXApp receives the message above, it sends each visible Window an update message after each event has been processed in the main event loop or in a modal event loop for an attention panel. A NO argument to setAutoupdate: stops the flow of automatic update messages to on-screen Windows. (Off-screen Windows continue to receive them.)
Note that automatic update messages are sent only after NXApp dispatches an event from the event loops set up by run and runModalFor: messages. If an application sets up a modal event loop in response to an event, no update messages will be sent until the modal loop ends. If the modal loop is for an attention panel, no update message will be sent until after the first event is dispatched in the loop. Therefore, this mechanism can't be used to disable menu items upon entering the mode.
Updating Menus
For a Menu to respond to update messages, at least one of its MenuCells must be assigned a method that can determine how the MenuCell should be displayed. The setUpdateAction: method makes the assignment: |
[menuItem setUpdateAction:@selector(fixMe:)];
|
The updateAction method returns the method selector that was assigned: |
SEL theMethod;
theMethod = [menuItem updateAction];
|
A different method can be assigned to each MenuCell. The method should take just one argument, the id of the MenuCell, and it should be implemented by the Menu's delegate. (Menus inherit the delegate defined in the Window class.) The method's job is to check the current state of the application and alter the MenuCell accordingly. It should return boolean YES if the MenuCell needs to be redisplayed, and NO if it doesn't.
Whenever a Menu receives an update message, it has its delegate perform the updating methods for each of its MenuCells. If a method has been assigned to more than one MenuCell, it will perform once for each MenuCell it's assigned to. There is no default updating method; you must assign one with the setUpdateAction: method and implement the method in the Menu's delegate.
You can temporarily suspend updating for a particular Menu, while leaving it in place for all other Windows, by sending the Menu a setAutoupdate: message with NO as the argument: |
[myMenu setAutoupdate:NO];
|
This disables the Menu's update method. By default, updating is enabled if an updating method has been assigned to any of the Menu's MenuCells; setUpdateAction: sends a setAutoupdate: message to the Menu with YES as its argument, thus automatically enabling the updating mechanism.
Updating Views
In general, when a View changes its state, it should display the change immediately. For example: |
- setTitle:(char *)aString
{
title = aString;
[self display];
return self;
}
|
There may be times, however, when it's best to postpone updating the display. For example, if several View attributes change at once, you probably want to wait until the last change is made to redisplay the View, rather than redisplay it after each change.
To temporarily prevent a View from being automatically displayed, you can send it a setAutodisplay: message with NO as its argument: |
[myView setAutodisplay:NO];
|
The same message with a YES argument reinstates automatic displaying. By default, all Views are created with the automatic display flag turned on. The isAutodisplay method returns the current state of the flag: |
BOOL doesDisplay;
doesDisplay = [myView isAutodisplay];
|
For this scheme to work, methods that alter View attributes must check whether it's OK to display the View. The setTitle: method shown above would need to be implemented more like this: |
- setTitle:(char *)aString
{
title = aString;
if ( [self isAutodisplay] )
[self display];
return self;
}
|
If a method changes a View but doesn't redisplay it because the automatic display flag is off, it can set another flag (vFlags.needsDisplay) indicating that the View still needs to be displayed: |
[myView setNeedsDisplay:YES];
|
This method works only while the View can't be automatically displayed (while the isAutodisplay method returns NO).
Other methods can check this flag to see whether they should display the View: |
BOOL outOfDate;
outOfDate = [myView needsDisplay];
|
One method that checks the flag is setAutodisplay:. When it turns automatic displaying back on (when its argument is YES), it checks whether the receiving View needs to be displayed. If it does, setAutodisplay: sends the View a display message. Displaying the View clears its needsDisplay flag; thereafter the needsDisplay method returns NO.
Another method that checks the flag is displayIfNeeded. It works its way down the view hierarchy, displaying only those Views that have their needsDisplay flags turned on. For more on this method, see "Displaying If Needed" later in this section.
With this refinement, the setTitle: method illustrated above would look more like this: |
- setTitle:(char *)aString
{
title = aString;
if ( [self isAutodisplay] )
[self display];
else
[self setNeedsDisplay:YES];
return self;
}
|
For convenience, the conditional statements in the setTitle: method illustrated above have been segregated into a separate View method, update. This last version of setTitle: can be simplified to three lines: |
- setTitle:(char *)aString
{
title = aString;
[self update];
return self;
}
|
It's recommended that all Views use the update method and follow the conventions it depends on.
Suspending Display
Just as it's sometimes a good idea to suspend the automatic updating of Views, it can also be a good idea to suspend all the displaying done within a Window for a short period of time. Suppose, for example, that several Views are changing and need to be redisplayed. You want the changes to be displayed all at once, not in piecemeal fashion. Rather than turn off the automatic display feature of each View, it's more convenient to suspend the display mechanism for the entire Window.
Similarly, if an off-screen Window is undergoing a series of changes, with some of the changes cancelling others, you may want to wait until the Window receives an update message (just before it's placed on-screen) to display the changes. This could save on the volume of PostScript code sent to the Window Server.
The disableDisplay method suspends displaying within a Window: |
[myWindow disableDisplay];
|
This message prevents the display methods defined in the View class from displaying any View within the Window. It should always be balanced with a reenableDisplay message when it's again OK to display the Window's Views. |
[myWindow reenableDisplay];
|
Because there can be many reasons to suspend the display methods, pairs of disableDisplay and reenableDisplay messages can be nested. Displaying isn't reinstated until the last reenableDisplay message is sent.
While displaying is disabled, display messages that reach any of the Window's Views have no effect except to set the View's needsDisplay flag. This makes it easy to find the Views that couldn't be displayed and to redisplay them when it's again possible.
The isDisplayEnabled method returns whether or not displaying is currently suspended for the receiving Window: |
BOOL canDraw;
[myWindow isDisplayEnabled];
|
All the display methods defined in the View class and Window class are disabled by disableDisplay, except one. The display method defined in the Window class reenables displaying before sending a display message to its frame view.
Suspending flushWindow
The disableDisplay method described above prevents the display methods from sending any drawing code to the Window Server. On occasion, you may want a less severe suspension of the display mechanism. It might be more efficient to continue rendering images in the window's backup buffer, but wait to have them flushed to the screen.
For those occasions, disableFlushWindow and reenableFlushWindow can be used instead of disableDisplay and reenableDisplay. |
[myWindow disableFlushWindow];
/* code that displays Views within the Window goes here */
[myWindow reenableFlushWindow];
|
disableFlushWindow prevents Window's flushWindow method from flushing the backup buffer of the receiving Window. After reenabling the method, the window buffer should be explicitly flushed: |
[myWindow flushWindow];
|
Since flushWindow is used by the display methods, disabling it lets a number of images accumulate in the buffer before they're shown to the user.
disableFlushWindow works only if the receiving Window object manages a buffered window. Of the three buffering types (nonretained, retained, and buffered), only buffered windows require drawing to be flushed to the screen.
Like disableDisplay and reenableDisplay, pairs of disableFlushWindow and reenableFlushWindow messages can be nested. Window's display method doesn't automatically reenable flushing, however.
Displaying If Needed
A View's needsDisplay flag is set automatically when: |
|
|
An update message is unable to display the View (because automatic displaying is disabled). |
|
|
|
A display message is unable to display the View because displaying has been disabled for the Window where the View is located. |
|
|
|
A display message is sent to the View when the View isn't associated with a window. A View isn't associated with a window if it hasn't been assigned to a view hierarchy or if the Window Server hasn't yet created a window for the Window object. |
|
In each case, the flag is a signal that there has been an unsuccessful attempt to display the View, which likely means that the appearance of the View doesn't reflect its current state. You can also set the flag directly using the setNeedsDisplay: method. |
[myView setNeedsDisplay:YES];
|
The View class defines a displayIfNeeded method that displays a View only if its needsDisplay flag is on. It's thus a much more efficient way of choosing which Views to update than the other display methods.
The Window class also defines a displayIfNeeded method, which simply passes the displayIfNeeded message on to the Window's frame view. As the message works its way down the view hierarchy, only flagged Views are displayed. Displaying the View turns the flag off.
If a number of changes need to be made within a window, you can disable the display mechanism, make the changes, reenable the display mechanism, and then send the Window a displayIfNeeded message: |
[myWindow disableDisplay];
/* make whatever changes are needed */
[myWindow reenableDisplay];
[myWindow displayIfNeeded];
|
If the methods that make the changes include automatic update messages, every altered View will be flagged and only those Views will be redisplayed. If update messages aren't sent automatically, you can send them yourself, or flag the Views directly with the setNeedsDisplay: method.
Modifying the Frame Rectangle
A View's initial frame rectangle is set by the class method that creates it. Slider's newFrame: method is an example: |
id mySlider;
NXRect rect;
NXSetRect(&rect, 20.0, 300.0, 15.0, 150.0);
mySlider = [Slider newFrame:&rect];
|
After a View is created, its frame rectangle can be relocated and resized by methods that insert new values in the View's frame instance variable: |
[myView setFrame:&newRect];
[myView moveTo:40.0 :100.0];
[myView sizeTo:30.0 :200.0];
|
Two other methods alter the current values by a specified amount: |
[myView moveBy:1.0 :1.0];
[myView sizeBy:-5.0 :10.0];
|
These two methods simply add the values recorded in the frame instance variable to the values they're passed and perform the sizeTo: and moveTo: methods to set the new values.
The getFrame: method provides the View's current frame rectangle: |
NXRect rect;
[myView getFrame:&rect];
|
Views can also be rotated around the point recorded in frame.origin. Here a View is first rotated counterclockwise 108 from its superview's coordinates, then turned back 36 clockwise: |
[myView rotateTo:108.0];
[myView rotateBy:-36.0];
|
Rotation turns the whole frame rectangle so that its sides are no longer aligned with its superview's coordinate system. This was illustrated earlier in Figures 6-7, "View Frame Rotation," and 6-8, "Default Coordinates."
Note: The rotateTo: and rotateBy: methods rotate the View itself, not its default coordinate system. In contrast, the rotate: method described earlier under "Modifying Default Coordinates" rotates the View's coordinate system, but not the View.
The frameAngle method returns the angle between the x- and y-axes of the superview's coordinate system and the sides of the frame rectangle: |
float rotation;
rotation = [myView frameAngle];
|
If frameAngle returns 0.0, the View isn't rotated from its superview.
Resizing Subviews
When a Window is resized, the Application Kit automatically resizes the frame view and content view to fit the new dimensions of the window. You should never resize these Views yourself.
When a View is resized, especially if it's the content view, it may be necessary to adjust the size or position of its subviews.
An application could explicitly adjust all Views with newly altered superviews whenever it resizes a Window or View. It could do the same when it receives a windowDidResize: message indicating that the window, and therefore the content view, has been resized.
The Application Kit provides a simpler solution, however. You can specify how you want a subview to adjust to a resized superview and let the adjustment happen automatically.
A superview will automatically adjust its subviews if it's sent a setAutoresizeSubviews: message with YES as the argument: |
[parentView setAutoresizeSubviews:YES];
|
Each subview must be told how to adapt with a setAutosizing: message: |
[myView setAutosizing:(NX_WIDTHSIZABLE | NX_HEIGHTSIZABLE)];
|
The argument is a mask formed from the constants illustrated in Figure 7-14 below. |
|
Figure 7-14. Resizing Constants
The constants specify what should be made to shrink or grow, both horizontally and vertically, to compensate for changes in the superview. In each direction, there are three choices: |
|
|
Resize the subview itself (NX_WIDTHSIZABLE and NX_HEIGHTSIZABLE). |
|
|
|
Resize the margin separating the edge of the superview from the sides of the subview with the lowest coordinate values (NX_MINXMARGINSIZABLE and NX_MINYMARGINSIZABLE). |
|
|
|
Resize the margin separating the edge of the superview from the sides of the subview with the highest coordinate values (NX_MAXXMARGINSIZABLE and NX_MAXYMARGINSIZABLE). |
|
The effect of different masks can be illustrated if a few changes are made to the Little demonstration program listed under "Setting Up Event-Handling Objects" earlier in this chapter. First, the Window is given a resize bar and enlarged a little, and the Text object is centered in the content view so that it's bordered by a uniform gray margin between it and the edge of the Window. This is shown in the first pane of Figure 7-15 below. Next, the content view is sent a setAutoresizeSubviews: message and the Text object is sent the setAutosizing: message illustrated above with a mask formed from NX_WIDTHSIZABLE and NX_HEIGHTSIZABLE. This tells the subview to resize itself while keeping its margins constant, as shown in the second pane of Figure 7-15. |
|
Figure 7-15. Resizing Subviews
It's also possible to resize the margins but keep the subview itself constant: |
[myView setAutosizing:(NX_MINXMARGINSIZABLE
| NX_MINYMARGINSIZABLE
| NX_MAXXMARGINSIZABLE
| NX_MAXYMARGINSIZABLE)];
|
The result is illustrated in the third pane of Figure 7-15.
Other combinations are also possible, including resizing both the margins and the subviews proportionally. Each mask should specify something to resize in both the horizontal and the vertical directions. If not, the margins with the greatest coordinate values will be the ones that change.
The method that actually does the resizing is superviewSizeChanged:. You can override it for a View that needs to be resized in a special way. The argument passed to superviewSizeChanged: is a pointer to an NXSize structure containing the old size of the superview. The receiving subview can get the superview's new size directly from the superview by sending it a getFrame: message. |
|
There are many different software components involved in printing with the NeXT computer. Printing begins in an application using the Application Kit connected to the Window Server. In response to a user's menu choice, the application, in conjunction with the Application Kit, generates the PostScript code required for rendering the images to be printed and sends it to the printing daemon, npd. npd establishes its own connection to the Window Server, prepares that Display PostScript context for imaging to the printer, and sends the Server the PostScript code, page by page.
The application's role in this chain of events is to work with the Application Kit to generate correct PostScript code which can be spooled to the printer via npd.
Generating PostScript Code
One of the architectural features of the NeXT computer is that it uses PostScript to draw on the display as well as the printer. This single imaging model simplifies printing, since if applications can draw their images on the screen, they are immediately capable of drawing them on the printer too.
When an application prints, it's usually printing all or part of a certain View, or possibly an entire window. One common case is for a document-oriented application to want to print the View containing the document in the key window. A View is printed by sending it a printPSCode: message, similar to how a View is displayed by sending it a display message. In fact, the printing machinery sends one or more display messages for various parts of the View. It's therefore essential that a View be able to successfully regenerate its image when sent a display message. The code to do this should be located in the drawSelf:: method that's performed in response to display messages. If this criterion is met, basic printing should be fairly easy for any application to achieve, and more advanced applications should have sufficient hooks to tune the default printing process.
Although both the display and printer are driven by PostScript code, there are a few subtle differences between the PostScript code used to draw on the screen and the code generated while printing. One difference is that the PostScript code normally sent to the Window Server is an unbroken stream of PostScript commands, whereas the file of PostScript code created when printing "conforms" to a set of "Document Structuring Conventions." Most of these conventions involve special comments inserted into the PostScript stream. An important convention that the files created by the Application Kit follow is that the PostScript code is divided into a "prologue" and a "script" section. The prologue contains definitions used by the document, but no imaging code, and the script contains order-independent pages marked by various comments. The Application Kit provides a convenient framework for generating conforming files. (For more information, see the Adobe Systems Document Structuring Conventions.)
Although the application has full access to its state when generating the PostScript code, when that file is actually imaged on the printer, the application will be completely uninvolved. Here "state" includes any state the application has created for itself within its PostScript execution context within the Window Server, or any state it has stored in PostScript shared VM in the Server. Also, the code may be printed via a network on a completely different machine than the one it was created on, with a completely different file system. For these reasons, the PostScript file that an application generates should not rely on any definitions outside itself, or any other state that cannot be guaranteed when the file is actually interpreted. For example, it isn't possible in the printing code to composite bits from an off-screen window that was created earlier in the application, since that window will not exist when the file is actually imaged.
It should be possible to print a file generated with the Application Kit on a PostScript device other than a NeXT computer and 400 dpi Laser Printer. To ensure this compatibility, you should be careful not to use Display PostScript extensions to draw while printing. This includes compositing operators, operators referring to windows or events, instance drawing operators, and graphics state operators. A few operators will be predefined in the template prologue generated by the Application Kit, and will thus be usable during printing. It's certain that rectclip, rectstroke, and rectfill will be simulated exactly in this prologue, and that the operators listed below will be defined to be a NULL operations. |
|
flushgraphics |
hidecursor |
|
execuserobject |
revealcursor |
|
defineuserobject |
obscurecursor |
|
setcursor |
showcursor |
|
Other operators may be predefined in the future. Applications may use the global variable NXDrawingStatus (described in the next section) to determine if they are displaying to the screen or printing.
Another important difference between displaying on the screen and printing is the data format. Almost all communication with the Window Server happens in an efficient, binary format, facilitated by the pswrap tool and the dpsclient library. When printing, ASCII PostScript code is written to a disk file. Fortunately, most applications will be unaffected by this format difference, since the Application Kit does sufficient setup to make the dpsclient library convert outgoing PostScript code from binary to ASCII when printing. Therefore, the same pswrap-generated functions can be used for displaying and printing.
Application Kit Printing Architecture
The printing machinery in the Application Kit is structured to take advantage of the object-oriented environment. All Views and Windows inherit a method named printPSCode:, which should do a reasonable default job of generating a PostScript file for that View or Window. Almost all of what printPSCode: does is call other support methods in View. Applications modify the printing behavior of that View by overriding these other methods. Since the various functions of printing are broken out into these other separate methods, it's easy to change any aspect of printing by overriding a simple method. When overriding many of these methods, an application will be able to affect the desired change to the default behavior, and still call upon the View superclass for most of the method's implementation.
For example, let's say you want to insert the title of the document your application is printing into the conforming PostScript file as a "%%Title" comment. You also want to add some conforming comments to the spooled file's header. As your View generates its prologue, it calls a method whose charter is to generate the start of the prologue. You could override this method as follows: |
- beginPrologueBBox:(NXRect *)boundingBox
creationDate:(char *)dateCreated
createdBy:(char *)anApplication
fonts:(char *)fontNames
forWhom:(char *)user
pages:(int)numPages
title:(char *)aTitle
{
[super beginPrologueBBox:boundingBox
creationDate:dateCreated
createdBy:anApplication
fonts:fontNames
forWhom:user
pages:numPages
title:<title of current window's document>];
DPSPrintf( "%%%%SomeComment: %d", someNumber );
return self;
}
|
During printing, various parameters control aspects of the printing job, such as how many pages are printed, and the size of the paper being printed on. This information can be set by the user through the PageLayout and Print panels, and is stored in an object of class PrintInfo. While a given print command is being executed, this information can be retrieved from a global PrintInfo kept by the application. For example, to find out the last page requested to print by the user, you could use the expression: |
[[NXApp printInfo] lastPage];
|
Simple applications will probably be content with having a single PrintInfo object that's created and initialized by the Application Kit. More advanced, document-oriented applications will probably want to store some pieces of the PrintInfo's data with their document, such as the paper type the document was created for. Such applications will need to ensure that the correct PrintInfo object is present in the Application object for all that ask for it. This could be done by either overriding Application's printInfo method and returning an appropriate object, or by setting the current PrintInfo object every time the active document changes.
One other useful piece of global information available to the application is the variable NXDrawingStatus, which can be NX_DRAWING, NX_PRINTING, or NX_COPYING. This variable reflects whether the program is generating PostScript code for the display, the printer, or the pasteboard. Sometimes applications will need to do some conditional drawing based on whether they're printing or not. NXDrawingStatus can be tested in a View's drawSelf:: method to know the current drawing mode.
Pagination
When the Application Kit is printing, it loops through all the pages being printed, determines the portion of the View being printed that belongs on the current page, and tells the View to display that portion of itself. The goal of pagination is to determine what parts of the View should appear on which page.
Pagination happens in two modes. In the first mode, the Application Kit applies a recursive algorithm to the View being printed, which allows the View and its subviews to participate in how they are split up onto various pages. By default, a View tries to alter the pagination boundaries so that it's not split in two. Some Views will want to override the adjustPageWidthNew:left:right:limit: or adjustPageHeightNew:top:bottom:limit: method to change how they're broken up when they cross a page boundary. For example, Text uses the second method to make sure that lines of text are not cut in half when the Text object crosses a page boundary.
In the second mode of pagination, the application tells the Kit where the various pages lie. This mode will be used by advanced applications that do their own pagination, and know where their page breaks lie. In this mode, the Application Kit will ask the application for the rectangle for a given page with the getRect:forPage: method, and will later tell the View to display this same rectangle.
The first of these pagination modes is the default. It's fairly automatic, and should produce reasonable results for many applications. Views can override the knowsPagesFirst:last: method to tell the Application Kit that they will use the second method, and be responsible for their own pagination.
Image Placement on the Page
Pagination determines what rectangle of the View told to print will be drawn on a given page. Before the View is told to display that rectangle, the Application Kit must know how to place that image on the physical page.
For each page printed, the View told to print is sent the placePrintRect:offset: message. This method is passed the rectangle being printed in page coordinates, and is to return the offset from the lower left corner of the page that should be used to position the image. The area of the paper being used can be obtained from the PrintInfo object with the paperRect method.
The default implementation of placePrintRect:offset: uses some bits in the PrintInfo object to determine whether to center the image, or to align it with the top and left margins on the page.
Display PostScript Contexts
The Display PostScript system has facilities for controlling the concurrent execution of multiple execution contexts within the Window Server. The dpsclient library extends the concept of a Display PostScript context for clients to be any output channel to which the library sends PostScript code. During normal operation, the application has a single binary connection to the Window Server through which it gets all events and performs all drawing. This connection is represented by the context instance variable of the Application object. When printing is begun, the Application Kit creates a second DPSContext whose output is in ASCII format. This context is stored in the PrintInfo object during printing. During printing, this new context is made the current context, and hence the PostScript generated by the application is sent to that file, and not to the Window Server.
Sometimes an application needs to communicate briefly with the Window Server while generating PostScript code. For example, it may need to read some data from the Window Server as part of doing some drawing. In these cases, the normal server DPSContext can be made the current context temporarily. After communicating with the Window Server, the context should be reset back to the context used for printing: |
DPSSetContext( [NXApp context] );
/* talk to the Window Server here */
DPSSetContext( [[NXApp printInfo] context] );
/* resume generating PostScript code to be printed */
|
Panels
There are three panels by which the user controls the various parameters of printing. The first is a PageLayout object. This panel is used to set properties that affect printing that affect how a WYSIWYG document is displayed on the screen. Applications will want to save most items from this panel with their documents.
The second panel is a PrintPanel object. The PrintPanel holds attributes of a given printing session that affect how the document is printed. Applications will not want to save these attributes with their documents.
The third panel is a ChoosePrinter object. It's invoked from the PrintPanel and permits the user to choose a printer to print on.
Each application has only one copy of each of these panels. If a panel has already been created, requests sent to the class object for a new panel will return the one already created.
Both of these panels load their contents from the global PrintInfo in the Application object when they come up, and save their values back to the same PrintInfo. The PrintInfo object is where to go for parameters for the current print job, not the various controls in the panels.
Applications will sometimes want to add extra controls and features to these panels specific to themselves. The controls should be contained in a View that's added to the panel with the setAccessoryView: method. You can define a subclass of the PrintInfo object to store information set by the accessory View and redefine the panel's writePrintInfo method to put it there. To initialize the display in the accessory View with information stored in the PrintInfo object, you can redefine the panel's readPrintInfo method.
When using Interface Builder to create your application's interface, you can easily make use of the Application Kit's printing panels. For the PageLayout panel, you should create a menu item in your Window menu called "Page Layout...", and have it send a message to either your subclass of Application or a custom object of your own design. This object should then get the PageLayout panel, and run it. For example, if the menu item's action is a doPageLayout: method: |
- doPageLayout:sender
{
[[PageLayout new] runModal];
}
|
You'll rarely invoke the PrintPanel in such a direct manner, since it's run by the printPSCode: message. However, you still must determine which View or Window to send the printPSCode: message to when the user chooses the print command. You should put a "Print..." menu item in your main menu. If you have a simple application that always prints the same View or Window, you can set this item's target to be that object, and its action to be printPSCode:. If you have a more advanced application, you may need to send your subclass of Application (or a custom object) a message you invent. For example, you might set the menu item's action to be doPrinting: and implement the following method to print the window containing the active document: |
- doPrinting:sender
{
[[self mainWindow] printPSCode:sender];
}