Release 3.3 Copyright ©1995 by NeXT Computer, Inc. All Rights Reserved.
| 4 |
The Run-Time System
| The Objective C language defers as many decisions as it can from compile time and link time to run time. Whenever possible, it does things dynamically. This means that the language requires not just a compiler, but also a run-time system to execute the compiled code. The run-time system acts as a kind of operating system for the Objective C language; it's what makes the language work.
Objective C programs interact with the run-time system at three distinct levels: |
| Through Objective C source code. For the most part, the run-time system works automatically and behind the scenes. You use it just by writing and compiling Objective C source code. | ||
| It's up to the compiler to produce the data structures that the run-time system requires and to arrange the run-time function calls that carry out language instructions. The data structures capture information found in class and category definitions and in protocol declarations; they include the class and protocol objects discussed earlier, as well as method selectors, instance variable templates, and other information distilled from source code. The principal run-time function is the one that sends messages, as described under "How Messaging Works" in Chapter 2. It's invoked by source-code message expressions. | ||
| Through a method interface defined in the Object class. Every object inherits from the Object class, so every object has access to the methods it defines. Most Object methods interact with the run-time system. | ||
| Some of these methods simply query the system for information. The preceding chapters, for example, mentioned the class method, which asks an object to identify its class, isKindOf: and isMemberOf:, which test an object's position in the inheritance hierarchy, respondsTo:, which checks whether an object can accept a particular message, conformsTo:, which checks whether it conforms to a protocol, and methodFor:, which asks for the address of a method implementation. Methods like these give an object the ability to introspect about itself. | ||
| Other methods set the run-time system in motion. For example, perform: and its companions initiate messages, and alloc produces a new object properly connected to its class. | ||
| All these methods were mentioned in previous chapters and are described in detail in Appendix C, "The Object Class." | ||
| Through direct calls to run-time functions. The run-time system has a public interface, consisting mainly of a set of functions. Many are functions that duplicate what you get automatically by writing Objective C code or what the Object class provides with a method interface. Others manipulate low-level run-time processes and data structures. These functions make it possible to develop other interfaces to the run-time system and produce tools that augment the development environment; they're not needed when programming in Objective C. | ||
| However, a few of the run-time functions might on occasion be useful when writing an Objective C program. These functions--such as sel_getUid(), which returns a method selector for a method name, and objc_lookUpClass(), which returns a class object for a class name--are described at various places in the text of this manual. | ||
| All the run-time functions are fully documented in the NEXTSTEP General Reference manual. |
| Because the Object class is at the root of all inheritance hierarchies, the methods it defines are inherited by all classes. Its methods therefore establish behaviors that are inherent to every instance and every class object. However, in a few cases, the Object class merely defines a framework for how something should be done; it doesn't provide all the necessary code itself.
For example, the Object class defines a name method that should return a character string associated with the receiver: |
![]() if ( !strcmp([anObject name], "Connochaetes taurinus") )
if ( !strcmp([anObject name], "Connochaetes taurinus") )
![]() . . .
. . .
| If you define a class of named objects, you must implement a name method to return the specific character string associated with the receiver. Object's version of the method can't know what that name will be, so it merely returns the class name as a default.
This chapter looks at five areas where the Object class provides a framework and defines conventions, but where you may need to write code to fill in the details: |
| Allocating and initializing new instances of a class | ||
| Deallocating instances when they're no longer needed | ||
| Forwarding messages to another object | ||
| Dynamically loading new modules into a running program | ||
| Archiving objects--for example, storing them in a file on disk |
| Other conventions of the Object class are described in Appendix C. |
| Allocation and Initialization |
| It takes two steps to create an object in Objective C. You must both: |
| Dynamically allocate memory for the new object, and | ||
| Initialize the newly allocated memory to appropriate values. |
| An object isn't fully functional until both steps have been completed. As discussed in Chapter 2, each step is accomplished by a separate method, but typically in a single line of code: |
![]() id anObject = [[Matrix alloc] init];
id anObject = [[Matrix alloc] init];
| Separating allocation from initialization gives you individual control over each step so that each can be modified independently of the other. The following sections look first at allocation and then at initialization, and discuss how they are in fact controlled and modified.
Allocating Memory for Objects In Objective C, memory for new objects is allocated using class methods defined in the Object class. Object defines two principal methods for this purpose, alloc and allocFromZone:. |
![]() + alloc;
+ alloc;
![]() + allocFromZone:(NXZone *)zone;
+ allocFromZone:(NXZone *)zone;
| These methods allocate enough memory to hold all the instance variables for an object belonging to the receiving class. They don't need to be overridden and modified in subclasses.
The argument passed to allocFromZone: determines where the new object will be located in memory. It permits you to group related objects into the same region of memory for better performance.
Zones In a multitasking environment like NEXTSTEP, users typically run several applications at once. These applications can easily require more memory than will physically fit on the user's system. To solve this problem, NEXTSTEP, like most modern systems, makes use of virtual memory--a system for addressing more information than can actually be accommodated in main memory. Whenever an application references some information, the system determines whether the memory page containing that information resides in main memory. If it doesn't, the page with the requested information must be read in. If there's no room for the new page, a page of resident memory must be stored to the disk to make room. This swapping of pages in and out of main memory, to and from the disk, is much slower than a direct memory reference. It slows the execution of applications, and, in a multitasking environment, can degrade the overall responsiveness of the system. Reducing swapping to a minimum can greatly increase system performance. One way to reduce swapping is to improve locality of reference, the chance that the next piece of information the system needs to reference will be located close to the last piece of information referenced, perhaps on the same page, or at least on a page recently referenced and so still in main memory. The idea is to minimize the number of pages that must be resident for a given operation by putting related information on the same page (or the same few pages) and keeping unrelated, or rarely used, information on other pages. To this end, NEXTSTEP lets you partition dynamic memory into zones and direct which zone objects (and other data structures) should be allocated from. Zones are recorded in NXZone structures, one per zone. These structures are provided by the system; you don't have to allocate memory for them or make copies. You also don't need to look inside the structure or manipulate its fields. You can simply regard pointers to the structures as zone identifiers. The system creates one default zone for each application, which is returned by NXDefaultMallocZone(). |
![]() NXZone *defaultZone = NXDefaultMallocZone();
NXZone *defaultZone = NXDefaultMallocZone();
| Other zones can be created by the NXCreateZone() function. |
![]() NXZone *newZone = NXCreateZone(vm_page_size * 2, vm_page_size, YES);
NXZone *newZone = NXCreateZone(vm_page_size * 2, vm_page_size, YES);
| This function takes three arguments: |
| The initial size of the zone in bytes. | ||
| The granularity of the zone (how much it should grow or shrink by). | ||
| Whether it's possible to free memory from the zone. For most zones, this normally is YES. However, it can be NO if a zone is to be used temporarily, then destroyed (with NXDestroyZone()). Destroying a zone effectively deallocates all the memory within it. |
| The initial size of a zone and its granularity should be set to small multiples of a page size, since a page is the smallest amount of memory handled by the virtual memory system. The size of a page can vary from installation to installation; its current value is stored in the vm_page_size global variable declared in mach/mach_init.h.
Ideally, zones should be moderate in size. Large zones may fail to group related data onto a small number of pages; they're prone to the same problem that zone allocation is meant to correct: the fragmentation of data across many pages. It's also not a good idea to have a large number of zones with very little information in them. The free space in one zone won't be available for allocation from other zones, so an application could end up using more memory than it should.
Allocating from a Zone The allocFromZone: method permits you to cluster related objects (such as a Matrix and its Cells) in the same region of memory. It takes a pointer to a zone as its argument: |
![]() NXZone *matrixZone = NXCreateZone(vm_page_size, vm_page_size, YES);
NXZone *matrixZone = NXCreateZone(vm_page_size, vm_page_size, YES);
![]() id newObject = [[Matrix allocFromZone:matrixZone] init];
id newObject = [[Matrix allocFromZone:matrixZone] init];
| The zone method returns the zone of the receiver and can be used to make sure one object is allocated from the same zone as another object. For example, a Matrix could be allocated from the same zone as the Window it will be displayed in: |
![]() id aMatrix = [[Matrix allocFromZone:[myWindow zone]] init];
id aMatrix = [[Matrix allocFromZone:[myWindow zone]] init];
| The NXZoneMalloc() function lets you specify a zone when dynamically allocating memory for data structures that aren't objects. It's arguments are a zone and the number of bytes to be allocated: |
![]() float *points = (float *)NXZoneMalloc(NXDefaultMallocZone(),
float *points = (float *)NXZoneMalloc(NXDefaultMallocZone(),
![]() sizeof(float) * numPoints);
sizeof(float) * numPoints);
| Allocation methods and functions that don't specify a zone, such as the alloc method, take memory from the default zone. The standard C malloc() function allocates from the default zone, or from memory outside any zone.
Objects that are commonly used together should be kept together in the same zone, along with any related data structures the objects use. For example, all the objects that contribute to a particular document and its display (the Window object, View objects, text data structures, and so on) could be kept together in the same zone, one created just for the document. When the document isn't open, none of the pages in the zone will clutter main memory. It's equally important to keep rarely used objects separate from those that are used more frequently. For example, users only occasionally refer to an application's information panel (usually only when first becoming familiar with the application). If the objects that contribute to the panel share pages with objects that are used regularly, they will take up space in main memory even when they're not needed. If your application often both allocates and frees a certain type of object, there are a couple of considerations to keep in mind. First, freeing tends to fragment memory. It might be best to keep all these objects in the same zone to prevent the fragmentation of other zones. Second, freeing takes a bit of time, because newly freed memory must be coalesced with memory already free. Rather than free each object individually, you might locate them all in a temporary zone that can't free memory, then destroy the whole zone at once (through a call to NXDestroyZone()). Such a zone can allocate memory quickly, but can only grow in size, so you should use this technique only if you will soon destroy the zone.
Initializing New Objects The alloc and allocFromZone: methods initialize a new object's isa instance variable so that it points to the object's class (the class object). All other instance variables are set to 0. Usually, an object needs to be more specifically initialized before it can be safely used. This initialization is the responsibility of class-specific instance methods that, by convention, begin with the abbreviation "init". If the method takes no arguments, the method name is just those four letters, init. If it takes arguments, labels for the arguments follow the "init" prefix. For example, a View can be initialized with an initFrame: method. Every class that declares instance variables must provide an init... method to initialize them. The Object class declares the isa variable and defines an init method. However, since isa is initialized when memory for a new object is allocated, all Object's init method does is return self. Object declares the method mainly to establish the naming convention described above.
The Object Returned An init... method normally initializes the instance variables of the receiver, then returns it. It's the responsibility of the method to return an object that can be used without error. However, in some cases, this responsibility can mean returning a different object than the receiver. For example, if a class keeps a list of named objects, it might provide an initName: method to initialize new instances. If there can be no more than one object per name, initName: might refuse to assign the same name to two objects. When asked to assign a new instance a name that's already being used by another object, it might free the newly allocated instance and return the other object--thus ensuring the uniqueness of the name while at the same time providing what was asked for, an instance with the requested name. In a few cases, it might be impossible for an init... method to do what it's asked to do. For example, an initFromFile: method might get the data it needs from a file passed as an argument. If the file name it's passed doesn't correspond to an actual file, it won't be able to complete the initialization. In such a case, the init... method could free the receiver and return nil, indicating that the requested object can't be created. Because an init... method might return an object other than the newly allocated receiver, or even return nil, it's important that programs use the value returned by the initialization method, not just that returned by alloc or allocFromZone:. The following code is very dangerous, since it ignores the return of init. |
![]() id anObject = [SomeClass alloc];
id anObject = [SomeClass alloc];
![]() [anObject init];
[anObject init];
![]() [anObject someOtherMessage];
[anObject someOtherMessage];
| It's recommended that you combine allocation and initialization messages: |
![]() id anObject = [[SomeClass alloc] init];
id anObject = [[SomeClass alloc] init];
![]() [anObject someOtherMessage];
[anObject someOtherMessage];
| If there's a chance that the init... method might return nil, the return value should be checked before proceeding: |
![]() id anObject = [[SomeClass alloc] init];
id anObject = [[SomeClass alloc] init];
![]() if ( anObject )
if ( anObject )
![]() [anObject someOtherMessage];
[anObject someOtherMessage];
![]() else
else
![]() . . .
. . .
| Arguments
An init... method must ensure that all of an object's instance variables have reasonable values. This doesn't mean that it needs to provide an argument for each variable. It can set some to default values or depend on the fact that (except for isa) all bits of memory allocated for a new object are set to 0. For example, if a class requires its instances to have a name and a data source, it might provide an initName:fromFile: method, but set nonessential instance variables to arbitrary values or allow them to have the null values set by default. It could then rely on methods like setEnabled:, setFriend:, and setDimensions: to modify default values after the initialization phase had been completed. Any init... method that takes arguments must be prepared to handle cases where an inappropriate value is passed. One option is to substitute a default value, and to let a null argument explicitly evoke the default.
Coordinating Classes Every class that declares instance variables must provide an init... method to initialize them (unless the variables require no initialization). The init... methods the class defines initialize only those variables declared in the class. Inherited instance variables are initialized by sending a message to super to perform an initialization method defined somewhere farther up the inheritance hierarchy: |
![]() - initName:(char *)string
- initName:(char *)string
![]() {
{
![]() if ( self = [super init] ) {
if ( self = [super init] ) {
![]() name = (char *)NXZoneMalloc([self zone], strlen(string) + 1);
name = (char *)NXZoneMalloc([self zone], strlen(string) + 1);
![]() strcpy(name, string);
strcpy(name, string);
![]() return self;
return self;
![]() }
}
![]() return nil;
return nil;
![]() }
}
| The message to super chains together initialization methods in all inherited classes. Because it comes first, it ensures that superclass variables are initialized before those declared in subclasses. For example, a Matrix object must be initialized as an Object, a Responder, a View, and a Control before it's initialized as a Matrix. (See Figure 7 in Chapter 2 for the Matrix inheritance hierarchy.)
The connection between the initName: method illustrated above and the inherited init method it incorporates is diagrammed in the figure below: |
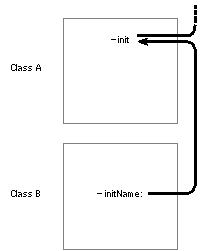 |
| Figure 15. Incorporating an Inherited Initialization Method
A class must also make sure that all inherited initialization methods work. For example, if class A defines an init method and its subclass B defines an initName: method, as shown in the figure above, B must also make sure that an init message will successfully initialize B instances. The easiest way to do that is to replace the inherited init method with a version that invokes initName:. |
![]() - init
- init
![]() {
{
![]() return [self initName:"default"];
return [self initName:"default"];
![]() }
}
| The initName: method would, in turn, invoke the inherited method, as was shown in the example and figure above. That figure can be modified to include B's version of init. |
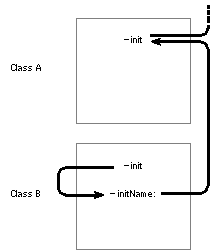 |
| Figure 16. Covering an Inherited Initialization Method
Covering inherited initialization methods makes the class you define more portable to other applications. If you leave an inherited method uncovered, someone else may use it to produce incorrectly initialized instances of your class. In the example above, initName: would be the designated initializer for its class (class B). The designated initializer is the method in each class that guarantees inherited instance variables are initialized (by sending a message to super to perform an inherited method). It's also the method that does most of the work, and the one that other initialization methods in the same class invoke. It's a NEXTSTEP convention that the designated initializer is always the method that allows the most freedom to determine the character of a new instance (the one with the most arguments). It's important to know the designated initializer when defining a subclass. For example, suppose we define class C, a subclass of B, and implement an initName:fromFile: method. In addition to this method, we have to make sure that the inherited init and initName: methods also work for instances of C. This can be done just by covering B's initName: with a version that invokes initName:fromFile:. |
![]() - initName:(char *)string
- initName:(char *)string
![]() {
{
![]() return [self initName:string fromFile:NULL];
return [self initName:string fromFile:NULL];
![]() }
}
| For an instance of the C class, the inherited init method will invoke this new version of initName: which will invoke initName:fromFile:. The relationship between these methods is diagrammed below. |
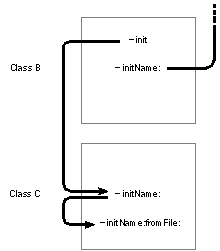 |
| Figure 17. Covering the Designated Initializer
This figure omits an important detail. The initName:fromFile: method, being the designated initializer for the C class, will send a message to super to invoke an inherited initialization method. But which of B's methods should it invoke, init or initName:? It can't invoke init, for two reasons: |
| Circularity would result (init invokes C's initName:, which invokes initName:fromFile:, which invokes init again). | ||
| It won't be able to take advantage of the initialization code in B's version of initName:. |
| Therefore, initName:fromFile: must invoke initName:. |
![]() - initName:(char *)string fromFile:(char *)pathname
- initName:(char *)string fromFile:(char *)pathname
![]() {
{
![]() if ( self = [super initName:string] )
if ( self = [super initName:string] )
![]() . . .
. . .
![]() }
}
| The general principle is this: |
| The designated initializer in one class must, through a message to super, invoke the designated initializer in an inherited class. |
| Designated initializers are chained to each other through messages to super, while other initialization methods are chained to designated initializers through messages to self.
The figure below shows how all the initialization methods in classes A, B, and C are linked. Messages to self are shown on the left and messages to super are shown on the right. |
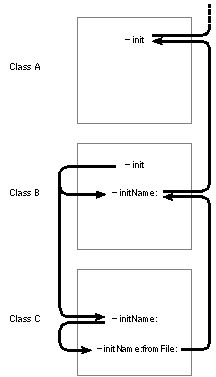 |
| Figure 18. Initialization Chain
Note that B's version of init sends a message to self to invoke the initName: method. Therefore, when the receiver is an instance of the B class, it will invoke B's version of initName:, and when the receiver is an instance of the C class, it will invoke C's version.
Combining Allocation and Initialization The Object class defines a new method that combines the two steps of allocating and initializing a new object. Just as you can define init... methods with arguments, you can also define new... methods that take similar arguments. For example: |
![]() + newName:(char *)string
+ newName:(char *)string
![]() {
{
![]() return [[self alloc] initName:string];
return [[self alloc] initName:string];
![]() }
}
| However, there's little point in implementing a new... method like this that simply covers for other allocation and initialization methods.
On the other hand, a new... method does make sense if the allocation must somehow be informed by the initialization. For example, if the data for the initialization is taken from a file, and the file might contain enough data to initialize more than one object, it would be impossible to know how many objects to allocate until the file is opened. In this case, you might implement a newListFromFile: method that takes the name of the file as an argument. It would open the file, see how many objects to allocate, and create a List object large enough to hold all the new objects. It would then allocate and initialize the objects from data in the file, put them in the List, and finally return the List. It also makes sense to combine allocation and initialization in a single method if you want to avoid the step of blindly allocating memory for a new object that you might not use. As mentioned under "The Object Returned" above, an init... method might sometimes substitute another object for the receiver. For example, when initName: is passed a name that's already taken, it might free the receiver and in its place return the object that was previously assigned the name. This means, of course, that an object is allocated and freed immediately without ever being used. If the code that checks whether the receiver should be initialized is placed inside the method that does the allocation instead of inside init..., you can avoid the step of allocating a new instance when one isn't needed and therefore would not have to free it. In the following example, the soloist method ensures that there's no more than one instance of the Soloist class. It allocates and initializes an instance only once: |
![]() + soloist
+ soloist
![]() {
{
![]() static Soloist *instance = nil;
static Soloist *instance = nil;
![]() if ( instance == nil )
if ( instance == nil )
![]() instance = [[self alloc] init];
instance = [[self alloc] init];
![]() return instance;
return instance;
![]() }
}
| Note that this method is not named "new" since it rarely returns a new object. |
| Deallocation |
| The Object class defines a free method that releases the memory that was originally allocated for an object. Because objects are created dynamically at run time, the memory they occupy must be freed when they've outlived their usefulness. This is accomplished by telling the object to free itself: |
![]() [anObject free];
[anObject free];
| The point of a free message is to deallocate all the memory occupied by the receiver. Object's version of the method deallocates the receiver's instance variables, but doesn't follow any variable that points to other memory. If the receiver allocated any additional memory--to store a character string or an array of structures, for example--that memory must also be freed (unless it's shared by other objects). Similarly, if the receiver is served by another object that would be rendered useless in its absence, that object must also be freed.
Therefore, it's necessary to override Object's version of free and implement a version that deallocates all the other memory the object occupies. Every class that has its objects allocate additional memory must have its own free method. Each version of free ends with a message to super to perform an inherited version of the method: |
![]() - free
- free
![]() {
{
![]() free(buffer);
free(buffer);
![]() if ( vmMemory )
if ( vmMemory )
![]() vm_deallocate(task_self(), vmMemory, memorySize);
vm_deallocate(task_self(), vmMemory, memorySize);
![]() [servant free];
[servant free];
![]() return [super free];
return [super free];
![]() }
}
| By working its way up the inheritance hierarchy, every free message eventually invokes Object's version of the of the method.
Object's version of free returns nil. If for some reason a free method is unable to free the receiver, it should avoid the message to super and return self instead. Note: Although free returns nil, it doesn't automatically change the receiver's id to nil; it merely makes the id invalid. Any further messages sent to the object will produce errors. To be safe, you can assign free's return value to the variable that stores the id: |
![]() myObject = [myObject free];
myObject = [myObject free];
| Forwarding |
| It's an error to send a message to an object that can't respond to it. However, before announcing the error, the run-time system gives the receiving object a second chance to handle the message. It sends the object a forward:: message with two arguments--the method selector in the original message and a pointer to the arguments that were passed with it. These two arguments fully specify the message the receiver was unable to respond to.
A forward:: method can be implemented to give a default response to the message, or to avoid the error in some other way. As its name implies, forward:: is commonly used to forward the message to another object. To see the scope and intent of forwarding, imagine the following scenarios: Suppose, first, that you're designing an object that can respond to a negotiate message, and you want its response to include the response of another kind of object. You could accomplish this easily by passing a negotiate message to the other object somewhere in the body of the negotiate method you implement. Take this a step further, and suppose that you want your object's response to a negotiate message to be exactly the response implemented in another class. One way to accomplish this would be to make your class inherit the method from the other class. However, it might not be possible to arrange things this way. There may be good reasons why your class and the class that implements negotiate are in different branches of the inheritance hierarchy. Even if your class can't inherit the negotiate method, you can still "borrow" it by implementing a version of the method that simply passes the message on to an instance of the other class: |
![]() - negotiate
- negotiate
![]() {
{
![]() if ( [someOtherObject respondsTo:@selector(negotiate)] )
if ( [someOtherObject respondsTo:@selector(negotiate)] )
![]() return [someOtherObject negotiate];
return [someOtherObject negotiate];
![]() return self;
return self;
![]() }
}
| This way of doing things could get a little cumbersome, especially if there were a number of messages you wanted your object to pass on to the other object. You'd have to implement one method to cover each method you wanted to borrow from the other class. Moreover, it would be impossible to handle cases where you didn't know, at the time you wrote the code, the full set of messages that you might want to forward. That set might depend on events at run time, and it might change as new methods and classes are implemented in the future.
The second chance offered by a forward:: message provides a less ad hoc solution to this problem, and one that's dynamic rather than static. It works like this: When an object can't respond to a message because it doesn't have a method matching the selector in the message, the run-time system informs the object by sending it a forward:: message. Every object inherits a forward:: method from the Object class. However, Object's version of the method simply generates a run-time error due to the unrecognized message. By overriding Object's version and implementing your own, you can take advantage of the opportunity that the forward:: message provides to forward messages to other objects. To forward a message, all a forward:: method needs to do is: |
| Determine where the message should go, and | ||
| Send it there with its original arguments. |
| The message can be sent with the performv:: method: |
![]() - forward:(SEL)aSelector :(marg_list)argFrame
- forward:(SEL)aSelector :(marg_list)argFrame
![]() {
{
![]() if ( [someOtherObject respondsTo:aSelector] )
if ( [someOtherObject respondsTo:aSelector] )
![]() return [someOtherObject performv:aSelector :argFrame];
return [someOtherObject performv:aSelector :argFrame];
![]() else
else
![]() . . .
. . .
![]() }
}
| The original message will return whatever value forward:: returns. The return type should be id.
The forward:: method's two arguments are the selector in the unrecognized message and the stack frame containing the arguments that were passed in the message. (Even methods like negotiate that declare no outward arguments are implemented with the two hidden arguments, self and _cmd, so the stack frame won't be empty.) Note that forward::'s arguments are passed unchanged to performv::. A forward:: method can act as a distribution center for unrecognized messages, parceling them out to different receivers. Or it can be a transfer station, sending all messages to the same destination. It can translate one message into another, or simply "swallow" some messages so there's no response and no error. A forward:: method can also consolidate several messages into a single response. What forward:: does is up to the implementor. However, the opportunity it provides for linking objects in a forwarding chain opens up possibilities for program design. Note: The forward:: method gets to handle messages only if they don't invoke an existing method in the nominal receiver. If, for example, you want your object to forward negotiate messages to another object, it can't have a negotiate method of its own. If it does, the message will never reach forward::.
Forwarding and Multiple Inheritance Forwarding mimics inheritance, and can be used to lend some of the effects of multiple inheritance to Objective C programs. As shown in Figure 19 below, an object that responds to a message by forwarding it appears to borrow or "inherit" a method implementation defined in another class. |
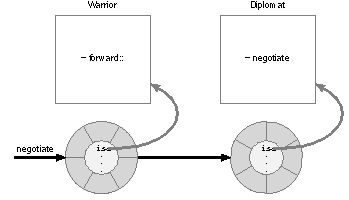 |
| Figure 19. Forwarding
In this illustration, an instance of the Warrior class forwards a negotiate message to an instance of the Diplomat class. The Warrior will appear to negotiate like a Diplomat. It will seem to respond to the negotiate message, and for all practical purposes it does respond (although it's really a Diplomat that's doing the work). The object that forwards a message thus "inherits" methods from two branches of the inheritance hierarchy--its own branch and that of the object that responds to the message. In the example above, it will appear as if the Warrior class inherits from Diplomat as well as its own superclass. Forwarding addresses most needs that lead programmers to value multiple inheritance. However, there's an important difference between the two: Multiple inheritance combines different capabilities in a single object. It tends toward large, multifaceted objects. Forwarding, on the other hand, assigns separate responsibilities to separate objects. It decomposes problems into smaller objects, but associates those objects in a way that's transparent to the message sender.
Surrogate Objects Forwarding not only mimics multiple inheritance, it also makes it possible to develop lightweight objects that represent or "cover" more substantial objects. The surrogate stands in for the other object and funnels messages to it. The proxy discussed under "Remote Messaging" in Chapter 3 is such an object. A proxy takes care of the administrative details of forwarding messages to a remote receiver, making sure argument values are copied and retrieved across the connection, and so on. But it doesn't attempt to do much else; it doesn't duplicate the functionality of the remote object but simply gives the remote object a local address, a place where it can receive messages in another application. Other kinds of surrogate objects are also possible. Suppose, for example, that you have an object that manipulates a lot of data--perhaps it creates a complicated image or reads the contents of a file on disk. Setting this object up could be time-consuming, so you prefer to do it lazily--when it's really needed or when system resources are temporarily idle. At the same time, you need at least a placeholder for this object in order for the other objects in the application to function properly. In this circumstance, you could initially create, not the full-fledged object, but a lightweight surrogate for it. This object could do some things on its own, such as answer questions about the data, but mostly it would just hold a place for the larger object and, when the time came, forward messages to it. When the surrogate's forward:: method first receives a message destined for the other object, it would check to be sure that the object existed and would create it if it didn't All messages for the larger object go through the surrogate, so as far as the rest of the program is concerned, the surrogate and the larger object would be the same.
Making Forwarding Transparent Although forwarding mimics inheritance, the Object class never confuses the two. Methods like respondsTo: and isKindOf: look only at the inheritance hierarchy, never at the forwarding chain. If, for example, a Warrior object is asked whether it responds to a negotiate message, |
![]() if ( [aWarrior respondsTo:@selector(negotiate)] )
if ( [aWarrior respondsTo:@selector(negotiate)] )
![]() . . .
. . .
| the answer will be NO, even though it can receive negotiate messages without error and respond to them, in a sense, by forwarding them to a Diplomat. (See Figure 19 above.)
In many cases, NO is the right answer. But it may not be. If you use forwarding to set up a surrogate object or to extend the capabilities of a class, the forwarding mechanism should probably be as transparent as inheritance. If you want your objects to act as if they truly inherited the behavior of the objects they forward messages to, you'll need to reimplement the respondsTo: and isKindOf: methods to include your forwarding algorithm: |
![]() - respondsTo:(SEL)aSelector
- respondsTo:(SEL)aSelector
![]() {
{
![]() if ( [super respondsTo:aSelector] )
if ( [super respondsTo:aSelector] )
![]() return YES;
return YES;
![]() else {
else {
![]() /* Here, test whether the aSelector message can be *
/* Here, test whether the aSelector message can be *
![]() * forwarded to another object and whether that object *
* forwarded to another object and whether that object *
![]() * can respond to it. Return YES if it can. */
* can respond to it. Return YES if it can. */
![]() }
}
![]() return NO;
return NO;
![]() }
}
| In addition to respondsTo: and isKindOf:, the instancesRespondTo: and isKindOfClassNamed: methods should also mirror the forwarding algorithm. These two methods round out the set. If protocols are used, the conformsTo: methods should likewise be added to the list. Similarly, if an object forwards any remote messages it receives, it should have versions of two other methods, descriptionForMethod: and descriptionForInstanceMethod:, that can return accurate descriptions of the methods that ultimately respond to the forwarded messages.
You might consider putting the forwarding algorithm somewhere in private code and have all these methods, forward:: included, call it. Note: All the methods mentioned above are described in Appendix C, "The Object Class." |
| Dynamic Loading |
| An Objective C program can load and link new classes and categories while it's running. The new code is incorporated into the program and treated identically to classes and categories loaded at the start.
Dynamic loading can be used to do a lot of different things. For example, device drivers written with the NEXTSTEP Device Driver KitTM(a Release 3.1 addition) are dynamically loaded into the kernel. Adaptors for database servers are dynamically loaded by the Database Kit. In the NEXTSTEP environment, dynamic loading currently finds its favored use in customizing applications. You can allow others to write modules that your program will load at run time--much as the NEXTSTEP Interface Builder loads custom palettes, the Preferences application loads custom displays, and the Workspace Manager loads data inspectors. The loadable modules extend what your application can do. They contribute to it in ways that you permit, but could not have anticipated or defined yourself. You provide the framework, but others provide the code. Dynamically loaded modules that customize an application generally come with their own user interface--perhaps their own windows, but more likely objects that draw in windows you provide. When the code is loaded and objects are instantiated or unarchived, the interface to the custom portion of the application is presented on-screen along with the rest of the user interface. The Preferences application, for example, has a window with a scrollable list of buttons along the top, plus a display area beneath the buttons. Each button controls the presentation of a different set of options within the display area; clicking a button causes its options to be displayed. Each dynamically loadable module provides a display that can be presented in the window, along with an image for the button and the code to handle user actions and set preferences. The Preferences window illustrated below shows the localization button highlighted and, beneath it, the display of localization options. |
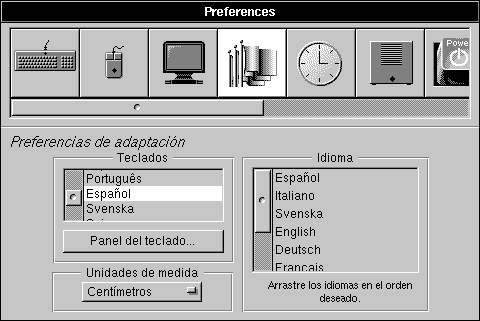 |
| Figure 20. The Preferences Application
Bundles Classes and categories are dynamically loaded and linked by calling the objc_loadModules() function. They can be unlinked and unloaded again by calling objc_unloadModules(). However, once code is loaded, it typically remains in place; there's little reason to unload it. These two functions are part of the Objective C run-time system and provide the basic methodology for dynamic loading and unloading. They're documented in the NEXTSTEP General Reference manual. However, the NEXTSTEP environment also provides another, more convenient interface for dynamic loading--one that's object-oriented and integrated with related services. The loading task can be assigned to an NXBundle object. NXBundles correspond to directories where programs store resources they'll refer to at run time. Each object manages one directory. The directory "bundles" the resources and makes them available to the NXBundle object and, through the object, to the program. The directory might contain image data, sound files, objects that were archived into so-called "nib files" by Interface Builder, tables of character strings, and other resources. It can also contain a file of executable code. An NXBundle object is initialized to a bundle directory with the initForDirectory: method as shown below (though, of course, you'd rarely use a hard-wired path like this): |
![]() char *path = "/LocalLibrary/Preferences/Music.preferences";
char *path = "/LocalLibrary/Preferences/Music.preferences";
![]() NXBundle *myBundle = [[NXBundle alloc] initForDirectory:path];
NXBundle *myBundle = [[NXBundle alloc] initForDirectory:path];
| An NXBundle can do two things with the information stored in the bundle directory: |
| Dynamically load the executable code and return class objects for the newly loaded classes | ||
| Find resources that match the user's language preference and make them available to the application |
| These two things go together; the whole point of an NXBundle is to combine them in a single facility. Dynamically loaded code doesn't stand on its own. It typically requires the support of various resource files--archived instances of the bundled classes, character strings that the code displays to users, bitmap images to place within the display, and so on. Code and resources are grouped together in the same directory and are managed together by the same NXBundle object.
Localized Resources Typically, a bundle directory packages a file of loadable code with all the resources that the code requires. Some resources in the bundle might occur in various alternative forms "localized" to a particular language or region of the world. For example, the English string "Select All" might have counterparts in Spanish ("Seleccionar todo"), German ("Alles auswählen"), French ("Tout sélectionner"), Swedish ("Markera allt"), and other languages. Localized resources are kept in subdirectories of the bundle directory. Each subdirectory is named after a language and carries a ".lproj" extension (for "language project"). For example, there might be Swedish.lproj, English.lproj, and Tagalog.lproj subdirectories. Each subdirectory has a matched set of files. If the user sets the language preference to Swedish, the application will use the files in Swedish.lproj. If the preference is set to English, English.lproj files will be used. When asked for a resource, an NXBundle looks in the subdirectory that matches the current preference. The figure below illustrates the layout of a possible bundle for the Preferences application. The Music file holds the loadable code and Music.tiff holds the bitmap image (in Tag Image File Format) that will be displayed on the button at the top of the window. The rest of the files are localized and located in ".lproj" subdirectories. |
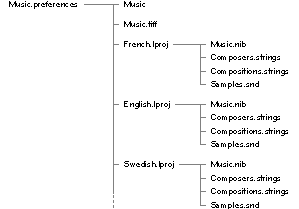 |
| Figure 21. A Bundle Directory
Note: Language preferences are set using the Preferences application, as shown above in Figure 20. The application not only sets the preference, it is itself localized and reflects the current choice. In the figure, the language preference is set to Spanish and, accordingly, Spanish is displayed in the window.
Loadable Code The loadable code in a bundle directory must be in a file with the same name as the directory (minus any extension on the directory name) and it must contain nothing but compiled class and category definitions. Bundled code is not localized. Rather, it's kept free of any content that would vary depending on the language or location where the software is used. This content is extracted from the code and put in resource files within the ".lproj" subdirectories. The same NXBundle object that loads the executable code can find the required resources at run time. Dynamic loading therefore should not be seen as the isolated task of loading and linking class and category code. It also includes loading the objects, images, strings, sounds, and other resources that are required at run time. The decision of which resources to load must be dynamic for it depends on information available only at run time--the user's language preference.
Loading Bundled Code When requested, an NXBundle returns class objects for the classes bundled within its directory. It waits until it receives the first request to load the bundled code. This message, for example, asks an NXBundle for the Mozart class: |
![]() Class composer = [myBundle classNamed:"Mozart"];
Class composer = [myBundle classNamed:"Mozart"];
| If the executable code stored in the bundle had not yet been loaded, this message would load it. All bundled classes are located in one file and are loaded at the same time. If the file doesn't contain the requested class, classNamed: returns nil.
The classNamed: method finds a specific class within the bundle, one that you request by name. Typically, however, an application needs to find only one class from the dynamically loaded file (at least initially), and it won't know or care what the class is named. The principalClass method returns this class: |
![]() Class head = [myBundle principalClass];
Class head = [myBundle principalClass];
| Like classNamed:, principalClass dynamically loads the bundled code if it hasn't already been loaded.
A set of bundled classes often supports a small subnetwork of objects that can be attached to the larger object network already in place. The connection is established through just one object, an instance of the principal class. That object might have methods to return other objects that the application can talk to, but typically all messages from the application to the subnetwork are funneled through the one instance. The NXBundle expects the principal class to be the first one encountered in the executable file. When several classes are linked into a dynamically loadable file, the principal class should be the first one listed on the ld command line. For example, this command makes DiscJockey the principal class in the Music bundle: |
![]() ld -o Music -r DiscJockey.o Bach.o Mozart.o Coltrane.o . . .
ld -o Music -r DiscJockey.o Bach.o Mozart.o Coltrane.o . . .
| Each application has a choice to make regarding when to load bundled code. It can load the code at start-up before the interaction with the user begins, or it can wait until the user requests it. There are benefits to waiting. For example, when it encounters a bundle of loadable code, the Preferences application immediately creates a button for it and puts the button in the scrollable list at the top of the window. It takes the image for the button from the bundle directory (Music.tiff in Figure 21 above). However, it doesn't dynamically load the bundled code (the Music file Figure 21) until the user clicks the button. Code that isn't used isn't loaded.
For some applications, the user's request can be even more explicit. For example, you might present the user with a panel that displays file icons for each bundle containing dynamically loadable code. The panel might even display some information about each bundle, information supplied by the customizer in the bundle directory. When the user double-clicks an icon, the application would load it and display its user interface on-screen. No matter what triggers dynamic loading, when your application is ready to start using the bundled code, the principalClass method will load it.
Organizing for Customization To allow others to customize your application, you need to set up a framework for finding, loading, and executing their code. So that customizers can prepare their code to work within your framework, you'll need to let them know what the framework is and what you expect of them. You are, in effect, entering into a contract of sorts with the customizer. The framework lets you carry out your end of the bargain; the information you provide lets them carry out theirs. You need to furnish customizers with at least the following information: |
| The path where your application will search for their code | ||
| The naming conventions you expect their bundle directories to follow | ||
| A protocol that they should implement so that your objects can talk to one of theirs | ||
| A protocol that you implement so that their objects can talk to one of yours | ||
| The interface their code can be linked against when it's loaded |
| The following sections discuss these matters in more detail.
Search Path Code must be located before it can be loaded. If you're setting up a framework that lets others add to your application, the first requirement is to publish the places where the application will look for bundles with dynamically loadable code. This usually takes the form of a search path. For example, the Preferences application looks for bundles inside a Preferences subdirectory located in one of the "Library" directories. It looks in this order: |
| First, in the user's home directory, ~/Library/Preferences, | ||
| Next, in the site-specific library, /LocalLibrary/Preferences, | ||
| Then, in the NeXT-supplied library, /NextLibrary/Preferences, and | ||
| Finally, in the application file package itself, /NextApps/Preferences.app. |
| This kind of path prefers the user version of a bundle over the site version, and the site version over one supplied by NeXT. If two or more bundles have the same name, the one that's encountered first is the one that's chosen, and those encountered afterward ignored.
Preferences includes its own file package in the search path because all of the buttons and preference options it displays are loaded from bundles at run time. The file package stores the bundles that come with the application. Note: The fact that Preferences dynamically loads its own code has benefits both for the user and for the programmer. For the user, it means reduced launch times. For the programmer, it means faster link times. It also means that Preferences can have a simpler design--a single paradigm is used for interacting with all preference modules. Moreover, the customization framework is thoroughly tested in Preferences' own development.
Bundle Name In addition to the search path, you'll also need to publish any constraints you impose on the name of the bundle directory. Preferences expects its bundles to carry a specific extension (".preferences"), but doesn't restrict the rest of the name. This seems like a good precedent to follow. The name shouldn't be so constrained that it limits the number of loadable modules, but it must be recognizable as being intended for a particular application. If you register the extension as one that denotes documents belonging to your application, the Workspace Manager will treat the bundle directory as a file package; it will display the directory as if it were a file. Just as users don't look inside files, they don't normally look inside file packages. This hides the contents of the bundle directory, simplifies its interface, and ensures its integrity.
Communication Protocols Bundled code is loaded simply by asking the NXBundle for the principal class, as mentioned above. But getting the principal class is just the first step. Once your program has the class, it needs to create an instance and talk to it. To be able to write code that can communicate with an instance of a dynamically loaded class, you need to know what messages the new instance will respond to. To arrange this communication, you'll need to publish a protocol of methods that you expect customizers to implement in the principal class. This protocol should include an initialization method, so that your code can properly initialize a new instance. If you want the dynamically loaded code to be able to talk to your objects (often a good idea), you'll also need to publish another protocol, one that's implemented by an object in your program. One of the first things your code should do is pass this object to the new instance of the principal class. For example, if the protocol you implement is called ApplicationResponsibilities, |
![]() @protocol ApplicationResponsibilities
@protocol ApplicationResponsibilities
![]() . . .
. . .
![]() @end
@end
| the protocol you expect the principal class to implement could include an initContact: method that would both (a) initialize a new instance of the principal class and (b) pass that instance an object that conforms to the ApplicationResponsibilities protocol: |
![]() @protocol CustomizerResponsibilities
@protocol CustomizerResponsibilities
![]() - initContact:(id <ApplicationResponsibilities>)anObject;
- initContact:(id <ApplicationResponsibilities>)anObject;
![]() . . .
. . .
![]() @end
@end
| Both protocols would be declared in a header file that you make available to potential customizers.
Before your application begins interacting with the customizer's code, it's a good idea to check whether the principal class conforms to the expected protocol: |
![]() if ( [[theBundle principalClass]
if ( [[theBundle principalClass]
![]() conformsTo:@protocol(CustomizerResponsibilites)] ) {
conformsTo:@protocol(CustomizerResponsibilites)] ) {
![]() . . .
. . .
![]() }
}
| If it does conform, you can create an instance of the principal class and begin talking to it: |
![]() id adjunct = [[[theBundle principalClass] alloc] initContact:myAgent];
id adjunct = [[[theBundle principalClass] alloc] initContact:myAgent];
![]() if ( adjunct )
if ( adjunct )
![]() . . .
. . .
| The object passed as initContact:'s argument is, in a sense, a counterpart to the new instance of the principal class. It receives messages from dynamically loaded code, just as the new instance receives messages sent from application code.
As an alternative to the two protocols, you could provide an interface to an abstract class that developers should subclass. The abstract class would declare methods--equivalent to the CustomizerResponsibilites protocol--that customizers should implement in their subclasses. It could also implement methods--equivalent to the ApplicationResponsibilities protocol--that customizers could use in their code to communicate with your application. The abstract class would reside in your application, rather than in a library. The superclass-subclass relationship is resolved when the customizer's subclass is loaded and linked dynamically. Note: Preferences and other applications that come with NEXTSTEP choose an abstract class over the two protocols. The class gives them the opportunity to lighten the customizer's burden by providing, through inheritance, part of the customization code.
Development Interfaces Most NEXTSTEP software resides in shared libraries, principally libNeXT_s and libsys_s. Linking to a shared library gives an application access to library code, but it doesn't actually incorporate the code into the application. At run time, one copy of the code is shared by all applications linked to the library. An application can be linked to a shared library, but the code it dynamically loads can't be. Bundled code must be self-contained; any unresolved symbols within it must be resolved by symbols found within the application it's dynamically linked to. It can't maintain an independent connection to a shared library. Therefore, if others are to customize your application, you'll need to inform them of the interface they can link against. Normally, dynamically loaded code can link against any program symbols that are global to the application or any shared library symbols the application actually references. It can't use facilities in the shared library that the application itself doesn't use. However, if you link your application to shared libraries with the |
![]() ld -o myApp -ObjC -u libNeXT_s -u libsys_s . . .
ld -o myApp -ObjC -u libNeXT_s -u libsys_s . . .
| all symbols defined in the listed libraries will be available to dynamically loaded code.
The strip utility can be used to remove extraneous symbols from the final version of your application. You should be careful to leave symbols that might be needed by dynamically loaded code. The |
![]() strip -s appSymbolsToSave -A myApp
strip -s appSymbolsToSave -A myApp
| In summary, it's important to let customizers know what programming interface they can rely on when developing dynamically loadable code, including: |
| Whether your application defines a programming interface that they can use, | ||
| Which libraries the application is linked against, and | ||
| Which part of the library interface is available to them. |
| Archiving |
| NEXTSTEPsoftware and the Object class support archiving, copying an object's data structure from dynamic memory to some other location. The other location can be a file where the object is stored until it's later reactivated, another application that will use the copy in its own way, the pasteboard, a port, or some other destination. Archiving permits objects to persist between sessions of the same application, and to be passed from one application to another.
Only the object data structure is archived (only its instance variables), not any of the class code that includes the object's methods and other information it needs to function properly. For an object to be of any use once it's read from the archive, the program that reads it must have access to this code. The class must have been loaded, either at startup or dynamically later on, before the object is unarchived. Interface Builder is perhaps the most dramatic example of how archiving can be used. It permits you to design an application on-screen using graphical tools. You choose objects from a palette, manipulate them graphically to initialize them, and connect them to each other to form a program network. Interface Builder archives these objects in a file; they can then be unarchived as part of your application, or again in Interface Builder to further modify the design.
Typed Streams Objects are archived by writing them to a special kind of data stream, a typed stream, that accepts not only the object's data but also information about what type of data it is and what class the object belongs to. The class information is needed to reconnect the object to its class when it's unarchived. Data written to the stream might go to a file, to the pasteboard, to memory somewhere, or to some other destination. It doesn't matter; the archiving mechanism doesn't distinguish among destinations. (In this discussion, it will be assumed that the stream is connected to a file.) Objects are unarchived in similar fashion by reading them from a typed stream. Again, the mechanism is oblivious to the source of the data. The stream might be connected to a file, to memory, to the pasteboard or a port, or to some other source. However, typed streams impose a format on the data in the archive. Therefore, you can read data using a typed stream only if the data was previously written using a typed stream. Because the archiving mechanism is independent of the destination or source of the data, the same code can be reused in a variety of situations. Unarchiving an object from an Interface Builder file, for example, uses the same code as retrieving it from the pasteboard or receiving it as an argument in a remote message. Typed streams are recorded in NXTypedStream structures. The functions that open a stream for reading or writing return an NXTypedStream pointer. For example, NXOpenTypedStreamForFile() opens a typed stream on a file: |
![]() NXTypedStream *stream;
NXTypedStream *stream;
![]() stream = NXOpenTypedStreamForFile("/home/archive", NX_READWRITE);
stream = NXOpenTypedStreamForFile("/home/archive", NX_READWRITE);
| The two arguments to NXOpenTypedStreamForFile() are a file name and a specification for how the stream will be used (NX_READWRITE, NX_READONLY, or NX_WRITEONLY).
Like NXZone and FILE structures, you don't have to allocate memory for an NXTypedStream or look inside the structure; a pointer to the structure can be regarded as a stream identifier.
Reading and Writing Archiving is initiated by calling a function that writes an object to a typed stream, typically NXWriteRootObject(): |
![]() NXWriteRootObject(stream, anObject);
NXWriteRootObject(stream, anObject);
| This generates a write: message to the object, telling it to write its instance variables to the stream. (The "root object" in the function name refers not to the root of the inheritance hierarchy, but to the object passed as the argument. Since archiving this object might indirectly cause other objects to be archived, it's the one that "roots" (initiates) the archiving sequence.)
Objects are unarchived by the inverse of this process, usually initiated by calling NXReadObject(): |
![]() id anObject = NXReadObject(stream);
id anObject = NXReadObject(stream);
| This function allocates memory for the object, reconnects it to its class, and generates a read: message to the object telling it to reinitialize its instance variables from the stream.
The write: and read: Methods The Object class defines default versions of the write: and read: methods. However, Object's versions can't know about instance variables declared in other classes. Thus, any class that declares instance variables must supply its own versions of write: and read: to archive and unarchive them. Every class has responsibility for reading and writing its own instance variables. So that write: and read: messages will archive or unarchive all of an object's instance variables, each version of either method should incorporate, through a message to super, the version it overrides: |
![]() - write:(NXTypedStream *)stream
- write:(NXTypedStream *)stream
![]() {
{
![]() [super write:stream];
[super write:stream];
![]() . . .
. . .
![]() }
}
![]() - read:(NXTypedStream *)stream
- read:(NXTypedStream *)stream
![]() {
{
![]() [super read:stream];
[super read:stream];
![]() . . .
. . .
![]() }
}
| Because the message to super comes first, instance variables are archived in the order of inheritance and unarchived in the same order. Those declared in a superclass are handled before those declared in a subclass.
Every write: method must be matched by a read: method. The two methods are the inverse of each other; whatever write: writes, read: reads. However, write: and read: don't have to account for every instance variable. It's more efficient to skip over instance variables that fall into one of the following categories: |
| Instance variables that are not essential to the character of the object | ||
| Those that would be invalid when the object is unarchived in a different context | ||
| Those that can be recalculated from scratch when the object is unarchived |
| For example, it would be better not to archive a variable that records a transitory state--one that changes often as the program runs (such as the current selection in a body of text). Rather, the variable could simply be set to an arbitrary initial value when the object is unarchived.
The Archiving Functions After the message to super, a write: method must get down to the business of archiving a set of instance variables. A number of functions are provided for this purpose, the most general of them being NXWriteType(), which archives a single variable, possibly a structure, and NXWriteTypes(), which archives a series of variables, none of which can be structures. As their first argument, both functions take a pointer to the stream. As their second argument, both take a string of characters encoding all the types to be written, including all the types within a structure. These type codes are almost identical to those provided by the @encode() compiler directive. (Differences are explained in the NEXTSTEP General Reference manual.) Pointers to the data to be archived follow the type codes. For example, imagine a class that declares these six instance variables, |
![]() {
{
![]() struct key info;
struct key info;
![]() char *name;
char *name;
![]() double factor;
double factor;
![]() unsigned int mask;
unsigned int mask;
![]() unsigned int flags;
unsigned int flags;
![]() int state;
int state;
![]() }
}
| where the key structure consists of just an integer and a string: |
![]() struct key {
struct key {
![]() int i;
int i;
![]() char *s;
char *s;
![]() };
};
| It might archive the instance variables as follows: |
![]() - write:(NXTypedStream *)stream
- write:(NXTypedStream *)stream
![]() {
{
![]() [super write:stream];
[super write:stream];
![]() NXWriteType(stream, "{i*}", &info);
NXWriteType(stream, "{i*}", &info);
![]() NXWriteTypes(stream, "*dII", &name, &factor, &mask, &flags);
NXWriteTypes(stream, "*dII", &name, &factor, &mask, &flags);
![]() return self;
return self;
![]() }
}
| Note that this method ignores the state variable.
The archiving functions follow a character pointer (coded `*') to archive the string it points to, and an object pointer (coded `@') to archive the object. However, they don't follow other kinds of pointers. You must explicitly archive any data that the object refers to but that resides in memory outside the object. The NXReadType() and NXReadTypes() functions read back what NXWriteType() and NXWriteTypes() write: |
![]() - read:(NXTypedStream *)stream
- read:(NXTypedStream *)stream
![]() {
{
![]() [super read:stream];
[super read:stream];
![]() NXReadType(stream, "{*i}", &info);
NXReadType(stream, "{*i}", &info);
![]() NXReadTypes(stream, "*dII", &name, &factor, &mask, &flags);
NXReadTypes(stream, "*dII", &name, &factor, &mask, &flags);
![]() state = 1;
state = 1;
![]() return self;
return self;
![]() }
}
| A read: method might also reinitialize instance variables that were not archived. Here it resets state to 1;
Outlet Instance Variables Most objects have instance variables that point to other objects. As explained in Chapter 1, these outlets let an object keep track of the other objects it needs to communicate with. They serve to define the connections between objects in a program. Outlets raise a question for archiving: When one object is archived, should the objects that its outlets point to also be archived? The answer to this question can't be a universal "yes." If it were, archiving one object might result in archiving a whole series of unwanted objects. Archiving a Matrix, for example, would also archive the Window object for the window where the matrix is drawn, along with every other object that draws in the window, all objects those objects are connected to, and so on. The answer also can't always be "no." If it were, essential elements of an archived object might be missing when it was unarchived. You'd get back a Matrix without its Cells, for example. How an outlet instance variable is archived depends on the nature of the connection it represents. In NEXTSTEP, you have three options: |
| If an outlet object is the private servant of the object being archived and can be recreated from scratch without losing information, it doesn't need to be archived. The write: method can simply ignore the object and read: can produce a new one to take its place. |
![]() - read:(NXTypedStream *)stream
- read:(NXTypedStream *)stream
![]() {
{
![]() [super read:stream];
[super read:stream];
![]() anOutlet = [[SomeClass alloc] init];
anOutlet = [[SomeClass alloc] init];
![]() . . .
. . .
![]() }
}
| If an outlet object is intrinsic to the object being archived, crucial to its character, or required for its operation, the write: method should archive it. For example, a Matrix archives its Cells. write: can archive an object by calling NXWriteType() or NXWriteTypes() and passing it the `@' type code that designates an object: |
![]() - write:(NXTypedStream *)stream
- write:(NXTypedStream *)stream
![]() {
{
![]() [super write:stream];
[super write:stream];
![]() NXWriteType(stream, "@", &anOutlet);
NXWriteType(stream, "@", &anOutlet);
![]() . . .
. . .
![]() }
}
| It's even simpler to use the shorthand NXWriteObject() method: |
![]() - write:(NXTypedStream *)stream
- write:(NXTypedStream *)stream
![]() {
{
![]() [super write:stream];
[super write:stream];
![]() NXWriteObject(stream, anOutlet);
NXWriteObject(stream, anOutlet);
![]() . . .
. . .
![]() }
}
| These three functions have equivalent results; they each initiate a write: message to the outlet object.
NXWriteObject() should be balanced by a call to NXReadObject() in the read: method. NXWriteType() is balanced by NXReadType() and NXWriteTypes() is balanced by NXReadTypes(). |
| If an outlet object is only peripherally connected to the object being archived, the write: method can call NXWriteObjectReference() to ask that a reference to it be maintained in case the object is archived for some other reason: |
![]() - write:(NXTypedStream *)stream
- write:(NXTypedStream *)stream
![]() {
{
![]() [super write:stream];
[super write:stream];
![]() NXWriteObjectReference(stream, anOutlet);
NXWriteObjectReference(stream, anOutlet);
![]() . . .
. . .
![]() }
}
| This function doesn't archive the object. However, it's possible that the object will be archived anyway, perhaps because some other write: method requests it. If so, NXWriteObjectReference() guarantees that the outlet connection will be reestablished when the objects are unarchived. If not, it makes sure the outlet instance variable is set to nil.
Like NXWriteObject(), NXWriteObjectReference() is balanced by calling NXReadObject() in the read: method: |
![]() - read:(NXTypedStream *)stream
- read:(NXTypedStream *)stream
![]() {
{
![]() [super read:stream];
[super read:stream];
![]() anOutlet = NXReadObject(stream);
anOutlet = NXReadObject(stream);
![]() . . .
. . .
![]() }
}
| For example, a Matrix writes a reference to its Window object. If just the Matrix is archived, NXReadObject() will set the outlet that points to the Window to nil. However, if the entire Window is archived, the Matrix will also be archived and NXReadObject() will reestablish its connection to the Window. |
| In addition to being used inside a write: method, NXWriteObject() can be used instead of NXWriteRootObject() to initiate archiving. However, NXWriteObject() fails in this role if any object it seeks to archive calls NXWriteObjectReference(). Only NXWriteRootObject() knows how to write a reference to an object. It makes two passes over the network of objects being archived. On the first pass, it maps out the connections between objects, taking note of which ones are referred to and where. On the second pass, it archives the objects. (Therefore, all write: methods should be able to be invoked twice with no side effects.)
NXWriteRootObject() can be used only to initiate archiving, never inside a write: method. Both NXWriteRootObject() and NXWriteObject() make sure that no object is archived more than once, no matter how may write: methods request that it be archived.
Final Steps Immediately after an object has been unarchived with the read: method, NXReadObject() sends it an awake message. The inherited version of awake defined in the Object class does nothing but return self. But a class can define an awake method of its own to reinitialize its instances and make sure they're in a usable state before they receive any other messages. Like write: and read: methods, awake methods should be chained together through messages to super. |
![]() - awake
- awake
![]() {
{
![]() [super awake];
[super awake];
![]() . . .
. . .
![]() }
}
| After the awake message, NXReadObject() sends each unarchived object that can respond a finishUnarchiving message. This message gives Objective C programs a chance to free the unarchived object and substitute another object for it. For example, if a class of named objects requires each name to be unique, and the newly unarchived object has a name that's already in use, finishUnarchiving might replace the new object with the existing one.
finishUnarchiving should return nil if there's no substitution, and the replacement object if there is. The Object class declares a prototype for this method, but doesn't implement it. |