Once you build an interface with objects, you connect those objects so they can communicate with each other. You make connections between objects in Interface Builder by Control-dragging a line between them and then selecting a name for the connection.

Working with Interface Builder


3

Making and Managing Connections


Connecting objects

Making connections in outline mode

Examining connections

Identifying objects in outline mode

Enabling inter-field tabblng

Disconnecting objects

Copying connected objects

Testing the interface


It could be said of me that in this book I have only made up a bunch of other men's flowers, providing of my own only the string that binds them together.
Montaigne, Essais

Let him look to his bond.
Shakespeare, Merchant of Venice


Communicating With Other Objects: Outlets and Actions

Outlets

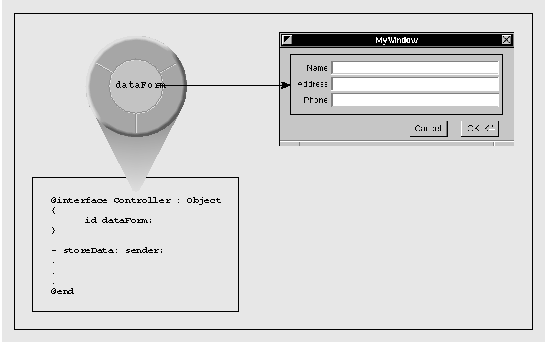
An outlet is an instance variable that points to another object.. Objects use outlets to communicate with other objects; they simply send messages to the object identified by the outlet.

Using Interface Builder, you can declare and set outlets for the custom objects in your application. You can also set ready-made outlets in many Application Kit objects, such as browsers. .Once initialized, the connection information for the outlet is stored in the nib file. At run time, the nib file is unarchived and the outlet is reinitialized with the connection information.

The Application Kit defines two types of outlets that you can use to establish specialized connections with other objects: delegates and targets.


Delegates

A delegate is an object that acts on behalf of another object. Many kit classes define delegate outlets as an alternative to subclassing. All your object must do is register itself as a delegate of the kit object. At important junctures in its life cycle, the kit object sends messages to its delegate, giving it an opportunity to participate in processing and sometimes even the chance to veto some behavior.

As examples, browsers request their delegates to supply the cells for browser columns; applications inform their delegates when they (the application) are initialized, hidden, and activated.

Targets

Targets are a special kind of outlet. They identify objects that can respond to action messages. When a user activates a Control object (for instance, clicking a button or moving a slider), that object sends an action message to the target. The action message gives application-specific meaning to the original mouse or key event.

Like a delegate, a target must implement methods to respond to the messages it's sent. But unlike a delegate, which receives messages chosen from a limited set defined by a kit, a target responds to action messages defined by the programmer.

You can also make one object a target of a second object programmatically by sending that second object setTarget:.


Actions

Control objects translate the event messages they receive when users manipulate them into messages meaningful within the application. They then send these messages to other objects.   These application-specific messages initiated by a Control object are called action messages, and the method they invoke are called action methods. A Control object is simply a user-interface device that permits the user to give instructions to the application, a device that mediates between the user and the object that will ultimately respond to the user's event.

Control, an abstract class, defines for its many subclasses (such as Button, Scroller, TextField, and Form) a paradigm for inter-object communication--action messages. But Control objects don't act alone: they always contain one or more objects of ActionCell or its subclasses. The ActionCell superclass defines instance variables for the two elements essential to an action message:

target: the object that's responsible for responding to the user's action on the Control
action: the method that specifies what the target is to do

Action methods take a single argument, the id of the Control object that sends the message. This argument enables the receiver to ask the control for more information, if it's needed.

A Control can send a different action message to a different target for each ActionCell it contains. Controls dispatch action messages differently; for instance, a Button generally sends action messages on a mouse-up event, but a Slider usually sends action messages continuously, as long as the mouse button is pressed.


CONNECTING OBJECTS


1 Select an object.
2 Control-drag a connection to another object.
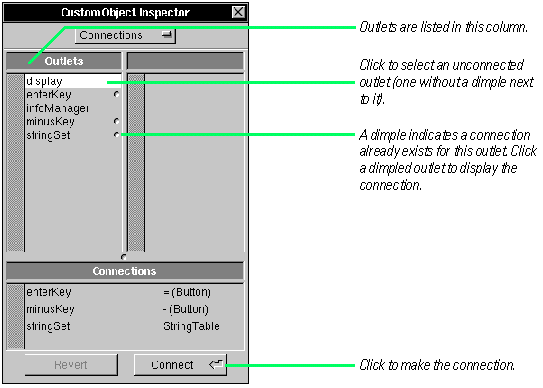
3 In the Inspector panel's Connections display, select an outlet or action.
4 Click the Connect button.


In an object-oriented application, isolated objects have little value; they need to send messages to each other to get the work of the application done. Interface Builder gives you a way to establish connections between objects.

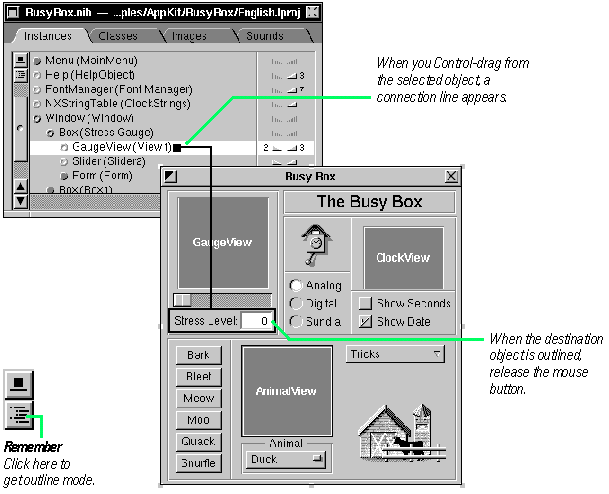
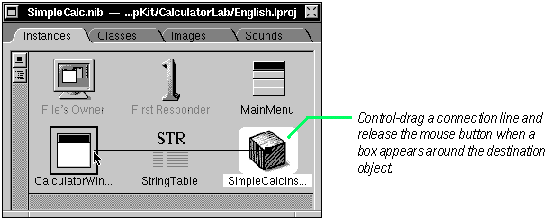
Begin making a connection in Interface Builder by Control-dragging a connection line from one object to another object. Almost any object will do. Usually you Control-drag a line between an object in the interface and an object in the Instances display.
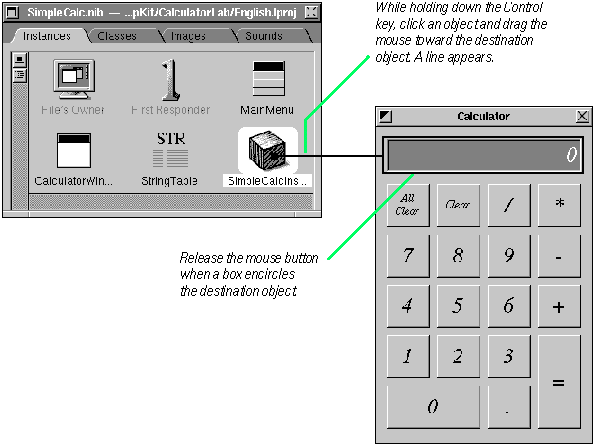
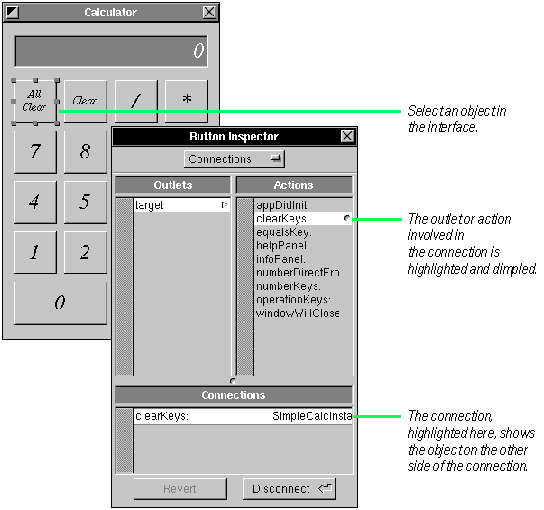
When you release the mouse button, the Inspector panel becomes the key window (see facing page). Its Connections display shows the current and potential connections for the destination object.

Outlet Connections

In the example above, the connection is made from a controller object--a custom object that manages the application--to a text field. The controller object (SimpleCalcInstance) declares several outlets--identifiers of destination objects-- as instance variables.

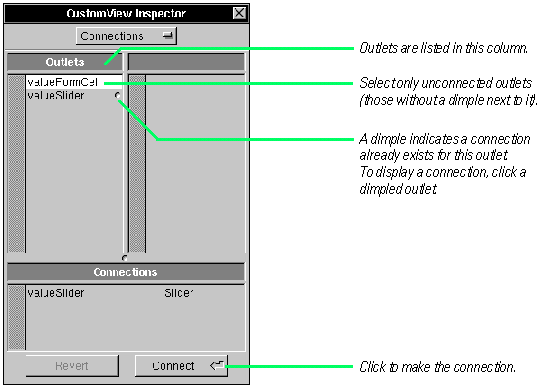
When you make a connection between objects, the first column of the Connections display shows the source object's outlets ("source" meaning the object from which a connection line is drawn).
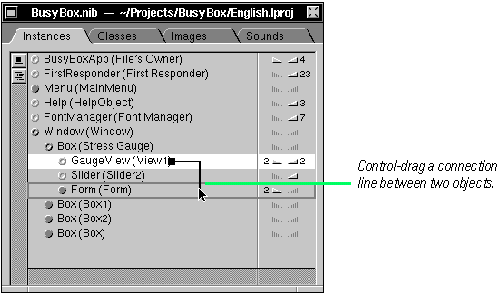
You can make outlet connections between objects in the Instances display.
Action Connections

When you make a connection by dragging a line from a Control object in the interface--a button, slider, text field, menu command, pop-up list, or matrix--odds are that the destination object is a target, and that you can complete the connection by selecting an action method.
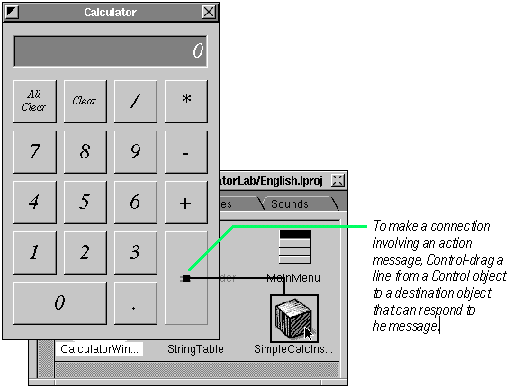
The destination object in an action connection is frequently a custom object that manages the application or a particular window (controller object).

When you make a connection from a Control object, the Inspector panel becomes key and shows the Connections display for the destination object.
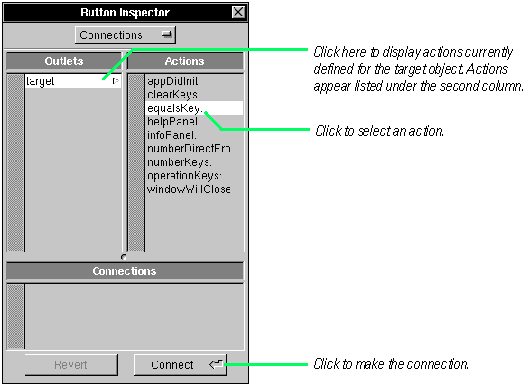
When the user manipulates the Control object, such as clicking a button or moving a slider, the action message is sent to the destination object (the target).

Connections Within the Interface

Sometimes you can connect two objects on an interface. These connections can involve both outlets and actions. Often one of the objects is a custom View object, as in this example:
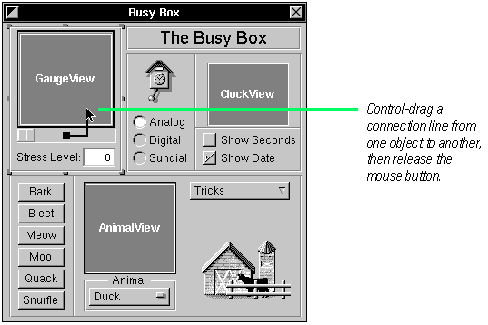
Connections within an interface can also involve two Application Kit objects. Two examples are interconnecting text fields (so the user can tab from field to field), and connecting a menu command such as Print to a Text object.

Tip: To enable printing of a Text object, drag a connection line from the Print menu command (or other Control object that initiates printing) and select the printPSCode: action in the Connections display.

Outlets are destination objects specified as instance variables. Actions are methods that Control objects (such as buttons) invoke in another object. See "Communicating with Other Objects: Outlets and Actions" in this chapter for more information.

Chapter 4, "Creating a Class" describes connecting the outlets and actions of custom objects in the context of creating a class.

See "Communicating with Objects: Outlets and Actions" in this chapter for more information on targets and actions.

See "Compound Objects" in Chapter 3 for descriptions of the interaction between Control objects and Cell objects, and of the role Matrix objects play.

You can connect text fields and form fields so that when the user presses the Tab key, the cursor moves to another field. See "Enabling Inter-Field Tabbing" later in this chapter for information on this procedure.


The Modes of the Instances Display

Icon Mode
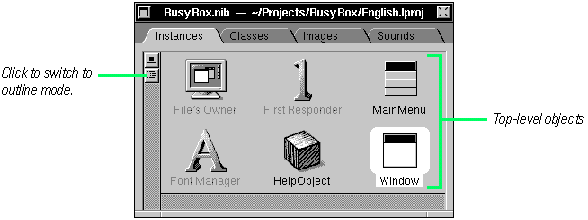
When you open a nib file in Interface Builder, the Instance display of the nib file window first shows objects as icons. This icon mode doesn't show all objects, just the top-level objects--those objects that are not contained by another object. Windows and panels and most controller objects (that is, objects that manage an application or a window) are top-level objects; although they may contain other objects (for instance, a window contains one or more views), no other object contains them.

The graphical representation of objects in icon mode makes it an ideal interface for many operations. Its simple, intuitive, and uncluttered nature makes it easy to do the basic things, such as making connections between top-level and interface objects.

For more complex operations, the Instances display has another mode--outline mode--that shows more detail about objects in the nib file, including their connections with each other.


Outline Mode
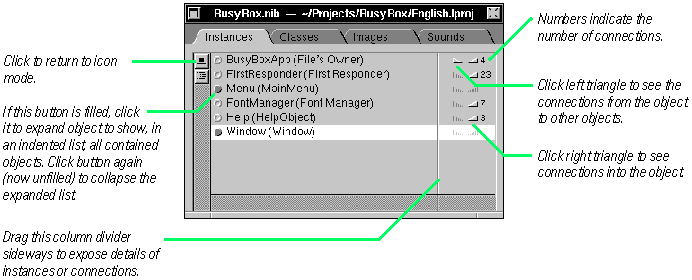
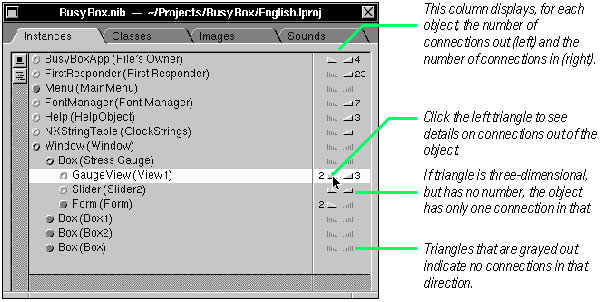
The most important advantage of outline mode of the Instances display is that it shows all objects in the nib file, not merely the top-level objects. It also shows all connections, both connections into an object and connections from an object to other objects.

The outline mode starts by listing the top-level objects in the nib file. By clicking the open button next to an instance, you can see what other objects it contains. Click a connection button (triangle button) to see what connections go into or out of an object.

You can connect objects in outline mode; there's no need no drag a connection line to the interface. Outline mode also has facilities that make it easy to identify objects in the interface and to disconnect objects.

Objects in icon mode are identified first by class name and then, in parentheses, by title. If the title is obscured, you can resize the nib file window until it is visible.

Expanding Objects in Outline Mode
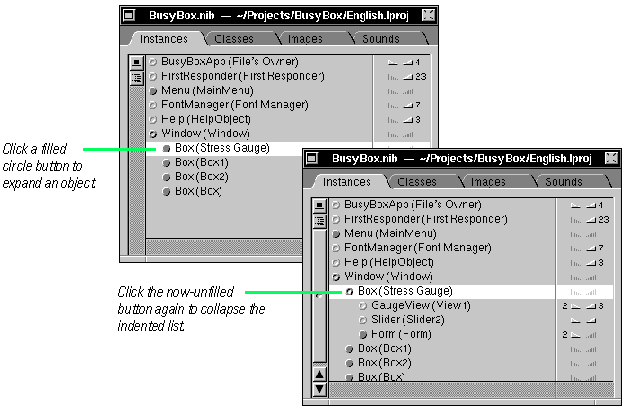
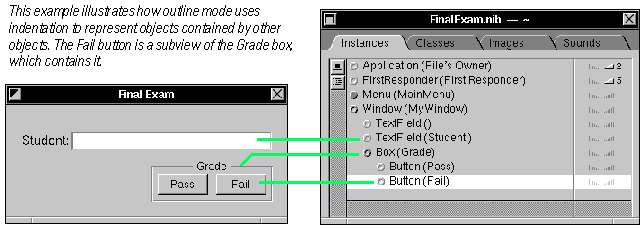
In outline mode objects that contain other objects have a small circle button to their left that is filled with gray. The subordinate objects are usually subviews of a window, panel, or another View object, but can be objects that are part of another object not visible on the screen. You display these contained objects by expanding the container object.

Click a circle button to expand an object into a list of its component objects; click it again to collapse the list. Expansions can be nested many levels. To expand everything within an object, Command-click the circle button. Collapse the list back to the original level by Command-clicking the circle button again.

See "The View Hierarchy" later in this chapter for a desciption of the relationship between superview and subview.


MAKING CONNECTIONS IN OUTLINE MODE


1 Select an object.
2 Control-drag a connection to another object.
3 Specify an outlet or action in the Connections display for the destination object.


You can make connections between objects in the outline mode of the Instances display as well as its icon mode. The connections can be between an object in the outline and an object in the interface or between two objects listed in the outline.

Before you make a connection involving an object in outline mode, make sure that the objects is visible in the display. (You might have to expand the object's "parents" in outline mode to do this.)


The Connections display of the destination object's Inspector lists the possible connections.

The outline mode offers the useful capability for making connections without leaving the nib file window. In this example, the same connection is made as in the previous example.

When the destination object is outlined, its Connections display lists the possible connections. Complete the connection as described above.


EXAMINING CONNECTIONS


In the interface:
Select an object and look at the Connections display of the Inspector panel.
In the Instances display:
Select an object and look at the Connections display of the Inspector panel.
In the Connections display:
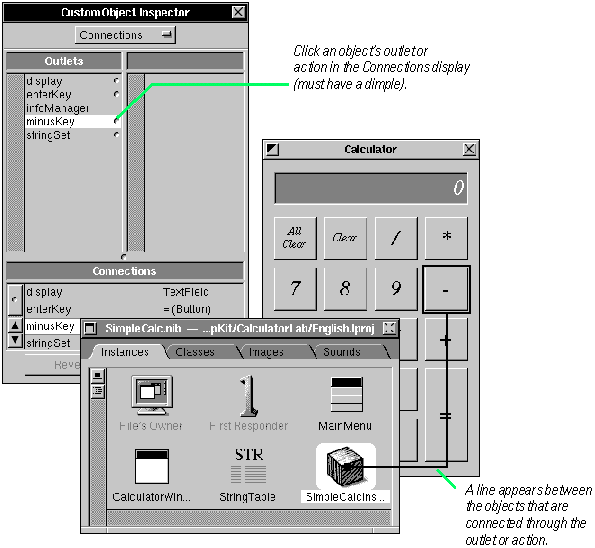
Click a dimpled outlet to see the connection line drawn.
In outline mode:
Click a triangle button in the column to the right of an object.


Interface Builder gives you many ways to examine and verify connections between objects. It makes it easy, for example, to discover what outlets and actions might be associated with an object in the interface.

You can also select an object in the Instances display (in both icon and outline modes) and examine the Inspector panel as described above to find out what object it is connected to.

You can also examine object connections going in the other direction too, from the Connections display to the interface and the Instances display.

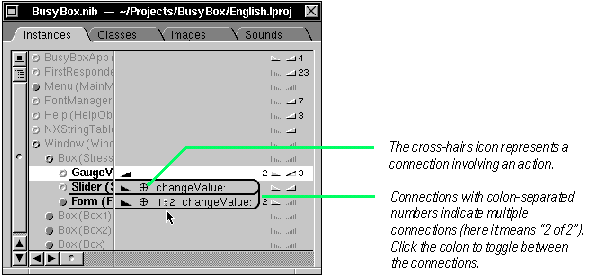
The Connections display allows you to see one connection at a time. The outline mode of the Instances display shows you all connections an object has, both connections into the object and connections from that object to other objects.


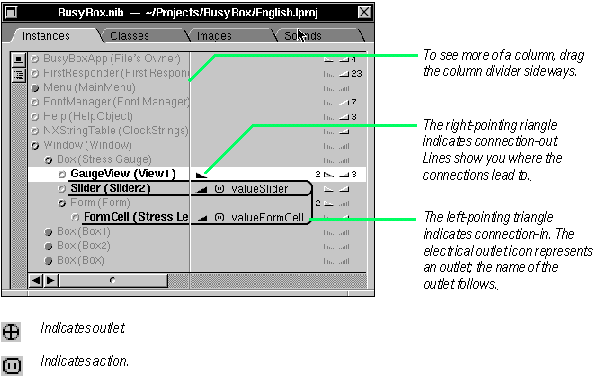
When you click a three-dimensional triangle, lines appear to show the connections between objects. The name and class of each connected object is highlighted in bold. Each connection is labelled with the name of an outlet or action.


To see connections into an object, click a three-dimensional triangle that points to the left (that is, a triangle on the right side of the connections column).

Note that an object may have multiple connections with another object, both in and out, both outlets and actions. In these cases, the outline mode lets you toggle between the connections.

To make the connection lines disappear, click the three-dimensional triangle button that is highlighted.


The View Hierarchy

When you expand a Window object in outline mode, and then expand the View objects indented beneath, you are looking at a view hierarchy. All the View objects within a window are linked together in this hierarchy, an abstract tree structure similar to the class inheritance hierarchy.

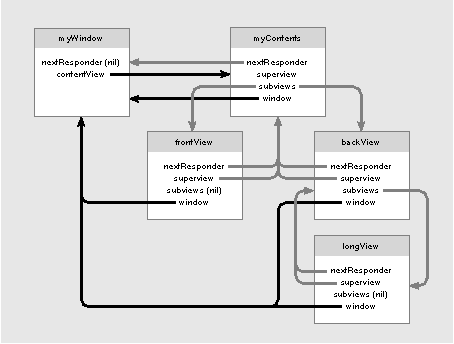
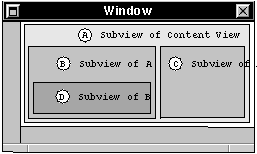
Within every window's content rectangle--the area enclosed by the border, title bar, and resize bar-- is its content view.   The content view is at the top of the view hierarchy. All other Views of the window descend from it. Each View has one other View as its superview and can be the superview for any number of subviews.

What physically determines a View's place in the hierarchy is enclosure.   A superview encloses its subviews. Three outlets of View reflect a View's physical relationships to other Views in the window and locate the View in the hierarchy:

window identifies the View's window (the window points to the content view)
superview  identifies the View's superview
subviews a list of the View's subviews

The defining relationship of enclosure makes it easeir to draw a View:

It allows you to construct a View object (the superview) from its subviews.
Views are positioned within the coordinates of their superviews, so when a View object is moved or its coordinate system is transformed, all its subviews are moved and transformed with it.
Each View object has its own coordinate system for drawing. Since a View draws within its own coordinate system, its drawing instructions can remain constant no matter where it or its superview moves on the screen.

Two other instance variables, the frame and bounds rectangles, set the location, dimensions, and coordinate systems of a View.   The frame instance variable holds the position and size of a View within its superview's coordinate system. The frame rectangle defines the area in which drawing can occur. The origin point of a frame locates the lower-left corner of the rectangle in the superview's coordinates. The bounds rectangle occupies the same area as the frame rectangle, but it is stated in a different coordinate system; the frame's origin becomes the origin (0.0, 0.0) of the View's drawing coordinates (bounds.origin). The bounds rectangle is thus expressed in the View's own drawing coordinates.

Another instance variable, inherited from the Responder class, determines how events are handled within the view hierarchy. The nextResponder variable by default identifies a View's superview. If a View receives an event message (for example, mouseDown:) and cannot handle it, that message is passed on to the View identified by nextResponder. See the specifications of the Application Kit's View and Responder classes in the NEXTSTEP General Reference and the book Object-Oriented Programming and the Objective C Language for more information on the view hierarchy and event handling.


IDENTIFYING OBJECTS IN OUTLINE MODE


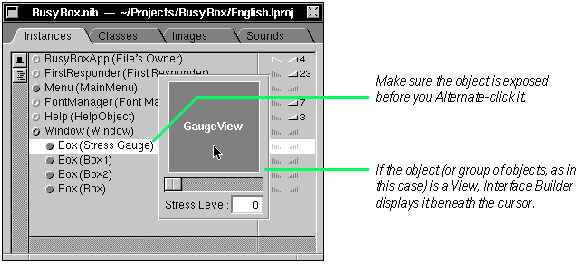
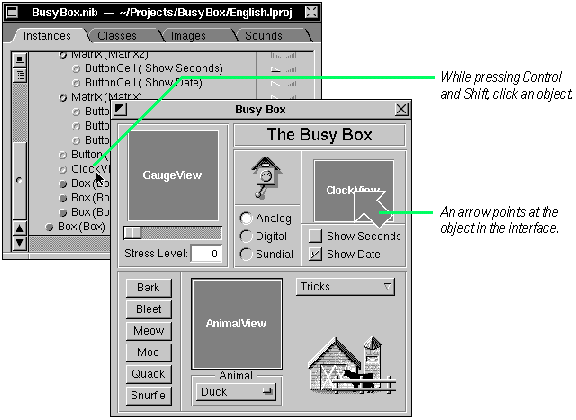
To see a representation of an object, Alternate-click it in outline mode of the Instances display.
To have an arrow point at the interface object, Control-Shift-click the object in outline mode.


In the outline mode of the Instances display you might want to verify what an object is before connecting it to another object. You have two graphical ways to identify an interface object. One method displays an image representing a selected object.

When you Alternate-click non-View objects in outline mode, the images that represent them in icon mode are displayed (cubes for custom objects, mini-windows for panels and windows). Menus, First Responder, and File's Owner don't display icons.

The other technique locates an object in the interface with a large arrow.

Control-Shift-Clicking Menu, File's Owner, and First Responder has no effect.

See "The Modes of the Instances Display" earlier in this chapter for an introduction to outline mode.


ENABLING INTER-FIELD TABBING


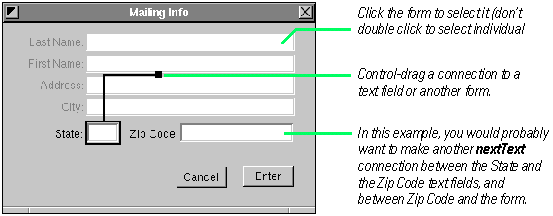
1 Make a connection line between forms or fields.
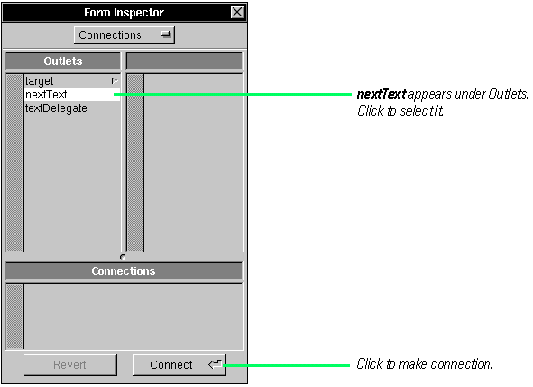
2 Select nextText in the object's Connections display.
3 Click the Connect button.


Sometimes when users press the Tab or Return key in a window with multiple fields, you want the cursor to jump from the current text or form field to the next field. When users press Shift-Tab, you want the cursor to go the previous field. A Form object (a matrix) automatically moves the cursor between its fields. But between text fields, between Forms, or between a Form and a text field, you must specify this behavior.

The Matrix class (of which Form is a subclass) and the TextField class define an instance variable, nextText, as an outlet. This is what you connect.

Next, make the connection in the Inspector panel.


Note the textDelegate outlet in this example's Inspector. This is the object that receives delegation messages from the Text class on behalf of a text-editable field. See "Acting as Delegate" in Chapter 4 and "Managing Documents Through Delegation" in Chapter 5 for information on delegation.


Standard Objects in the Instances Display:
File's Owner, First Responder, and FontManager

   File's Owner

Every nib file has one owner, represented by the File's Owner icon. The owner is an object, external to the nib file, that channels messages between the objects unarchived from the nib file and the other objects in your application.


Not only must the owning object be external to its nib file, it must exist before the nib file is unarchived. This is because the same message to NXApp that loads a nib file (loadNibSection:owner: and its variants) also specifies the file's owner.

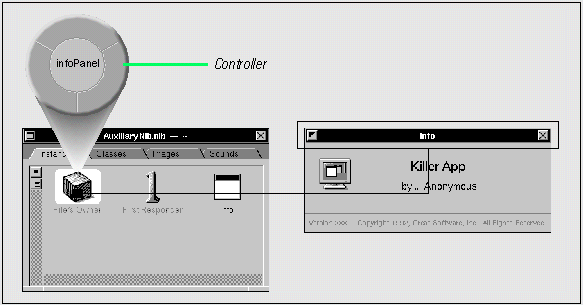
The typical owner of an auxiliary nib file (such as one containing an Info panel) is an instance of the class you assign to File's Owner in Interface Builder. This class is almost always a custom class, and is frequently the class of the object that manages your application. Once you make the assignment, File's Owner serves as a proxy instance of your class, which you can then connect to the interface. (By the way, the typical owner of an application's main nib file is NXApp, the global Application object.)

See Chapter 5, "Working with Multiple Nib Files," for more on the role of File's Owner in the loading of auxiliary nib files and for details on assigning classes to File's Owner.


   First Responder

The First Responder is the object within a window that first receives keyboard events, mouse-moved events, and action messages from Control objects that don't have an explicit target (for example, cut and paste). The FirstResponder object is the active window's focus for future events. Although technically an object, First Responder is really a status conferred on an object.

Usually, when you click an object that accepts key events (such as a text field), that object becomes the window's First Responder. First Responder status also changes when you make another window key in your application. (Because of this, First Responder can be useful when you build multiple-document applications.) Over time, many different objects can become the First Responder, but at any one time only one object has this status. The First Responder icon stands for the object that currently has this status, no matter which actual object it is within your application.

The First Responder figures into the event-handling behavior defined by the Responder class. In a window, objects inheriting from Responder (including View, Application, and Window) are part of a a linked list of event-handling objects called a responder chain. If the First Responder can't respond to an event message, its next responder is given a chance to respond. The next responder is (in this general order) a view's superview, or its window, the application, or the delegates of the window or application. If a Responder object can't handle the message, the message continues to be passed up the chain from object to object in search of a Responder that can. Messages are passed in one direction only: up the view hierarchy toward the window and application.

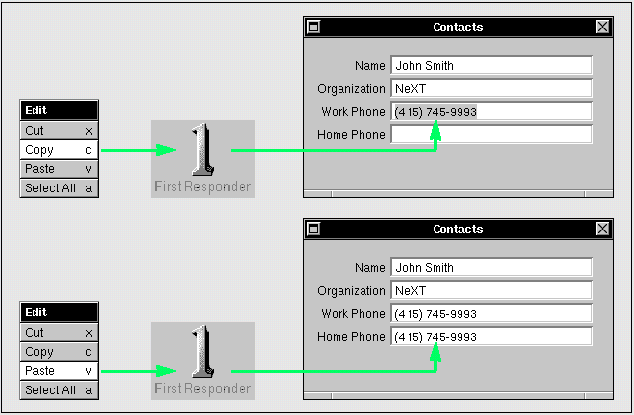
In Interface Builder you can connect a Control object in the interface to the First Responder icon. Thereafter, when the user manipulates this Control (say, by clicking a menu cell entitled Copy) an action message ( copy:) is sent to the object that is currently First Responder. If you examine in Interface Builder the default connections from the Edit menu, you'll discover that its menu cells are all connected to First Responder.


   Font Manager

The FontManager icon represents a shared instance of the FontManager class among the objects of an application. Interface Builder automatically creates and adds this object to your project when you drag the Font menu into your application's menu. The FontManager is the center of activity for font conversion. It accepts messages from font conversion user-interface objects (such as the Font menu or the Font panel) and appropriately converts the current font in the selection by sending a changeFont: message up the responder chain. See the documentation on the FontManager class for more information.


DISCONNECTING OBJECTS


1 Select an object.
2 In the Connections display, select a connection.
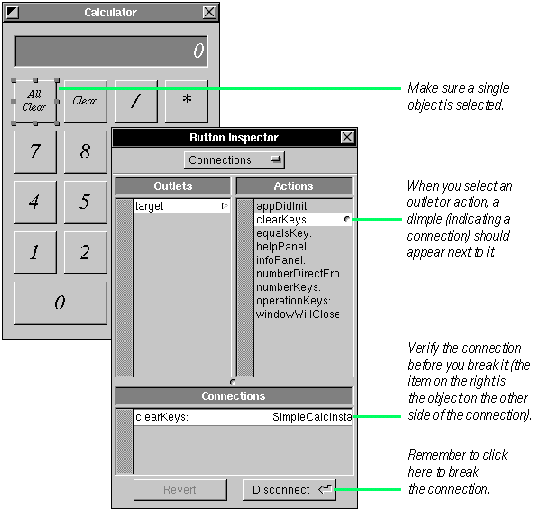
3 Click Disconnect..


Interface Builder gives you two ways to break the connections between objects. The first method uses the Inspector panel.

You can also initiate this procedure by selecting objects in icon mode of the Instances display, and then disconnecting them in the Inspector panel as above.

The alternative method for disconnecting objects is somewhat easier because you can complete the operation in one place: in outline mode of the Instances display. First show connections for an object by clicking a three-dimensional triangle button.

To make the scissors cursor appear over a connection line, you must press the Control key over a line on the right side of the column divider (nearest the connection-out and connection-in triangle buttons). You Control-click on the left side of the column divider to begin connection operations.

See the task earlier in this chapter, "Examining Connections," to learn how to use outline mode to display the connections between objects.


COPYING INTERCONNECTED OBJECTS


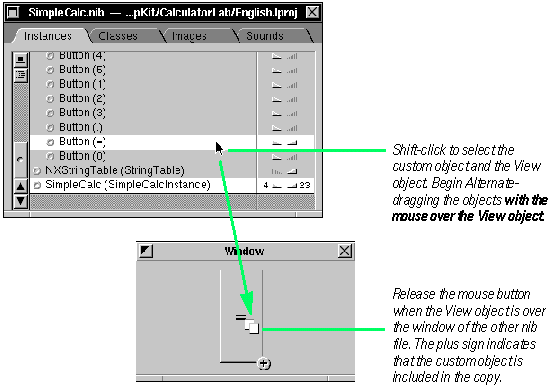
1 Select the objects that are connected.
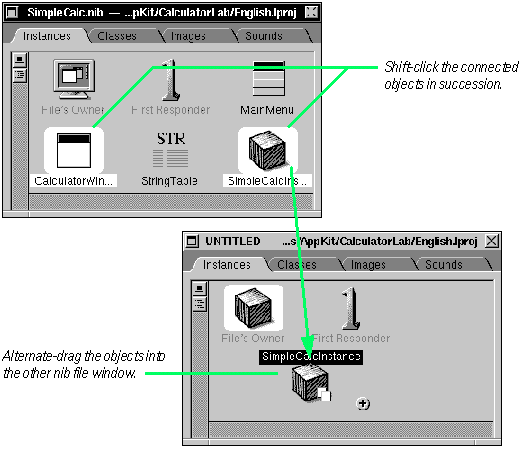
2 Alternate-drag the objects into another nib file window or onto another Window or Panel object.


You can easily copy objects--with their connections-- between nib files. You'll probably use this feature most often to copy a window and its views along with the custom object that manages those views.

Notice the icon representing the copied objects in the example above. Under the mouse is the icon representing the object that is actually dragged. The plus sign indicates that more than one object is involved in the operation. When the copying process completes, the new nib file window holds duplicates of the objects that include their connections to each other.

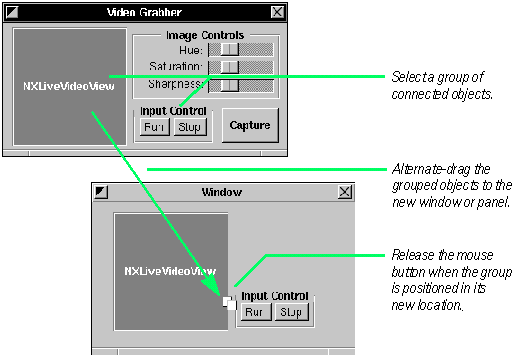
You can use the same basic technique to copy connected objects on an interface. In the next example, an instance of a View subclass is connected to the Run and Stop buttons. You can copy these objects and their connections by Alternate-dragging them onto a window in another nib file.

Another occasion for copying connected interface objects is when you want to make copies of text fields or form fields and preserve the connections between fields.

Tip: If you want to copy interconnected interface objects to another window or panel in the same nib file, select the objects, copy and paste them (using the Copy and Paste commands), and then Alternate-drag the duplicated objects.

From the outline mode of the Instances display, you can copy an individual View object, a custom non-View object, and the connections between the two.


The various scenarios for copying objects and their connections between nib files is quite similar to the procedures for copying objects to dynamic palettes. See Chapter 5, "Using Dynamic Palettes," for more information on this Interface Builder feature.


TESTING THE INTERFACE


1 Choose the Test Interface menu command.
2 Check the functioning of kit objects.
3 Choose Quit from the application menu or double-click the switch icon in the application dock.


After you create an interface, Interface Builder lets you see how it works from
the user's perspective. Just choose the Test Interface command from the Document menu.

Interface Builder's menu, windows, and panels disappear, leaving only the actual interface and (if you are testing the application's main nib file) the main menu. Give your interface a test ride. Here's some of the things you might try:

Verify that the cursor moves from field to field when you press Tab and Return.
Verify that you can copy, cut, and paste text (First Responder actions).
See if you can print (the Print menu item must be connected to an appropriate View object's printPSCode: action method).

Note: When you test your interface, the behavior provided by your custom classes is not called into play (with the exception of static, compiled palette objects). You can only test the behavior that kit and static palette objects exhibit in themselves and when they send messages to each other. To test all components of your application, you must compile and run it.

When you are finished testing the interface, exit from text mode.