Release 3.3 Copyright ©1995 by NeXT Computer, Inc. All Rights Reserved.
|
Changes made for the current release of NeXTstep affect the information presented in this chapter. For details see:
 /NextLibrary/Documentation/NextDev/ReleaseNotes/AppKit.rtf /NextLibrary/Documentation/NextDev/ReleaseNotes/AppKit.rtf
/NextLibrary/Documentation/NextDev/ReleaseNotes/AllocInitAndNew.rtf
/NextLibrary/Documentation/NextDev/ReleaseNotes/Performance.rtf
The simplest way to program an application for the NeXT computer is to take advantage of the facilities built into the three software kits--the Application Kit, Sound Kit, and Music Kit. The Application Kit provides a basic program structure for applications that draw on the screen and respond to events--for almost all NeXT applications, even those that mainly use the other kits. It implements the NeXT user interface and relieves you of many of the more tedious programming tasks common to most applications. When you use the Application Kit, you need to write only the code that makes your program distinct from a generic application.
Through the Application Kit, your program can: |
|
 |
Open and maintain a connection to the Window Server. |
|
|
Place windows on the screen. |
|
|
Draw within the windows. |
|
|
Process keyboard and mouse events. |
|
|
Create buttons, menus, and the other graphical objects defined in the user interface. |
|
|
Display editable text. |
|
|
Print documents and on-screen displays. |
|
|
Write data to and retrieve data from the pasteboard. |
|
|
Manage off-screen bitmaps, including bitmaps for the cursor. |
|
|
Communicate with cooperating applications. |
|
This chapter introduces the Application Kit and the program structure it defines. Chapter 7, "Program Dynamics," follows with a more detailed discussion of drawing and event handling within this structure. The Sound Kit and Music Kit are discussed in Sound, Music, and Signal Processing.
The three software kits provide an integrated object-oriented programming environment. They're coded in Objective-C, an object-oriented extension of the C language; programs that make use of the kits must also be written in Objective-C. However, through Interface Builder, you can develop much of your program graphically, on-screen, without writing any Objective-C code. Interface Builder constructs and initializes the user-interface objects for your application and sets up their connections to the rest of the program.
Chapter 8, "Interface Builder," assumes the program structure that's defined in the Application Kit and described in this and the following chapters. Chapter 9, "User-Interface Objects," has a more detailed discussion of Kit-defined objects that draw and respond to events; these are objects that you can program using Interface Builder. Chapter 10, "Support Objects and Functions," then presents the objects, functions, and macros that support the main functionality of your program.
If you're unfamiliar with object-oriented programming and the terminology and syntax of Objective-C, consult Chapter 3, "Object-Oriented Programming and Objective-C." |
|
Writing a Program with the Application Kit |
|
Every application consists of a network of objects--many defined in the Application Kit, some defined in the application you write. The structure of the network and the kinds of messages that get passed from object to object are the subjects of this and the following chapter.
Class Definitions
The Application Kit consists mainly of class definitions. It defines a separate class for each of the canonical control objects in the NeXT user interface. It also defines classes for panels and menus, for objects that permit users to enter and edit text, for an object that can manage the pasteboard for your application, for bitmaps and cursors, and for an object that oversees the entire application. All these classes, and others, are described in detail in this and the following chapters.
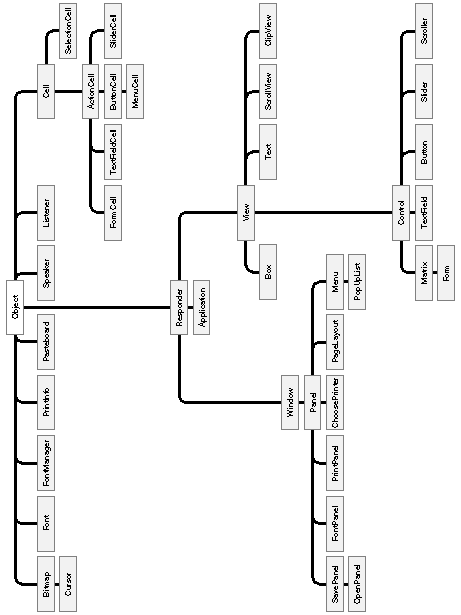
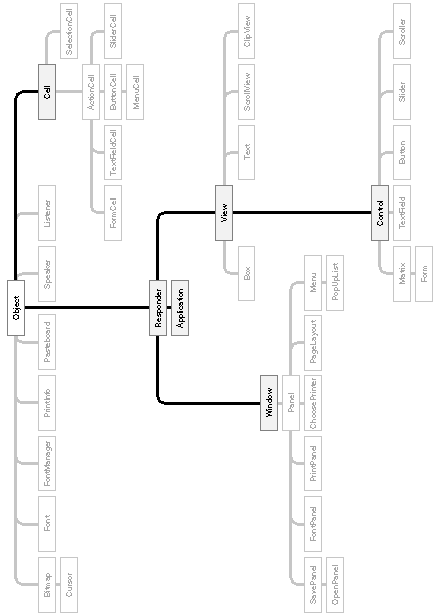
Like all Objective-C classes, the classes defined in the Application Kit are linked, through their superclasses, to an inheritance hierarchy that has the Object class at its root. Figure 6-1 shows the classes in the Application Kit inheritance hierarchy. |
|
 |
|
Figure 6-1. Application Kit Inheritance Hierarchy
This diagram shows, for example, that the Panel class has the Window class as its superclass, that the Window class has the Responder class as its superclass, and that the superclass of Responder is Object.
Each class inherits both instance variables (data structures) and methods (procedures) from all the classes above it in the hierarchy. The Panel class inherits from Window, Responder, and Object. This means that an instance of the Panel class can use not only Panel methods, but also methods defined in the Window, Responder, and Object classes. It also means that every Panel object has all the instance variables declared in the three classes it inherits from, in addition to any that might be declared in the Panel class itself.
Since the methods and instance variables that are defined in a class are inherited by its subclasses, a subclass can be viewed as a variant of the classes above it in the hierarchy. Inheritance makes Panel a kind of Window, and Window a kind of Responder. When we speak of a "Window object," we mean not only objects belonging directly to the Window class, but also any object that belongs to any class that inherits from Window. Panels, OpenPanels, FontPanels, Menus, and PopUpLists are all Windows.
Using Kit-Defined Classes
You can make use of Application Kit classes in four ways: |
|
|
You can create objects (instances) belonging to the classes defined in the Kit. Your application can include Button, Slider, and Menu instances, for example. |
|
|
|
You can define new subclasses of Application Kit classes, then create instances of the subclasses for your application. Through its superclass, each class you define will inherit methods and instance variables from the Kit. The instance variables and methods you add in the subclass definition serve to adapt generic Kit capabilities to the specific needs of your application. |
|
|
|
You can add new methods to a Kit class by putting them in a category definition that extends the original definition of the class. |
|
|
|
You can define your own objects to act on behalf of objects that inherit from the Application Kit. Kit objects handle most of the work themselves, but can delegate responsibility for some of the messages they receive to other objects. |
|
Instances
In many cases, creating an instance of an Application Kit class is all that's needed. Class definitions in the Kit give you a good deal of freedom to adjust an instance to the needs of your application. A Button, for example, can be shaped, titled, associated with a keystroke, and assigned an action of your choosing, simply by initializing its instance variables. (For a Button, you'd usually do this through Interface Builder.)
Subclasses
Since your application will do some things no other application will do, it will probably need to define some objects of its own. In most cases, these objects will be adaptations of objects defined in the Application Kit. For example, the Panel class defines a kind of window that behaves as a panel should according to the user-interface guidelines. If you need a panel with a particular display and a special relationship to the other windows in your application, you can define it as a subclass of Panel.
The main reason for defining subclasses of Kit classes is to design objects that draw and respond to events in ways that are specific to your application. Generally, you'd define subclasses of View.
A View is an object that has an area and a coordinate system for drawing within a window. It can be selected to receive keyboard and mouse events, and can be scrolled and automatically displayed. If you need an object with these features, you'd simply define a subclass of View and implement methods that draw and respond to events as you'd like. You wouldn't have to re-implement the methods that manage the object's coordinate system, display it on the screen, permit it to be scrolled, or select it to receive mouse and keyboard events. The subclass inherits all the methods and instance variables of the View class; you need to implement only the features you want to add or change.
You might also choose to define subclasses of specific kinds of Views. For example, the Button class defines one- and two-state buttons. If you want a button that can display three or more states, you can subclass Button to add the functionality that you need.
Categories
In simple cases, where the only modification you need to make to a Kit-defined class is the addition of some methods, you can add them in a category definition rather than in a new subclass. Categories extend the definition of an existing class to encompass new methods. They're discussed under "Adding to a Class" in Chapter 3.
Delegates
Some Application Kit objects permit other objects to intervene and control some of their actions. Because the Kit object delegates responsibility for its behavior to the controlling object, the controlling object is known as a delegate. A delegate does only as much as you program it to do (in its class definition). One delegate can serve a number of different client objects.
By centralizing application-specific code in the delegate, you can adapt the behavior of Application Kit objects without defining Kit subclasses. The delegate can be a subclass of an Application Kit class, but usually it's just a subclass of the generic Object class.
The section on "<The Extended Framework>," later in this chapter, has more information on delegates and the messages they can receive.
Structuring an Application
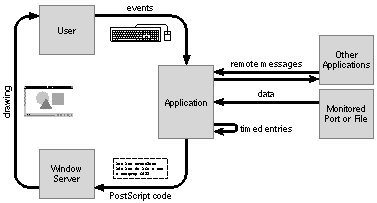
When it's launched, an application creates a set of objects for itself, displays itself on the screen and waits for events from the Window Server. Whenever it receives an event, it initiates a message to the responsible object, then waits for the next event. The object that receives the message will initiate some messages of its own, so several objects are likely to be involved in the application's response to the event.
The response to an event always includes a visible reaction on-screen, if only to let the user know the event was received. Applications draw both to present the user with a display that can prompt for events and to show the results of those events. The user, the application, and the Window Server participate in a continuous cycle of action and response that's illustrated in Figure 6-2 below. |
|
 |
|
Figure 6-2. The Event Cycle
This cycle is driven by the user's actions. From the point of view of an application, it's driven by events. Between events, applications can respond to three other kinds of input: |
|
|
Remote messages, messages received from other applications. For example, an application might receive a message asking it to supply some data in text form to a word processor, or it might get a message from the Workspace Manager requesting it to open another file. Remote messages are handled just like messages initiated within the application itself. |
|
|
|
Timed entries, procedures that are to be called periodically and have been registered with the DPSAddTimedEntry() function. |
|
|
|
Data received at a monitored port or file. For example, an application might monitor changes to a central database (perhaps of messages written to the console). The monitoring procedure is registered using the DPSAddPort() or DPSAddFD() function. |
|
Most everything that an application does is, directly or indirectly, a response to an event, to a remote message (which is itself prompted by an event in another application), to a timed entry (which is usually registered because of an event), or to data received at a monitored port or file (which changes due to user activity elsewhere).
To respond to events and remote messages, every application needs: |
|
|
An Application object, to get events from the Window Server |
|
|
|
Window objects, to provide areas on-screen where the application can draw |
|
|
|
View objects, to draw within the Windows and to handle keyboard and mouse events associated with windows |
|
|
|
A Listener, to receive remote messages, and a Speaker, to send them |
|
The Application Kit creates a default Listener and Speaker for every application. You must create the Application object, Windows, and Views for yourself.
The Application object also oversees the application's Windows, and is usually expected to respond to the remote messages received by the Listener. Windows oversee their Views. All the objects are designed to work together in a coherent program structure.
This brief outline of how an application works is explained and expanded throughout the rest of this chapter.
Responding to Kit-Generated Messages
As it receives events from the Window Server and reacts to the instructions in your program, the Application Kit initiates a variety of messages. Very often, the message is designed to give the objects in your program the opportunity to do their own work in their own way. To take advantage of this opportunity, you need only implement the appropriate method in a class definition.
The chart below lists some of the methods that you might consider implementing. All these methods, and their place in the Application Kit's program structure, are discussed in detail later in this and the next chapter, and in Chapter 9. The chart is an introduction and for quick reference only. |
|
If You Want to: |
Write Your Own Version of: |
|
Respond to events and subevents |
keyDown: |
|
keyUp: |
|
|
flagsChanged: |
|
|
mouseDown: |
|
|
mouseUp: |
|
|
mouseDragged: |
|
|
mouseEntered: |
|
|
mouseExited: |
|
|
mouseMoved: |
|
|
windowMoved: |
|
|
windowExposed: |
|
|
windowResized: |
|
|
applicationDefined: |
|
|
powerOff: |
|
|
|
Determine which events to receive |
acceptsFirstResponder |
|
acceptsFirstMouse |
|
|
|
Reflect change of event-handling status |
becomeActiveApp |
|
resignActiveApp |
|
|
becomeKeyWindow |
|
|
resignKeyWindow |
|
|
becomeMainWindow |
|
|
resignMainWindow |
|
|
becomeFirstResponder |
|
|
resignFirstResponder |
|
|
|
Respond to a keyboard alternative |
performKeyEquivalent: |
|
commandKey: |
|
|
Draw an object on the screen |
drawSelf:: |
|
|
Open a file |
validateFilename
openFile:ok:
appAcceptsAnotherFile
appOpenFile:type: |
|
Archive and unarchive an object |
read: |
|
write: |
|
|
finishUnarchiving |
|
|
awake |
|
|
Change the cursor |
resetCursorRects |
|
|
React when the user logs out |
powerOffIn:andSave:
appPowerOff: |
|
|
Control text displays |
textWillChange:
textDidChange:
textWillEnd:
textDidEnd:endChar:
textWillResize:
textDidResize:oldBounds:invalid:
textWillSetSel:toFont:
textWillConvert:fromFont:toFont:
textWillStartReadingRichText:
textWillReadRichText:stream:atPosition:
textWillFinishReadingRichText:
textDidlRead:paperSize:
textWillWrite:paperSize:
textWillWriteRichText:stream:forRun: |
|
|
|
atPosition:emitDefaultRichText:
text:isEmpty: |
|
|
Control a window |
windowWillClose:
windowWillReturnFieldEditor:toObject:
windowWillMiniaturize:toMiniwindow:
windowDidMiniaturize:
windowDidDeminiaturize:
windowWillResize:toSize:
windowDidResize:
windowDidExpose:
windowDidMove:
windowDidBecomeKey:
windowDidResignKey:
windowDidBecomeMain:
windowDidResignMain:
windowDidUpdate: |
|
|
Manage the application |
appDidHide:
appDidUnhide:
appDidInit:
appDidBecomeActive:
appDidResignActive:
appDidUpdate: |
|
|
Update a menu item |
A method with a name of your own choosing |
|
Respond to user actions on a control |
A method with a name of your own choosing |
|
Although you may write your own versions of these methods, you never send a message to have an object perform them. The message is initiated by the Application Kit as part of its procedures for handling an event, or in reaction to another message your program sends.
There's no penalty for failing to write your own versions of these methods. In a few cases (textWillEnd:, for example), the message won't be sent unless the receiving object has a method that can respond. In other cases (mouseDown: and drawSelf::, for example), the Kit defines a default version of the method that the receiving object can inherit and use.
Note: When defining a class, you're free to override any inherited method. However, most methods do what you need them to do, so there's no reason to override them (just as there's no reason to override functions in the standard C library). The difference between most methods and the methods in the list above is that the listed methods are designed to be overridden; most methods are not. |
|
Principal Application Kit Classes |
|
Application Kit objects are designed to work together. Through them, and through your own subclass adaptations of them, your program assumes a framework for dealing with events, drawing on the screen, and managing user-interface objects.
The inheritance hierarchy of Application Kit classes was presented in Figure 6-1 above. As that illustration shows, most Application Kit classes inherit from the Responder class, and almost all Responders also inherit from Window or View. The basic structure of a complete Application Kit program can be outlined by looking at just these three classes and the other Responder subclass, Application. Although other Kit classes--notably Panel, Menu, Listener, and Speaker--play important roles, the fundamental framework of an application is defined by Responder and its three subclasses.
Two other Kit classes, Control and Cell, make a vital enough contribution to program design to also be considered principal classes. The principal Application Kit classes are highlighted in Figure 6-3 on the next page. |
|
 |
|
Figure 6-3. Principal Application Kit Classes
Responder is an abstract superclass; programs use instances of its subclasses rather than of Responder itself. Objects that inherit from Responder can, as its name implies, respond to events. Those that inherit from View can also draw on the screen. Since the mouse requires a graphical object for the cursor to point to, Views are the principal handlers of mouse events. Since typing must be displayed on-screen, Views also handle keyboard events. Most of the objects in your program will likely be Views of one sort or another.
Control is the abstract superclass for View objects that fit the control-action and target-selection paradigms of the user interface. The main attribute that Control imparts to its subclasses is the ability to translate events into application-specific messages for other objects. Each of the controls described in the user interface--buttons, sliders, text fields, and scrollers--is implemented as a separate Control subclass.
The Cell class defines an object that is very much like a View; it can draw and respond to events. But Cells lack the View superstructure that assigns the object an actual location within a window and permits it to receive events. Cells therefore must serve at the pleasure of Views. A View gets events for its Cells and tells them where and when to draw. Cells are a way of dividing a View into semi-autonomous regions, just as Views divide up the content area of a window. Most Control objects use a Cell to handle their drawing tasks.
Each Window object corresponds to a separate window provided by the Window Server. Every program will have at least one Window object, not only to open an area on the screen for the application to draw in, but also to supervise drawing and event handling among the View objects that are displayed within the window. Each Window typically has a number of Views arranged hierarchically inside it. Window's subclass, Panel, defines an object that can fill the role of a panel in the user interface. Panel's main subclass, Menu, defines objects that serve as menus.
Every program must also include one, and only one, Application object to act as its contact with the Window Server. The Application object supervises the entire program, receiving events from the Server and dispatching them to the appropriate Window objects. It manages the Windows in the application much as each Window object manages its Views.
The following sections amplify on this brief overview of these basic Application Kit classes. Other classes are described later in the chapter and in Chapters 9 and 10 as the Kit is examined in more detail. In addition, the NeXTstep Reference manuals describe every public method and instance variable that's defined in all the classes.
Responder
Responder is the abstract superclass that most other Application Kit classes inherit from. Those that don't inherit from Responder principally act as support for those that do. The objects that inherit from Responder respond to events; they receive the messages that are initiated by the user's actions on the keyboard and mouse.
Responders participate in a linked list of event-handling objects called a responder chain. If an object in the chain can't handle a message that's sent to it, the message is passed on to its next responder. If the next responder can't handle it either, the message continues to be passed up the chain from object to object in search of a Responder that can. This allows event handling to be consolidated in an object that collects messages originally intended for other Responders. The chain is unidirectional; messages are passed in one direction only.
The Responder class defines the elements essential to the responder chain, a nextResponder instance variable and the methods for passing messages from one object to another.
Only two types of message are passed along the chain. Both types are generated in direct response to the user's actions. They are: |
|
|
Messages that announce an event, such as messages to perform a keyDown: or mouseExited: method. This type of message is discussed under "Event Messages" in the "Event Handling" section of the next chapter. |
|
|
|
Messages that announce a user action on a Control object, such as a Button or a Slider. These messages are discussed under "Action Messages" in the "Event Handling" section of the next chapter. |
|
Although Responder's contribution to event handling is crucial, it's also quite small. Its subclasses--especially Application, View, Window, and Control--add much more specific event-handling capabilities.
View
The View class provides a structure for drawing on the screen and for handling mouse and keyboard events. All the graphical objects defined in the NeXT user interface inherit from View. Views draw scrollers and buttons, display text, and even draw the borders and title bars of windows. The graphical objects you design must also be Views.
The drawing a View object places on the screen can be thought of as a visual representation of the object itself. In many cases, View subclasses are named for the objects they draw. A Button, for example, draws an image of a button that the cursor can point to and the user can click or press. We speak both of the Button object "drawing" and of it "being drawn" on the screen. In a sense, it draws itself.
Although all View objects are also Responders, you can define a View that draws but doesn't respond to events. Any events it happens to receive will be passed to another object through the responder chain.
The View Hierarchy
Every View object is associated with the particular window where it's displayed. All the Views within a window are linked together in a view hierarchy. Each View has another View as its superview and may be the superview for any number of subviews.
The view hierarchy benefits drawing in two ways: |
|
|
It permits a View object to be constructed out of other Views. For example, a graphical keypad might be a View with separate subviews for each key. A spreadsheet could use a different View for each data field. |
|
|
|
It also permits each View object to have its own coordinate system for drawing. Views are positioned within the coordinates of their superviews, so when a View object is moved or its coordinate system is transformed, all its subviews are moved and transformed with it. Since a View draws within its own coordinate system, its drawing instructions can remain constant no matter where it or its superview moves on the screen. |
|
The view hierarchy is not the same as the inheritance hierarchy. The inheritance hierarchy is an arrangement of classes; the view hierarchy is an arrangement of objects. They don't parallel each other. You could create an instance of the Box class that had another instance of Box as its superview, for example, and several ScrollViews and Controls as subviews.
The inheritance hierarchy is fixed at compile time. The view hierarchy is dynamic; it can be rearranged as the program runs. A View can be moved from window to window and be installed as a subview first of one superview then of another.
Three instance variables locate a View object within its view hierarchy: |
|
window |
The Window object where the View will appear |
|
|
superview |
The object that's immediately above the View in the hierarchy |
|
|
subviews |
A list of all the objects that are immediately below the View in the hierarchy |
|
A View's superview and all the Views above the superview in the view hierarchy are sometimes referred to as the View's ancestors. A View's subviews and all the Views below its subviews are known as its descendants.
The Frame Rectangle
The location and dimensions of a View object are provided by the instance variable frame. frame is an NXRect, a structure that defines the essential features of a rectangle, its coordinates and size: |
typedef float NXCoord;
typedef struct _NXPoint {
NXCoord x, y;
} NXPoint;
typedef struct _NXSize {
NXCoord width, height;
} NXSize;
typedef struct _NXRect {
NXPoint origin;
NXSize size;
} NXRect;
|
This structure was discussed in Chapter 4, "Drawing."
The width and height variables specify the dimensions of the rectangle within the superview's coordinate system; they cannot be negative. The x and y variables locate one corner of the rectangle, also within the superview's coordinates. The width and height are measured from this corner along the positive x- and y-axes, so the corner is the one with the smallest x and y values in the superview's coordinate system.
If the superview's coordinate system has the positive x-axis extending rightward and the positive y-axis extending upward in the usual manner, the x and y variables specify the lower left corner. If the superview's coordinates have been rotated or flipped, the corner may not be at the lower left visually.
NXCoord, NXPoint, and NXSize are defined in the NeXT header file dpsclient/event.h. The NXRect structure itself is defined in appkit/graphics.h; it's used throughout the Application Kit to specify the size and location of rectangles.
A View object doesn't have to draw a rectangle--it could be a circle, for example, a stick figure, or a line of text--but it draws only inside the area specified by its frame instance variable. This area is the View's frame rectangle. A default clipping path is constructed around the edge of the rectangle before the object is displayed. You can specify a more restricted clipping path for the View, but you can't extend it to include any area falling outside its frame rectangle.
The frame rectangle, therefore, defines the boundaries of the View, the tablet on which it can draw. A View object can be thought of as simply a rectangular opening into the window. frame specifies the location and dimensions of this opening.
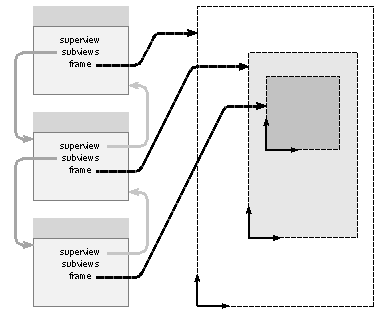
Figure 6-4 shows the frame rectangles of three hierarchically arranged Views. |
|
 |
|
Figure 6-4. Frame Rectangles in the View Hierarchy
Each subview in Figure 6-4 has a frame rectangle that lies totally within the frame rectangle of its superview. This generally is the case. A View's frame rectangle can be larger than its superview's or extend outside it, but only drawing that's within the View's frame rectangle and within the frame rectangles of all its ancestor Views will be visible on-screen.
Figure 6-5 shows three Views similar to those illustrated in Figure 6-4. In Figure 6-5, however, the middle View lies partially outside its superview's frame rectangle. Although the lowest View lies entirely inside its superview, it also lies partially outside an ancestor View, so only the colored portion of it will be visible. |
|
 |
|
Figure 6-5. Displaced Frame Rectangles
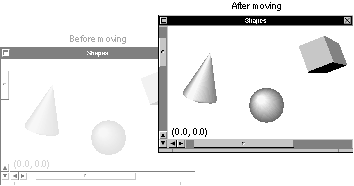
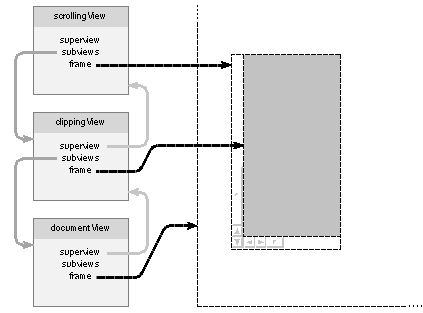
Sometimes, a View contains more material than there's room within a window to display--a View containing the contents of a long document, for example. Such a View can be made the subview of another, much smaller View so that only part of it is visible. With the aid of scrollers, the user can control the larger View's placement within its superview. As the subview moves, different portions of it are scrolled into view. This is illustrated in Figure 6-6. The top View in this illustration would be an instance of the ScrollView class; the middle View would be a ClipView. The largest View, but the one at the bottom of the hierarchy, could be any type of View that you want the user to be able to scroll. |
|
 |
|
Figure 6-6. Scrolling a View
The frame rectangle is first set by an argument to the class method that creates the View. It can then be modified by methods defined in the View class. These methods are described under "Drawing in the View Hierarchy" in the next chapter.
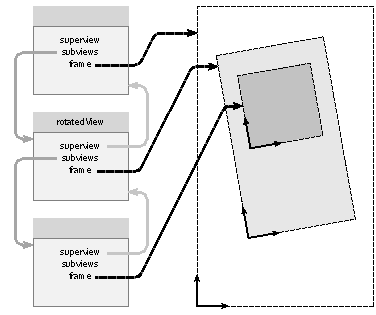
The entire View--that is, the entire frame rectangle--can be rotated around its origin. Rotation doesn't affect the shape of the View; it remains a rectangle even though it has been turned and the sides of its frame are no longer parallel to its superview's x- and y-axes.
Rotation also doesn't affect the values of the frame instance variable; the size of the rectangle remains the same and the corner specified by frame.origin stays at the same point no matter what the orientation of the rectangle's sides.
Figure 6-7 illustrates the same three Views that were shown in Figure 6-4, above. Here, however, the View in the center of the hierarchy has been rotated. Note that its subview rotates with it. |
|
 |
|
Figure 6-7. View Frame Rotation
Although rotating a frame rectangle is possible, it's not encouraged. It's usually better to rotate the drawing within a View, but to leave the View itself aligned with the screen coordinate system.
Drawing Coordinates
Each View has its own coordinate system for drawing. Before a View draws, its coordinate system is made the current coordinate system for the application.
As a default, a View's coordinate system is the same as its superview's, except that: |
|
|
The point recorded in a View's frame instance variable becomes the origin (0.0, 0.0) of its drawing coordinates. |
|
|
|
If a View is rotated, its coordinate system is rotated with it; the x- and y-axes stay parallel to the sides of the View's frame rectangle. |
|
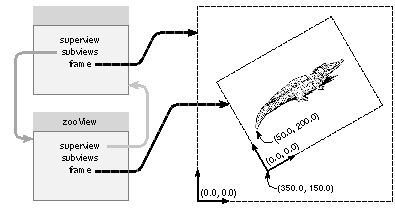
Figure 6-8 illustrates the relationship between a View's default coordinate system and its superview's coordinates. The zooView object in this figure is located at (350.0, 150.0) in its superview's coordinate system. For the drawing that zooView does, this same point is treated as the coordinate origin (0.0, 0.0). In Figure 6-8, zooView begins the tip of the crocodile's tail at (50.0, 200.0) as measured from this origin. |
|
 |
|
Figure 6-8. Default Coordinates
In Figure 6-8, zooView's frame was rotated about 36 counterclockwise. The default x- and y-axes rotate with the frame, so the picture that zooView draws is aligned with the sides of the frame rectangle. The rotation doesn't affect the values in zooView's frame instance variable or change the origin of its drawing coordinates.
Note: Frame rotation is shown here only to make the example complete. In practice, although you might rotate the coordinate system temporarily as you draw, you'd rarely want to rotate the entire frame rectangle.
A View can also adopt a different coordinate system by modifying the system it gets by default. Modifications are made with methods that parallel the standard PostScript transformations: |
|
|
The coordinate origin can be translated to a point other than frame.origin. |
|
|
|
The size of a unit along either the x- or y-axis can be scaled to a dimension other than the one used by the superview. |
|
|
|
The coordinate axes can be rotated around the origin so that they're no longer aligned with the sides of the frame rectangle. |
|
These modifications alter the reference coordinate system that the View uses for drawing, and may affect the appearance of what's drawn, but they don't change the area where the drawing appears--that is, they don't affect the View's frame rectangle.
Besides the default coordinate system and transformations of it, a View can opt for either of two alternative coordinate systems: |
|
|
It can keep its superview's coordinate system. |
|
|
|
It can flip its coordinate system so that the origin is in the upper left corner and the positive y-axis extends downward. Flipped coordinates are especially useful for Views that draw text in the normal manner for English (starting at the upper left of the page and proceeding to the lower right). |
|
"Drawing in the View Hierarchy," in the next chapter, has more detailed information on these options, the methods that can be used to transform the default coordinate system for drawing, and other aspects of View coordinates and displays.
The Bounds Rectangle
The frame instance variable locates and sizes a View within its superview's coordinate system, but is of little use when the View comes to draw within its own coordinate system. To draw efficiently, a View often needs to know where it's located and how large it is within its own coordinates; that is, it needs to have its frame rectangle translated into its own coordinate system. The bounds instance variable provides this information.
A View's bounds rectangle is guaranteed to be the smallest rectangle that completely encloses the View and is expressed in the View's own drawing coordinates. It will usually specify exactly the same area on-screen as the frame rectangle, though stated in a different coordinate system. If a View uses the default coordinate system, bounds will be identical to frame, except that bounds.origin will be (0.0, 0.0).
Views typically use the bounds rectangle to ensure that they don't uselessly attempt to draw images that will never be rendered on the screen. By checking whether the images they wish to draw lie within their bounds, they can avoid sending the Window Server drawing instructions for images that lie outside the View and will consequently be clipped.
Although programs read the bounds instance variable, they never set it. bounds is automatically updated by methods that change the frame rectangle and by methods that alter the View's coordinate system. These methods are described under "Drawing in the View Hierarchy" in the next chapter.
The Visible Rectangle
The drawing that a View does is clipped not only to its own frame rectangle, but also to every ancestor View above it in the view hierarchy. Therefore, the bounds rectangle by itself is a reliable guide only for Views that aren't scrolled and stay entirely within the frame rectangles of all their ancestors. For Views that fail this test, the View class provides a more reliable indicator of where to draw than bounds alone--the visible rectangle.
The visible rectangle is the smallest rectangle guaranteed to cover the visible portion of a View's frame rectangle, but stated--like the bounds rectangle--in the View's own reference coordinate system. If a View lies completely inside all its ancestors, the visible rectangle will be identical to the bounds rectangle. If not, the visible rectangle will cover only a part of the bounds rectangle.
Visibility is reckoned only in terms of the view hierarchy; a View may be "visible" even if it's in an off-screen window, or in an on-screen window obscured by other windows.
In Figure 6-5, "Displaced Frame Rectangles," above, the visible rectangles for the two smaller Views are shaded. In Figure 6-6, "Scrolling a View," the visible rectangle for the documentView is the portion of it that shows through the clippingView.
Views don't cache the visible rectangle; it's calculated when needed from the bounds rectangles of the View and from the frame rectangles of all the Views above it in the view hierarchy.
Displaying a View
Like Responder, View acts mainly as an abstract superclass; you'd generally create instances of its subclasses, not of the View class itself. You certainly wouldn't create an instance of View for an object you'd want to see displayed; the View class provides the general mechanism, methods, and instance variables for displaying an object on the screen, but its instances lack methods that can actually do the drawing.
To the general structure provided by View, a subclass must add a drawSelf:: method with specific drawing instructions in the PostScript language. When a View object receives a display message like this, |
[aView display];
|
it's brought into focus--its coordinate system is made the application's current coordinate system--and it receives a message to perform its drawSelf:: method. The display method repeats these steps recursively for each of the View's subviews, so all the Views below aView in the view hierarchy are displayed. Views always draw in their own coordinate systems, and subviews are always displayed after (that is, on top of) their superviews.
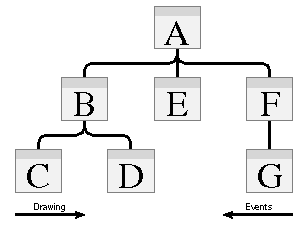
Figure 6-9 below shows the order in which Views draw. When View A receives a display message, it draws itself and passes the message on to its subviews, B, E, and F. View B is the first of the three to draw, and its subviews, C and D, draw after it and before E. Each branch of the view hierarchy completes drawing before the next branch begins. In this diagram, Views draw in alphabetical order. |
|
 |
|
Figure 6-9. A View Hierarchy
See "Drawing in the View Hierarchy," in the next chapter, for more information on the mechanism for displaying Views.
Associating Events with Views
Users choose a View on-screen by pointing to it (positioning the cursor over its frame rectangle) and pressing the mouse button. This action results in a mouse-down event that records the window where the cursor is located and the cursor's coordinates. The Application Kit uses this information to find the View and ask it to respond to the event (and to any mouse-dragged and mouse-up events that follow the mouse-down).
Mouse events are associated with Views by working down the view hierarchy, and from the last subview to draw to the first. If, for example, the user presses the mouse button while the cursor is inside View A of the hierarchy shown in Figure 6-9 above, the Application Kit would check to see whether it's also inside one of A's subviews, beginning with subview F. If the cursor isn't inside F, the Kit checks subview E, then B. If it is inside F, the Kit checks F's subview, G. The result is that the last View to draw, the one on top, is the first to get a chance to respond to the mouse-down event.
Keyboard events are associated with a View in the key window that the user selects with a mouse-down event. If the selected View can display user-editable text or graphics, it becomes the Window's first responder. The first responder is given the first opportunity to handle keyboard events and menu commands like Copy, Paste, and Select All that participate in the target-selection paradigm. Every Window can have a first responder, but only the key window's first responder gets keyboard events.
View Subclasses
The objects defined by View subclasses fall into three major groups: |
|
|
Views that display data and enable the user to change and manipulate it. The Text object is such a View; it displays user-editable text. |
|
|
|
Views that capture instructions from the user and pass them on to other objects. The subclasses of Control--Button, Slider, Scroller, TextField, Matrix, and Form--define such objects. |
|
|
|
Views that are used in conjunction with other Views, either to enhance or to regulate the display. A Box frames the drawing done by other Views. The frame rectangle of a ClipView defines the area in which a larger subview can be displayed and scrolled; ScrollView adds scrollers to control the display within a ClipView. |
|
Views that belong to the first group are the ultimate consumers of user events; they display the results of the user's actions.
Views that belong to the second group act as intermediaries for actions that ultimately are intended to affect other objects. Because of their importance to program structure, these Views are discussed in a little more detail in the section on the Control class below.
Control
Responder and its immediate subclasses (View, Window, and Application) define the principal event-handling structure for an application. But events alone don't give an application much information about the user's intentions. Because events are closely tied to the computer hardware (keyboard and mouse), there can be but a handful of different event types. Applications therefore need to provide software objects that users can manipulate to give more precise instructions to the application. The Control class is an abstract superclass for objects that play this role. Controls are Views that receive mouse and keyboard events and translate them into application-specific messages for other objects.
A Control's job is to interpret the user's mouse and keyboard actions and ask another object to respond to them. Graphically, Controls provide the user with a display that can be manipulated with the mouse and keyboard--a button that can be pressed, a slider with a knob that can be dragged, or a text field where data can be entered. Functionally, they convert the mouse and keyboard events they receive into action messages for other objects. The object that receives an action message from a Control is its target.
Both the action message and the target can be set by the application, so it's possible to adapt instances of a single Control subclass to many uses. One Button might translate the mouse events it receives into a start: message; another Button might translate its mouse events into repeat: or stop: messages. There's a limited set of events, but a virtually unlimited number of control actions.
Since a Menu makes use of a Control object (a Matrix) to contain its list of commands, the message the Menu sends when the user chooses a command is also an action message. Each command has its own action message and can have its own target.
Action messages take a single argument, the id of the Control that sends the message. If a target needs more information to accurately respond to an action message, it can send a message back to the Control requesting the information it needs. For example, if a target receives a changeFilename: message from a TextField, it can send a stringValue message back to the TextField to find the file name the user typed in.
It's your application's responsibility not only to set each Control's target and action message, but also to make sure that the targets can respond. In some cases, objects defined in the Kit can be made the target of a Control. The Text object, for example, can respond to copy:, paste:, and selectAll: messages, among others. In most cases, however, you'll need to define the target object and implement the methods that will respond to the action messages it receives.
In either case, the Controls themselves can be taken directly from the Kit. The Kit defines six off-the-shelf Control objects that you can use without subclassing--Button, Slider, TextField, Scroller, Matrix, and Form. You can, of course, also define your own Control subclasses.
Action messages should be viewed as application-specific extensions of events. The role of action messages in event handling is discussed under "Action Messages" in the next chapter.
Cell
A Cell is an object that can draw within a View and handle events that are passed to it from the View. Whereas a View receives display messages and events that are distributed down the view hierarchy, a Cell draws and receives events from a View.
A View can record its internal characteristics--what it looks like, how it should respond to the user's action, and so on--in one or more Cell objects. The View itself keeps track of its external characteristics--its size and where it's located in the view hierarchy, for example--as well as of any properties that need to be coordinated among Cells.
Cells are neither Responders nor Views, so they don't initiate drawing or event handling. They may know how to display and highlight a View, or a portion of a View, but can act only on the View's initiative. They may know how to respond to mouse events, but they must get the initial mouse-down event from a View.
Text and Icons
As defined in the Application Kit, instances of the Cell class know how to do two simple drawing tasks: |
|
|
Draw a short segment of text within a prescribed rectangle, and |
|
|
Draw a bitmap image, an icon, at a specified location. |
|
If a View needs a text label, it can let a Cell draw it. If it needs the application icon displayed within a panel, a Cell is an efficient way to render it. To set a Cell instance to display an icon, you pass it the name of a Bitmap object. To have the Cell display text, you assign it a character string.
For more elaborate drawing tasks, you may need to define View-specific Cell subclasses. Instead of placing drawing code in a View method, drawSelf::, it's isolated in the Cell's drawSelf:inView: and drawInside:inView: methods. In addition to drawing methods, you can endow a Cell subclass with View-specific event-handling methods.
ActionCells
In the Application Kit, most Controls are built around Cells in just this way. A Cell subclass, ActionCell, has instance variables and methods designed specifically for the Control task of translating user events into action messages. For example, the ActionCell class, rather than Control, declares instance variables to record the selector that will be used in an action message and the target object of the message. An ActionCell simply provides that information to its Control when asked; the Control dispatches the action message in response to the events it receives.
There's an ActionCell subclass corresponding to most of the basic Control types, as shown in the chart below: |
|
Control Subclass |
ActionCell Subclass |
|
Button |
ButtonCell |
|
Form |
FormCell |
|
Slider |
SliderCell |
|
TextField |
TextFieldCell |
|
Some Controls display a single Cell--a Button contains one ButtonCell, a Slider one SliderCell, and a TextField one TextFieldCell.
Other Controls display and manage a group of Cells. A Form can display any number of FormCells. A Matrix can be filled with ButtonCells, SliderCells, TextFieldCells, or any other type of Cell. A Matrix of ButtonCells is, in effect, a coordinated set of buttons, each with its own target and action. A Matrix loaded with MenuCells is used to implement Menus.
Window
Each window in an application is managed by its own Window object. Conversely, every Window object corresponds to a separate window maintained by the Window Server. When you create an instance of the Window class (or of any Window subclass), the Window Server produces the window the instance will manage. The window is identified by a window number, the Window by its object id.
To conserve memory and reduce startup time, you can delay creating a window for a Window object until it's placed on-screen; you can also arrange to destroy the window when it's removed from the screen. So it's possible for a Window object to be temporarily without a window. Nevertheless, for the object to fulfill its function, it must at some time be associated with an on-screen or off-screen window.
Note: Throughout this manual, Window objects are referred to with an uppercase "W", and windows created by the Window Server are referred to with a lowercase "w". The distinction should be clear: A window can be on-screen or off-screen, images appear in it, it's affected by PostScript operators like windowdeviceround, and so on. A Window has instance variables, it organizes a group of Views, handles events received from the Window Server, and so on. However, since applications affect a window by sending messages to a Window object, uppercase "Window" often covers both the object and the window it manages.
Frame and Content Rectangles
A Window is defined by either of two rectangles, a frame rectangle that surrounds the entire window area, including its border, title bar, and resize bar, or a content rectangle that encloses just the window's content area. Both rectangles are specified in the screen coordinate system.
The content rectangle is typically used when creating a new Window, and sometimes when resizing it. Values from the frame rectangle are used when relocating a Window.
Like a View, a Window keeps track of its frame rectangle with a frame instance variable. But a Window's frame rectangle differs from a View's in some important ways: |
|
|
Methods can't change the location or size of a Window simply by altering its frame rectangle. To move or resize a window, you must send instructions to the Window Server. Use the methods described under "Managing Windows" later in this chapter. |
|
|
|
Users can move and resize windows without the application's intervention. The application is informed of these user actions through messages that they generate. See "Event Messages" in the next chapter for more on these messages. |
|
|
|
Windows can't be rotated. The sides of their frame rectangles remain aligned with the x- and y-axes of the screen coordinate system. |
|
|
|
Windows don't draw, so they don't need a bounds rectangle or a special coordinate system for drawing. |
|
Managing the View Hierarchy
In addition to managing one of the Window Server's windows, a Window object manages a hierarchy of Views. It has an important part to play both in distributing events among the objects in its view hierarchy and in regulating coordinate transformations among the Views.
Frame and Content Views
Every Window has a view hierarchy with at least two Views: a frame view and a content view.
The frame view fills the frame rectangle and draws the Window's border, title bar, and resize bar. It's at the root of the Window's view hierarchy; its superview is nil. A Window has a frame view even if it has no border or title bar.
The frame view is a private object created by the Window. Applications should refrain from altering it, changing its position in the view hierarchy, or assigning it subviews. Your application won't draw in the border or title bar, and has no need to handle mouse events outside the content area. For all practical purposes, you can consider the frame view to be above the view hierarchy rather than in it.
The content view is the frame view's only public subview. It fills the entire area of the content rectangle (the area enclosed by the border, title bar, and resize bar). Every Window creates a default content view for itself. It's not a private object; you can replace it with your own View. The Window records its content view in an instance variable, contentView. A method of the same name returns the content view's id: |
id curView;
curView = [myWindow contentView];
|
Although the content view has a superview, your application should treat it as if it were at the root of the view hierarchy. For an application, it serves as the principal link connecting the view hierarchy to the Window. To put a View in a Window, install it as a subview of the content view (or as a subview of a View that's already been installed). You can also replace the default content view with your own.
Coordinate Systems
When a Window is created (or awakened after being unarchived), a Display PostScript graphic state object is created for it. Applications identify the graphics state by a user object, a unique integer: |
int myGState;
myGState = [myWindow gState];
|
The graphics state object has two important properties for Views that draw within the Window: |
|
|
It identifies the window as the output "device" where their drawing will be rendered. |
|
|
It records the window's base coordinate system. |
|
The base coordinate system is the reference point for defining the individual coordinate systems of the Window's Views. The frame view draws the Window's border, title bar, and resize bar directly in the base coordinate system. Unless the other Views are assigned graphic state objects of their own, they draw in coordinate systems that are transformations of the base coordinate system.
The value returned by gState can be used as an argument to functions like PScomposite() and PSdissolve(), but you generally don't need to refer to it. The Application Kit takes care of setting the correct graphics state.
Events
Every Window object keeps an event mask that determines which events the Window Server can associate with the window it manages. Keyboard and mouse events associated with a window are first sent to the Window object. The Window then distributes them to its Views.
The View that the user selects to receive keyboard events is known as the first responder. Each Window maintains a firstResponder instance variable for the object that should handle the next keyboard event it receives. It constantly updates the instance variable in response to the user's actions with the mouse; whenever it gets a mouse-down event, it finds the subview where the cursor is located, sends it the event, and tries to make it the firstResponder for subsequent events. (See "The First Responder" under "Event Handling" in the next chapter for more information.)
A Window object handles kit-defined subevents--like window-moved and window-exposed--itself; it doesn't distribute them to its Views.
Window Subclasses
Window has a single subclass, Panel. But the Panel class has several subclasses. Most, such as PrintPanel, FontPanel, and SavePanel, define specific panels that are common to many applications. One is a generic Menu class for all the menus of an application.
Panels are Windows with a special purpose: They hold Views that control other objects associated with other windows of the application. The Views in a Panel are typically Controls of one sort or another; you can think of a Panel as simply a Window container for a cluster of Controls. A Menu has just one Control, a Matrix of MenuCells.
The Panel class gives objects that inherit from it the behavior expected of panels in the user interface: |
|
|
A Panel can't become the main window, though by default it can become the key window. |
|
|
|
In general, the only Panels that are visible on-screen are the ones that belong to the application the user is currently working in. By default, the Application Kit hides Panels whenever an application deactivates, unless the Panel is an attention panel. |
|
|
|
When a Panel is closed, it's removed from the screen list but isn't destroyed. |
|
|
|
A Panel passes Command key-down events to the objects in its view hierarchy so that those with keyboard alternatives can respond. See "Keyboard Alternatives" in the next chapter for details. |
|
A Menu is a Panel that displays a single list of commands for the user to choose from. It adds three main features to those defined in the Panel class: |
|
|
A Menu can never become the key window (though it can still respond to keyboard alternatives). |
|
|
|
Menus are assigned a tier in the screen list that keeps them in front of all other windows (except attention panels and lists). |
|
|
|
Menus participate in a system of submenus. Any Menu can be made a submenu of another Menu simply by assigning it to a command in the other Menu. |
|
Menu has one subclass, PopUpList, whose instances serve as either pop-up or pull-down lists.
The user's actions on the Controls in a Panel or Menu generate messages for other objects. These messages are discussed under "Action Messages" in the "Event Handling" section of the next chapter.
Application
Every program must have an Application object to supervise its connection to the Window Server, keep track of its Windows, and get its events. It should be the first object created in your program, before any Windows or Views. As one of its first acts, a new Application object connects the application to the Window Server and initializes its run-time environment.
The Application object you create for your program is assigned to a global variable, NXApp. This makes it well-known to the other objects in the application so they can send it messages and avail themselves of its services.
The Application object has four main tasks: |
|
|
It receives events from the Window Server and distributes them to other objects. |
|
|
It manages all the application's Windows. |
|
|
It serves as the default delegate for the application's Listener. |
|
|
It keeps global information that's shared by other objects. |
|
The Application object (or its delegate) can also hold application-specific code that defines at least part of what the application is about.
Receiving Events
Soon after an application is launched, NXApp begins getting events from the Window Server and dispatching them to other objects for action. It continues to get events and dispatch them until the application terminates. NXApp is the only Kit object with the ability to receive events from the Server, and the only one with an overview of the whole application.
The section on "Event Handling" in the next chapter has a complete discussion of the Application object's role in responding to events.
Window Management
The Application object keeps an instance variable, windowList, which holds the ids of all the Windows associated with the application. The window list lets NXApp: |
|
|
Distribute events to the proper Windows. |
|
|
|
Distribute Command key-down events to all on-screen and off-screen Windows (including Menus and Panels) that might have Controls with keyboard alternatives. |
|
|
|
Make sure that drawing appears in the right window. |
|
|
|
Hide and unhide all the application's windows. |
|
|
|
Send messages that update Window displays. |
|
|
|
Find most of the objects in the application, through each Window's view hierarchy and the instance variables of the Views. |
|
Window management tasks are shared by Window objects and NXApp. The methods defined in both classes are discussed together in a later section of this chapter, "Managing Windows."
Listener's Delegate
Each application has a Speaker object to send remote messages to other applications and a Listener to receive them. A certain number of the remote messages an application receives come from the Workspace Manager: |
|
|
When the user chooses a file in a directory window, the Workspace Manager may send the responsible application an openFile:ok: messages to have it open the file. |
|
|
|
When the user turns the power off or logs out, the Workspace Manager broadcasts the news by sending a powerOffIn:andSave: message to every running application. |
|
|
|
When the user double-clicks a freestanding or docked icon, the application receives an unhide message. |
|
|
|
When the user unmounts a disk, applications are informed with an unmounting:ok: message. |
|
When the Listener receives these messages from the Workspace Manager, it passes them on to its delegate, which is by default the Application object. The Application object has methods to respond to each of the messages listed above. However, in some cases--such as opening files--it requires help from methods that you need to implement.
Global Services
Because of its central position in a program, the Application object is able to provide other objects with a variety of services. Among other things, NXApp can: |
|
|
Activate the application. |
|
|
Get events for other objects. |
|
|
Terminate the application process. |
|
A principal service is to maintain global information for the application and return it when asked: |
|
|
NXApp can say whether the application is the current active application, and whether it's currently hidden: |
BOOL activeStatus, offScreen;
activeStatus = [NXApp isActive];
offScreen = [NXApp isHidden];
|
|
It can supply information about the application's PostScript execution context: |
DPSContext myContext;
myContext = [NXApp context];
|
|
It can return the port where other applications can send it messages: |
port_t socket;
socket = [NXApp replyPort];
|
|
NXApp can identify the Window that holds the freestanding or docked icon that the Workspace Manager created for the application: |
myIconWindow = [NXApp appIcon];
|
Your application can draw in this Window, but the Workspace Manager owns it. |
|
|
It provides the application with a Pasteboard object that it can use to support cut, copy, and paste operations: |
myPasteboard = [NXApp pasteboard];
|
|
NXApp registers and returns the application's main menu: |
[NXApp setMainMenu:theMenu];
myMenu = [NXApp mainMenu];
|
|
It can also register and return global Listener and Speaker objects for the application: |
[NXApp setAppListener:theListener];
[NXApp setAppSpeaker:theSpeaker];
myListener = [NXApp appListener];
mySpeaker = [NXApp appSpeaker];
|
The Listener and Speaker enable an application to communicate with the Workspace Manager and other applications. |
|
Other services of the Application object are described in later sections of this chapter and in the specification sheet for the Application class in NeXTstep Reference, Volume 1.
Application-Specific Code
Because of its central role in an application, NXApp may seem like a good place to put code that's central to your application. You can do this by defining an Application subclass and adding the instance variables and methods you need. An example is shown below. |
@interface MyApplication : Application
{
id actor;
}
- setActor:anObject;
- actor;
@end
@implementation MyApplication
- setActor:anObject
{
actor = anObject;
return(self);
}
- actor
{
return(actor);
}
@end
|
This subclass definition does very little. It simply adds the instance variable actor and provides the methods actor and setActor: so that other objects can read and change its value. In all other respects, an instance of the MyApplication class is identical to an instance of the Application class.
Instead of defining an Application subclass, you can centralize your code in another object and make it the Application object's delegate: |
id myObject;
myObject = [MyClass new];
[NXApp setDelegate:myObject];
|
The delegate will act on behalf of NXApp.
Either way, there are good reasons for putting application-specific code in the Application object (or its delegate). Some of them are listed below.
Overseeing Other Objects
The Application object oversees the application's Windows. And, as the last few items listed in the section on "Global Services" above illustrate, it maintains program globals for a number of other objects.
As you add objects to your application and program its algorithms, you may be tempted to expand the services of the Application object to include overseeing your objects as well. This can be as simple as adding an instance variable and the methods to set and return its value, as shown above in the example of the MyApplication class.
Action Messages
When an action message from a Control is destined for a target selected by the user, the Application Kit first checks whether the selected receiver can actually respond to the message. If it can't, the Kit tries to find an alternative receiver. NXApp is the last object given a chance to respond. It's therefore a good place to put methods that define the application's default responses to action messages. See "Action Messages" in the next chapter for more on how these messages are dispatched.
Remote Messages
By default, NXApp is the object that's expected to respond to remote messages from other applications. You can set up your application so that other objects receive remote messages, but the Application object has code to deal, at least in part, with common cases, such as user requests to open another file relayed through the Workspace Manager.
Application-Defined Events
If your application makes use of application-defined events, the method that responds to them should be implemented in the Application object (or its delegate). |
|
A complete application is formed from a variety of objects working together. Each object has its own part (and sometimes several parts) to play. When the user acts and the application receives an event, the Application object generates a message to another object. That object does its part and most likely generates additional messages to still other objects. Those objects may generate their own messages, and so on until the application is ready for another event.
To work together like this, objects must somehow be linked together; each one must know (or be able to find) the appropriate receivers for the messages it sends. Objects usually store this information in instance variables that are initialized when the program starts up and may be altered as it runs. The instance variables define the roles that objects can play within the application; when initialized, they define the framework of the application.
The Application Kit provides a program structure for the applications that use it. It provides, in fact, for three levels of structure, ranging from a core framework of tightly linked objects, to objects in defined roles that are more loosely connected, to ways of freely connecting objects in any configuration you choose.
The Core Framework
Responder and its subclasses define a number of instance variables that point to other objects. They were mentioned in the previous discussion of the principal Application Kit classes and are listed again below for ease of reference. |
|
Responder |
nextResponder |
|
|
View |
superview
subviews
window |
|
|
Window |
contentView |
|
|
Application |
windowList |
|
When these instance variables are initialized, objects are linked into a working program structure. The framework they define is a network of Responders; they all link Responders to other Responders.
In some cases, an instance variable is initialized when the object it points to is created; in other cases it's initialized when a View is assigned a place in a Window's view hierarchy. Rarely is an instance variable set explicitly; because the connections between the principal event-handling objects of an application are crucial, the Application Kit tries to set them itself as a by-product of other decisions you make.
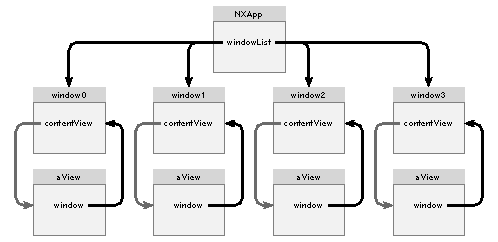
Figure 6-10 and Figure 6-11 below diagram the connections that are maintained by the core instance variables. Figure 6-10 shows how the Application object, NXApp, is connected to the Windows of the application and how each Window is connected to its view hierarchy. |
|
 |
|
Figure 6-10. Connections to Windows
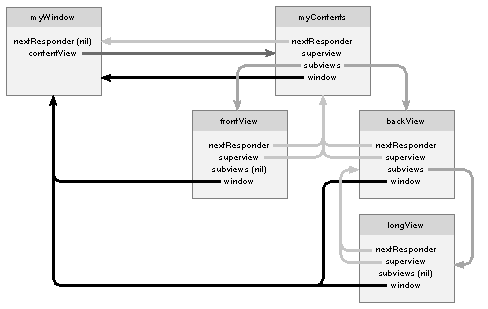
Figure 6-11 shows how objects are connected within a Window's view hierarchy. The particular Window in this example, myWindow, has four Views; myContents is the content view and it has two subviews, frontView and backView. backView also has a subview, longView. |
|
Figure 6-11. Connections in the View Hierarchy
The sections below discuss each instance variable illustrated in Figure 6-10 and Figure 6-11.
windowList
When a new Window object is created, it's added to NXApp's list of Windows. The list lets NXApp keep track of all the Windows in the application and, through the Windows, all the Views in every view hierarchy.
The windowList instance variable lists Windows in the order the application creates them (not their order on-screen). It's a List object that's returned by the windowList method: |
id myWindows;
myWindows = [NXApp windowList];
|
Windows (and other objects) keep track of the Application object by its global name, NXApp; they don't need to cache a pointer to it.
contentView
Windows have more than one pointer into their view hierarchies. The most public pointer, and the one that's most important to application programs, is contentView. Every Window creates a default contentView for itself, since it must have one to function correctly. You can install your own with the setContentView: method: |
id oldView;
oldView = [myWindow setContentView:aView];
|
This method resizes aView so that it fits the Window's content rectangle and makes it a subview of the View that draws the Window's border and title bar. It detaches the former contentView from the Window's view hierarchy and returns it so that you can free it or reuse it somewhere else.
The Window returns its current content view when asked: |
id curView;
curView = [myWindow contentView];
|
superview and subviews
The addSubview: method links objects into the view hierarchy: |
[wideView addSubview:myView];
|
This message makes myView a subview of wideView; both wideView's subviews list and myView's superview instance variable are adjusted accordingly. If myView was already the subview of another View, addSubview: would first remove it from the subviews list of its former superview before adding it to the end of wideView's subviews list.
Because Views are displayed in the order that they appear within the subviews list, it's possible for one subview to draw on top of another subview. (Events are associated with subviews in the opposite order, so the View on top will get the event.)
When you assign a View to a superview, you can specify its position in the subviews list by using the addSubview::relativeTo: method instead of addSubview:. |
[wideView addSubview:yourView :NX_BELOW relativeTo:myView];
|
This message puts yourView just ahead of myView in wideView's list of subviews, where it will draw immediately below (prior to) myView. If yourView and myView overlap, myView will be on top. It's also possible, with the NX_ABOVE constant, to specify drawing positions above another View.
If the final argument to addSubview::relativeTo: is nil, NX_BELOW places the View in the very first position in the list, and NX_ABOVE places it in the very last position.
The replaceSubview:with: method removes a View from the subviews list and puts another View in its place. Here myView replaces yourView: |
[wideView replaceSubview:yourView with:myView];
|
There's no default assignment of superview; you must explicitly set it with the addSubview:, addSubview::relativeTo:, or replaceSubview:with: method.
The removeFromSuperview method unlinks a View from the view hierarchy; it's deleted from the subviews list of its superview and its own superview instance variable is set to nil, but it isn't freed. Here yourView is removed from the view hierarchy: |
[yourView removeFromSuperview];
|
The superview method returns a View's superview, and subviews returns its list of subviews, an instance of the List class: |
id parent;
parent = [myView superview];
id children;
children = [myView subviews];
|
The isDescendantOf: method returns whether the receiver is on a direct path below another View in the view hierarchy: |
BOOL isHeir;
isHeir = [myView isDescendantOf:anotherView];
|
You can also test the relationship between two Views by finding their closest common ancestor: |
id link;
link = [myView findAncestorSharedWith:yourView];
|
This method may return the id of either the receiver or the specified View, if one is the ancestor of the other. If the two Views aren't connected to the same Window (the same view hierarchy), it returns nil.
window
When a View object is positioned within a view hierarchy, its window instance variable is automatically initialized to the Window that owns the hierarchy, as are the window instance variables of any descendant Views it may have.
When myView is made a subview of wideView in the example below (repeated from the section above), its window instance variable is updated to match wideView's. |
[wideView addSubview:myView];
|
The following four methods all have this effect: |
|
setContentView:
addSubview:
addSubview::relativeTo:
replaceSubview:with: |
|
A removeFromSuperview message makes the affected View's window instance variable nil. The window instance variables of all its descendant Views are similarly made nil. This also holds true for the Views that are removed from the view hierarchy by setContentView: or replaceSubview:with: messages.
Every View can identify its Window: |
id oriel;
oriel = [myView window];
|
The window instance variable gives a View access to information about the drawing environment that's kept by the window. For example, a View can ask the Window for the window number or send the content view a message: |
int handle;
handle = [window windowNum];
[[window contentView] display];
|
nextResponder
Every Window, View, and Application object inherits a nextResponder instance variable from the Responder class. When a View is assigned a superview, its nextResponder is initialized with its superview's id. In the addSubview: example above, wideView was made myView's next responder.
Within a Window, the responder chain mirrors the view hierarchy up to the content view. The setContentView: method makes the Window the new content view's next responder. The Window's next responder is nil.
The methods that remove a View from the view hierarchy set its nextResponder instance variable to nil.
It's best to keep the responder chain parallel to the view hierarchy, as addSubview:, addSubview::relativeTo:, and replaceSubview:with: do. But, if you need to, the setNextResponder: method lets you override default next responder assignments. Here it adds lastResponder to the end of myWindow's responder chain: |
[myWindow setNextResponder:lastResponder];
|
The nextResponder method returns an object's current next responder: |
next = [myView nextResponder];
|
Outlets
Every application must have an Application object, at least two or three Windows, and some Views to display within the Windows. So every application will have the core framework of Responders discussed above. This framework is self-contained; instance variables like windowList and superview store references to other core objects.
Almost every application will need to define its own set of objects to encapsulate behavior that's specific to the application. Some objects will be Responders--Views of a custom design, special types of Panels, an Application subclass. As such, they assume roles within the core framework.
Most applications will also need to define objects that aren't Responders, or define relationships between objects that aren't covered by the core instance variables. An application's network of objects can be extended beyond the core framework through what Interface Builder terms "outlets"--instance variables that point to other objects. The Application Kit provides some outlets that you can initialize, and you can provide others to accommodate the objects you define for your application.
In many ways, outlets are similar to core instance variables like superview and windowList; they define receivers for messages that are generated in response to events and remote messages. But outlets mainly differ from the instance variables that define the core framework: |
|
|
Outlets are set explicitly, not as a by-product of some other action. |
|
|
|
They can be nil; applications usually provide default behavior when an outlet hasn't been initialized. |
|
|
|
An outlet can belong to any class. They can be Responders, but don't have to be. They're often objects that are defined specifically to hold the inner algorithms of the application, as opposed to the code concerned with the user interface. As such, they're usually subclasses of the generic Object class. |
|
The Application Kit defines two outlet instance variables that can extend a connection to objects outside the core: |
|
|
Controls send their action messages to a target. |
|
|
Some objects let a delegate take over some of their responsibilities. |
|
The sections that follow discuss the role of these two instance variables in a program's structure.
Delegates
A delegate acts for another object. Instead of defining a subclass to add functionality to a class, the methods and instance variables that would have gone into the subclass are placed in a class definition for an independent object. That object is then assigned to be the delegate of one or more client objects.
There are no default delegates. You must define the delegate's class to give it the functionality your application requires, create an instance of the class, and assign it to a client with the setDelegate: method. Here setDelegate: makes myProxy NXApp's delegate: |
[NXApp setDelegate:myProxy];
|
delegate returns the receiver's delegate: |
id theBoss;
theBoss = [NXApp delegate];
|
These Application Kit classes define setDelegate: and delegate methods: |
|
Application
Window
Text
Listener
Speaker |
|
The delegate that's assigned to a Window or to the Application object can eliminate the need to define a Window or Application subclass; it can take over most functions you'd be tempted to add to the class. Panels, Menus, and PopUpLists inherit the ability to have a delegate from the Window class.
Although other Responders have delegates, Views (with the exception of Text objects) don't. Applications generally need to define View subclasses to add specific drawing and event-handling behavior to the generic class. The subclass can contain any application-specific code you need to write; a delegate would be extra baggage.
As implemented in the Application Kit, the Text object has enough functionality and options to serve almost all applications; few will need to define a Text subclass. It has a delegate only to give the application control over the user's text input and editing, and over the user's attempts to resize the display.
The delegates defined for Responders (in the Application, Window, and Text classes) extend the event-handling capabilities of those objects. The delegates defined in the Speaker and Listener classes extend the application's ability to send and respond to remote messages. At startup, before processing the first event, the Application object makes sure that a Listener and Speaker are in place and sets itself, NXApp, to be their delegate. The Listener normally entrusts its delegate with the remote messages it receives. But since NXApp can have its own delegate, the Listener defers to NXApp's delegate whenever possible. You can therefore implement the methods that respond to remote messages in an Application subclass or in the class you define for the Application object's delegate.
Delegated Messages
Because a delegate is an object you design, it can do anything you choose for it to do. You could, for example, have it hold the basic algorithms for your application and make it the target for a set of Controls.
In its role as a delegate, it can receive a variety of messages both from the client objects it serves and from other Kit objects that get the delegate's id from the client. The Application Kit initiates some messages to delegates as part of the normal process of responding to events and remote messages. Messages are sent only if the delegate implements a method that can respond. In general, the messages sent by Kit objects fall into four categories: |
|
|
Messages that notify the delegate of some action the client object took or is about to take. |
|
|
|
Untargeted action messages that the client object could potentially have responded to. Application and Window delegates are the only ones that can receive action messages from Controls. See "Action Messages" under "Event Handling" in the next chapter for a description of how these messages are distributed to delegates (and other objects). |
|
|
|
Remote messages from other applications, as relayed through the Listener. By default, NXApp is expected to respond to remote messages. Its delegate can intervene and take over that function. |
|
|
|
Messages that announce application-defined events and subevents of the system-defined event. It's the Application object's responsibility to respond to these events, and its delegate is given a chance to handle the task. See "Event Handling" in the next chapter for details. |
|
Notification messages are easily recognized by the structure of the methods they ask the delegate to perform: |
|
class { Will | Did } Action : . . . |
|
The method name begins with an indication of the client object's class--"app," "window," or "text." This is followed by "Will" or "Did", depending on whether the message notifies the delegate prior to the client taking action or only after the client has acted. Next is an indication of the action and a colon introducing the method's first argument, the id of the object sending the message. A notification message is always sent by the client object itself, so the sender belongs to the class identified by the first word of the method name. Other keywords and arguments may be added at the end.
Prior notifications (those with "Will") generally give the delegate a chance to approve or disapprove of the impending action, or to modify it in some way. For example, a Window sends its delegate windowWillResize:toSize: messages as the user drags an outline of the window to a new location. The message gives the delegate a chance to constrain the size of the window.
Notifications after the fact (those with "Did") allow the delegate to coordinate other activities with the actions of its client. For example, a Window delegate receives windowDidBecomeKey: messages from a client Window after the Window becomes the key window. The Application object sends its delegate an appDidInit: message after the application has been initialized and is ready to receive its first event. This gives the delegate a chance to do any final initialization that may be necessary.
Windows, Text objects, and the Application object can send their delegates notification messages dealing with a wide variety of topics. Each of these messages is described later in this chapter, in Chapter 7, or in Chapter 9 under the appropriate topic. The full set of notification methods are listed below for ease of reference: |
|
appDidInit:
appDidBecomeActive:
appDidResignActive:
appDidHide:
appDidUnhide:
appDidUpdate: |
|
windowWillClose:
windowWillResize:toSize:
windowWillReturnFieldEditor:toObject:
windowWillMiniaturize:toMiniwindow:
windowDidResize:
windowDidMiniaturize:
windowDidDeminiaturize:
windowDidExpose:
windowDidMove:
windowDidBecomeKey:
windowDidResignKey:
windowDidBecomeMain:
windowDidResignMain:
windowDidUpdate: |
|
textWillResize:
textWillChange:
textWillEnd:
textWillSetSel:toFont:
textWillConvert:fromFont:toFont:
textDidResize:oldBounds:invalid:
textDidChange:
textDidEnd:endChar:
textWillStartReadingRichText:
textWillReadRichText:stream:atPosition:
textWillFinishReadingRichText:
textDidRead:paperSize:
textWillWrite:paperSize:
textWillWriteRichText:stream:forRun:atPosition:emitDefaultRichText:
text:isEmpty: |
|
The last method in this list lacks a "Will" or "Did." It's the exception that proves the rule.
Because a delegate can belong to any class, the Application Kit checks before sending it a message to be sure that it has implemented a method that can respond. You can implement just the methods that you need.
Targets
Targets receive action messages that are generated as the result of user actions on a control. The action message gives application-specific meaning to the events the control receives.
Like a delegate, a target must implement methods to respond to the messages it's sent. But unlike a delegate, which receives notification messages chosen from a limited and Kit-defined set, a target receives action messages that are set by the programmer.
Because you can set both the target and the method it's to perform, the Application Kit assumes that the target has implemented a method to respond to the action message it's sent. The Kit doesn't check to make sure the target can respond before sending the message.
See "Action Messages" in the next chapter for information on the structure of these messages and the pattern of distribution when no explicit target is set.
Defining an Outlet
The instance variables defined in the Application Kit--target, superview, contentView, and so on--specify certain roles that objects can play in an application.
You can define other roles simply by adding outlet instance variables in a subclass definition. You could, for example, define an object that would act as the delegate for a number of Windows and provide the object with an outlet instance variable for each Window. Or you could define a View subclass with an instance variable that pointed to an object that had a special relationship to the View, in essence a View delegate.
Object-oriented programming makes adding to the program structure in this way fairly easy. Interface Builder makes it even easier. As you build your application, it lets you define outlets for the messages your objects will send. Interface Builder provides each outlet with a method to set its value; you can define a corresponding method to return its current value.
Named Objects
There's an alternative to instance variables as a way of defining the relationships between objects. With Application Kit functions, you can assign an object a name, then later use the name to retrieve its id when you want to send it a message. So that more than one object can have the same name, objects are also assigned an owner. The name is a character string; the owner is another object, which can be nil.
NXGetNamedObject() returns the id when passed a name and owner: |
id myGame;
myGame = NXGetNamedObject("gameBoard", NXApp);
|
NXGetNamedObject() returns nil if it can't find the object for any reason. A simple misspelling of the name can cause a nil return.
Instead of a single name, NXGetNamedObject() can also be passed a series of names concatenated together and separated by underscores as illustrated below: |
id myObject;
myObject = NXGetNamedObject("aaa_bbbb_cc_ddd", NXApp);
|
The owner (NXApp in the example above) should own the object named first in the list ("aaa" above). The object named first should be the owner of the object identified by the second name. That object should own the object identified by the third name, and so on. NXGetNamedObject() returns the object identified by the last name ("ddd" in the example above).
Note: An object name should not include an underscore. If it does, NXGetNamedObject() will treat it as a separator dividing one name from another, rather than as part of the name.
You can name an object and specify an owner for it with NXNameObject(). This example assigns a name and owner to self: |
NXNameObject("bartholomewCubbins", self, NXApp);
|
Interface Builder assigns default names to objects, but it permits you to edit or replace the names that are assigned. Interface Builder also assigns owners. Subviews of the Window's content view are considered to be owned by the Window; other Views are owned by their superviews. The Window's owner is determined at run time, when the objects are loaded into memory by loadNibFile:owner: and loadNibSection:owner:. The method's second argument names the owner of all Windows in the Interface Builder archive file.
NXUnnameObject() breaks the association between a name and an object: |
NXUnnameObject("bartholomewCubbins", self);
|
If you pass an object id to NXGetObjectName(), it returns a name that can be inserted into the series passed to NXGetNamedObject(): |
char *myName;
myName = NXGetObjectName(self);
|
Windows are managed through individual Window objects and through the Application object, which keeps a list of all the Windows in the application. This section describes methods defined in both classes.
Setting Up a Window
The principal class method that creates a new Window, newContent:style:backing:buttonMask:defer:, labels five arguments. They ask for information about the location and size of the Window, its style and type of buffering, what title bar buttons it should have, and whether the Window Server should defer creating a window for the object until one is needed. |
id myWindow;
NXRect winRect;
NXSetRect(&winRect, 100.0, 200.0, 400.0, 700.0);
myWindow = [Window newContent:&winRect
style:NX_TITLEDWINDOWSTYLE
backing:NX_BUFFERED
buttonMask:(NX_MINIATURIZEBUTTONMASK |
NX_CLOSEBUTTONMASK)
defer:NO];
|
The NXSetRect() function initializes an NXRect structure. Here it locates winRect at (100.0, 200.0) and assigns it a width of 400.0 and a height of 700.0. This rectangle is then used to position the window, as explained in the following table: |
|
Argument |
Permitted Values |
|
content |
A pointer to an NXRect structure that specifies the size and location of the window's content area in screen coordinates. The border, title bar, and resize bar are drawn around the area specified. All values in the structure are floating-point numbers (NXCoords), but since a window must be aligned on pixel boundaries, the values shouldn't have any fractional parts. If they do, they'll be rounded down to the nearest whole integer. |
|
|
style |
The style of the Window's border and title bar. Window styles are discussed in Chapter 2, "The NeXT User Interface." These constants are provided to specify a Window's style: |
|
|
|
NX_PLAINSTYLE |
|
|
|
NX_TITLEDSTYLE |
|
|
|
NX_SIZEBARSTYLE |
|
|
|
NX_MENUSTYLE |
|
|
|
NX_MINIWINDOWSTYLE |
|
|
|
NX_MINIWORLDSTYLE |
|
|
|
NX_TOKENSTYLE |
|
|
|
In general, Windows created by an application specify one of the first three styles in this list, principally NX_TITLEDSTYLE or NX_SIZEBARSTYLE. The other constants are mainly for the internal use of the Application Kit. (See the discussion of style in Chapter 2.) |
|
|
backing |
The buffering type for the window. The choices are: |
|
|
|
NX_RETAINED |
|
|
|
NX_NONRETAINED |
|
|
|
NX_BUFFERED |
|
|
button mask |
The title bar buttons for this window. They can be specified by combinations of these masks: |
|
|
|
NX_CLOSEBUTTONMASK |
|
|
|
NX_RESIZEBUTTONMASK |
|
|
|
NX_MINIATURIZEBUTTONMASK |
|
|
|
NX_ALLBUTTONS combines all three masks into a single constant. |
|
|
|
Although there is no "resize button," NX_RESIZEBUTTONMASK is what makes the resize bar work. It should always be specified for resizable windows (those with NX_SIZEBARSTYLE). Without it, the resize bar is just a pretty appendage at the bottom of a window. |
|
|
defer |
A boolean flag. If it's YES, the Application Kit won't ask the Window Server to produce a window for the Window object until the application is ready to place the window on-screen. If the flag is NO, a window is created immediately for the object. All windows are created off-screen and must be placed on-screen with the orderWindow:relativeTo:, makeKeyAndOrderFront: or orderFront: method. These methods are discussed under "Reordering a Window" later in this section. "Deferred and One-Shot Windows" below has more on when it's appropriate to pass YES as an argument here. |
|
Once the window's style, buffering type, and title bar buttons have been set, they can't be changed. There are methods that return the style and button mask: |
int myStyle, myButtons;
myStyle = [myWindow style];
myButtons = [myWindow buttonMask];
|
The Miniwindow
The Application Kit provides a miniwindow counterpart for each window the user miniaturizes (the miniwindow isn't created until it's needed). The Kit takes care of the mechanics of miniaturization through Window's miniaturize: and deminiaturize: methods. Messages to perform these methods are generated in response to user actions--clicking the miniaturize button and double-clicking the miniwindow.
The application's responsibility is limited to determining what image should be displayed within the miniwindow. On the MegaPixel Display, there's room for a 48-pixel by 48-pixel icon below the miniwindow's title bar. According to the user-interface guidelines in Chapter 2, if the window holds a document, this should be the same icon as the one the Workspace Manager displays for the document in a directory window. If not, it should be the same as the application icon.
You can set the icon using Window's setMiniwindowIcon: method. The following message has the miniwindow counterpart for myWindow display the default application icon: |
[myWindow setMiniwindowIcon:"defaultappicon"];
|
In addition to "defaultappicon," you can pass setMiniwindowIcon: the name you've assigned to a Bitmap object or the names of icons stored as sections in the __ICON or __TIFF segments of the application executable. A Bitmap will be created for the icon when and if it's needed for the miniwindow. (See "Environmental Information" later in this chapter for more on the __ICON and __TIFF segments.)
The miniwindowIcon method returns the name of the icon used in the receiver's miniwindow: |
const char *mininame;
mininame = [myWindow miniwindowIcon];
|
The Title
If the window has a title bar, the setTitle: method can be used to give it a title or modify the current one; title returns the current title: |
[myWindow setTitle:"Product Names"];
aString = [myWindow title];
|
When a title is set, it's displayed immediately, regardless of whether the display mechanism is temporarily disabled. (See the next chapter for information on the display mechanism.)
The Application Kit doesn't provide a default title; a window remains untitled unless you assign one with the setTitle: method. The same title is used for both the window and its miniwindow counterpart. Because there's less room in a miniwindow, it may display only the initial part of the title that's set.
Titles that are too long for the space between the title bar buttons are cropped to fit. To be sure that a window is wide enough for its title, use the minFrameWidth:forStyle:buttonMask: class method to get the minimum required width: |
float howWide;
howWide = [Window minFrameWidth:"A Long Window Title"
forStyle:NX_TITLEDSTYLE
buttonMask:NX_CLOSEBUTTONMASK];
|
Note that this method returns the width of the frame rectangle, not the content rectangle. Because of the border, the frame rectangle of a titled or resizable window is 2.0 units wider than its content rectangle.
Changing the Close Button
If a window displays an editable document, the application should alter the appearance of the window's close button to reflect whether or not the user has made to changes to the document that haven't been saved. |
[myWindow setDocEdited:YES];
|
The message above has myWindow display the close button that indicates unsaved changes, if it isn't already displaying it. The same message with NO as the argument would have myWindow display the standard close button.
The isDocEdited method returns the last value set by setDocEdited:. NO is the default value. |
BOOL lastSet;
lastSet = [myWindow isDocEdited];
|
Background Color
A window can be assigned a background color with the setBackgroundGray: method: |
[myWindow setBackgroundGray:NX_WHITE];
|
The default background color is light gray (NX_LTGRAY). backgroundGray returns the current background color: |
float shade;
shade = [myWindow backgroundGray];
|
Whenever the Window is displayed, its content area is filled with the background color before any of its Views draw, but only if its content view hasn't been registered as an opaque View. Since an opaque content view paints every pixel within the content area, the background color wouldn't show through anyway. (See "Displaying Background Views," in the next chapter, for information on opaque Views.)
Deferred and One-Shot Windows
Each Window object is associated with a window provided by the Window Server. The Window Server usually provides the window when the Window object is created. However, when you create a Window, you have the option of not producing a window for it right away. If you pass YES as the last argument to newContent:style:backing:buttonMask:defer:, the Window object will be created but it won't be associated with a window until one of three methods puts it on-screen: orderFront:, makeKeyAndOrderFront:, or orderWindow:relativeTo:. Any of these methods will: |
|
|
Make the Window Server produce a window for the Window object. |
|
|
|
Send the Window a display message so that all its Views are displayed into its backup buffer. |
|
|
|
Place the window on-screen. |
|
(The orderFront: and orderWindow:relativeTo: methods are discussed more specifically under "Reordering a Window" below. makeKeyAndOrderFront: combines makeKeyWindow and orderFront: messages into a single method.)
Deferring the creation of a Window object's window makes sense in two situations: |
|
|
If a window might never be used, deferring it saves the memory that would otherwise be allocated to it. |
|
|
|
If the application is large, deferring some of its windows will reduce the time required to launch it. |
|
Once a window is associated with a Window object, the association usually lasts until the Window object is freed. Freeing the object also frees its window. However, you can arrange for the window to be freed whenever it's taken out of the screen list, by sending the object a setOneShot: message: |
[myWindow setOneShot:YES];
|
A new window will be produced for the Window object each time it's returned to the screen.
isOneShot returns the value set by the last setOneShot: message: |
BOOL willFree;
willFree = [myWindow isOneShot];
|
Windows that the user might never bring to the screen, or might put on-screen just once, are prime candidates for being deferred and made one-shot. The information panel, rarely used attention panels, and specialized submenus fit this category.
By deferring the creation of the Window object's window until it's needed and then freeing it when it's no longer needed, you can combine the benefits of buffering when the window is on-screen with the benefits of a nonretained window when it's not.
You should never attempt to draw within a Window that isn't associated with one of the Window Server's windows. The display methods discussed under "Drawing in the View Hierarchy" in the next chapter check to be sure that a window exists for a Window object before displaying any of its Views. Dynamic drawing methods are performed only while the window is visible, so there's little reason to check. However, if you write any independent code that can draw in an off-screen window, you need to be certain that a window exists before attempting to draw. If the windowNum method doesn't return an integer greater than 0, there is no window to draw in.
Hiding Panels
By default, when the active application deactivates, the Application Kit hides its panels. However, you can choose to override this default and leave a panel on-screen even when its application isn't active: |
[myPanel setHideOnDeactivate:NO];
|
The doesHideOnDeactivate returns the value set by the last setHideOnDeactivate: message: |
BOOL willHide;
willHide = [myPanel doesHideOnDeactivate];
|
Chapter 2 gives guidelines for when it's permitted to leave a panel for a deactivated application on-screen. It should be a rare occurrence.
Window Status
Although users generally select the key window and main window, there's a method that lets the application do it: |
[myWindow makeKeyWindow];
|
This method is most often used to designate the initial key window when the application first starts up. When a standard window is made the key window, it also becomes the main window. (The makeKeyWindow method can be performed in conjunction with orderFront: by a single message to makeKeyAndOrderFront:.)
The isKeyWindow and isMainWindow methods return the status of the receiving object: |
BOOL nowKey, nowMain;
nowKey = [myWindow isKeyWindow];
nowMain = [myWindow isMainWidnow];
|
The Application object can identify the current key window and main window: |
id keyWin, mainWin;
keyWin = [NXApp keyWindow];
mainWin = [NXApp mainWindow];
|
These methods return nil if the key window or main window isn't in the current application.
For more detailed information on the methods that determine and reflect window status, see "The Key Window and Main Window" in the next chapter.
Physical Management
There are three ways that an application can manipulate the window associated with a Window object. It can: |
|
|
Move the window, |
|
|
Resize it, and |
|
|
Reorder it in (or out of) the screen list. |
|
These operations are accomplished through messages to the Window object, which, in turn, generates instructions for the Window Server.
Moving a Window
The moveTo:: method repositions a window within the screen coordinate system: |
[myWindow moveTo:x :y];
|
Its arguments, (x, y), give the new location of the lower left corner of the Window's frame rectangle in screen coordinates. Figure 6-12, below, illustrates the effect of the moveTo:: method. Note that when the window moves, its coordinate system and all its contents move with it. |
|
Figure 6-12. moveTo::
Another method, moveTopLeftTo::, can be used to reposition a window by its top left corner: |
[myWindow moveTopLeftTo:x :y];
|
moveTopLeftTo:: is the same as moveTo::, except that it positions the top left, rather than the lower left, corner of the window. If the height of the window's frame rectangle were subtracted from the y coordinate, a moveTo:: message could be used with the same effect as moveTopLeftTo::.
These two methods move the window from its starting location to its destination in a single step; the window isn't drawn in any intermediate positions. Note that unlike the class methods that create a Window, they position the window's frame rectangle, not its content rectangle.
The moveTo:: and moveTopLeftTo:: methods don't generate window-moved subevents (of the kit-defined event). Since the new location of the window is evident from the method's two arguments, none is needed. Window-moved subevents are generated when the user moves a window, not when the application does. The subevent serves as the application's only notice that something has happened.
Typically, users move a window by dragging it by its title bar, but you can also let users drag a window by a point within its content area. The dragFrom::eventNum: method specifies the point and requests the Window Server to move the window in response to the user's action. A dragFrom::eventNum: message should be sent only after receiving the mouse-down event that initiates dragging. Its first two arguments give the current location of the cursor within the window's base coordinate system, and can be taken from the event record of the mouse-down event. The third argument is the event number of the mouse-down event, also taken from its event record. |
[myWindow dragFrom:eventPtr->location.x :eventPtr->location.y
eventNum:eventPtr->data.mouse.eventNum];
|
The Window Server moves the window so that the cursor stays at the same location within the window. When the user releases the mouse button, it generates a window-moved subevent to notify the application. The user's mouse-dragged events are trapped by the Window Server; they're not sent to the application.
The center method positions a window so that it's centered in the top two-thirds of the screen. That's where attention panels should come up so that users can't miss or ignore them. |
[myPanel center];
|
This method adjusts the position of the window, if necessary, to keep its title bar on-screen.
Resizing a Window
The placeWindow: method resizes and repositions a window within the screen coordinate system. Its argument is a pointer to an NXRect structure with the new location and dimensions of the window's frame rectangle: |
NXRect newRect;
NXSetRect(&newRect, 300.0, 500.0, 700.0, 600.0);
[myWindow placeWindow:&newRect];
|
As illustrated in Figure 6-13 below, the window both moves to a new location and assumes a new shape. |
|
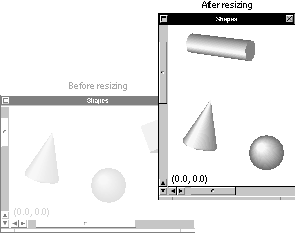 |
|
Figure 6-13. placeWindow:
However, placeWindow: is an expensive way to move a window when compared to moveTo:: and moveTopLeftTo::. The latter two methods rely on the Window Server to shift the window's display and coordinate system to a new location, but placeWindow: must reinitialize the window's coordinate system and clipping path and redisplay all the Views within the window after it has moved. For this reason, placeWindow: should be used only to resize a window, not to move it.
To make what's going on clear to the user, it's best not to mix resizing with moving. To avoid the appearance of moving a window when you resize it, keep a corner or side of the window constant, or resize the window by expanding it outward (or collapsing it inward) on all sides at once.
Figure 6-13 above disregards this advice. It appears to move the window because, in a sense, its top and right sides are expanded outward while its bottom and left sides are collapsed inward.
sizeWindow::, an alternative to placeWindow:, keeps the lower left corner of the window constant while adjusting its width and height. |
[myWindow sizeWindow:width :height];
|
Its arguments specify the new width and height of the window's content rectangle (not its frame rectangle) in screen coordinates.
Because the new size of the window is apparent from the arguments to placeWindow: and sizeWindow::, neither method generates a window-resized subevent (of the kit-defined event).
Reordering a Window
The orderWindow:relativeTo: method alters the position of a window in the Window Server's screen list. The first argument specifies whether the receiving Window is to be placed above another window in the list, placed below another window, or left entirely off the list. The choices are: |
|
The second argument is a window number that identifies the window the receiving object is to be ordered above or below, or 0 if the receiver is to be ordered above or below all other windows in its tier. If the first argument is NX_OUT, the second argument is ignored. This message takes myWindow out of the screen list: |
[myWindow orderWindow:NX_OUT relativeTo:0];
|
The orderWindow:relativeTo: method won't let you order a window into another tier. If the second argument names a window in a higher or lower tier, the receiving Window will be reordered so that it's as close to that window as possible, but it won't be ordered out of its own tier.
It's generally not very useful for an application window to be ordered behind the workspace window (the window that provides the dark gray background on-screen), since users wouldn't be able to find it there. Therefore, the message below puts the receiving Window at the back of its tier but keeps it just in front of the workspace window. You can think of the workspace window as being in a tier of its own. |
[myWindow orderWindow:NX_BELOW relativeTo:0];
|
The Window class defines three methods as shortcuts for common reordering cases. Each method takes a single argument, an id, so that it can be used in action messages. The method itself doesn't make use of the argument. |
[myWindow orderOut:nil];
[myWindow orderFront:nil];
[myWindow orderBack:nil];
|
The orderOut: method removes the receiving Window from the screen list; it has the same effect as the first orderWindow:relativeTo: example shown above. The orderFront: method puts the receiving Window at the front of its tier in the screen list. orderBack: puts a window at the back of its tier, but in front of the workspace window; it's a shorthand for the second orderWindow:relativeTo: example shown above.
A fourth method, makeKeyAndOrderFront:, combines two operations that often go together--making a Window the key window (as makeKeyWindow does) and putting it at the front of its tier (as orderFront: does). The user interface requires a window to come forward when it becomes the key window. |
[myWindow makeKeyAndOrderFront:nil]
|
When the key window (or main window) is taken out of the screen list, it loses its key window (or main window) status. The Application Kit tries to make another window in the active application the new key window (and main window). However, simply reordering windows within the screen list or putting a window that was previously out of the list in, has no affect on any window's status. Moving another window in front of the key window doesn't change the key window.
Getting Information about a Window
NXApp and Window objects provide information about the application's Windows in response to messages sent by other objects.
Many of these messages were illustrated earlier in this chapter. For information about properties that are set when a Window is established, see "Setting Up a Window" above. For information on methods that report a Window's status as the key window or main window, see "Window Status" earlier in this section and "Selecting an Application, Window, and View" in the next chapter. Methods that provide other information are described below.
Frame and Content Rectangles
The getFrame: method takes a pointer to a rectangle (NXRect *), which it initializes with the location and size of the Window in screen coordinates. |
NXRect myFrame;
[myWindow getFrame:&myFrame];
|
getFrame: provides the Window's frame rectangle. Given the frame rectangle, the getContentRect:forFrameRect:style: class method can find the content rectangle: |
NXRect myContent;
[Window getContentRect:&myContent
forFrameRect:&myFrame
style:NX_TITLEDSTYLE];
|
Given the content rectangle, getFrameRect:forContentRect: can find the frame rectangle: |
[Window getFrameRect:&myFrame
forContentRect:&myContent
style:NX_TITLEDSTYLE];
|
Window Numbers
The windowNum method returns the receiver's window number: |
int which;
which = [myWindow windowNum];
|
If the receiving Window object isn't currently associated with a window, this method returns  1. 1.
The Application object can find the id of the Window object associated with a window when given its window number: |
id theWindow;
theWindow = [NXApp findWindow:theNum];
|
Screen List Information
A Window can return whether it's currently in the screen list: |
BOOL inList;
inList = [myWindow isVisible];
|
The isVisible method returns YES even if the window is completely covered by other windows. This method merely tests whether the window is somewhere in the screen list.
The Application object can identify of the frontmost window in the list. It will generally be a menu or an attention panel: |
id topWin;
topWin = [NXApp frontWindow];
|
NXApp can also provide the ordering of all the application's windows in the screen list: |
int *listPtr, howMany;
[NXApp getScreenList:&listPtr count:&howMany];
|
getScreenList:count: produces an array that lists all the on-screen windows belonging to the application, ordered as they are in the screen list (the front window first). It returns, by reference, a pointer to the array and the number of windows listed. The array is a list of window numbers, not ids. To find the id of a Window, pass the window number as the argument in a findWindow: message: |
id theWin;
theWin = [NXApp findWindow:*(listPtr+3)];
|
Environmental Information |
|
Applications run in an environment that's determined in part by the hardware, in part by the Mach operating system, the Window Server, and the Application Kit, and in part by choices made by the user. The Kit defines methods and functions that supply the environmental information an application might require: |
|
|
The getScreenSize: method, defined in the Application class, supplies the size of the screen where the application's windows are displayed: |
NXSize theScreen;
[NXApp getScreenSize:&theScreen];
|
You should use this method rather than assume a fixed screen size. |
|
|
The hostName method provides the name of the machine where the application is running: |
const char *where;
where = [NXApp hostName];
|
|
Application's appName method provides the name of the application: |
const char *me;
me = [NXApp appName];
|
The name is the one assigned while compiling the program, as explained under "Segments" below, or if no name was assigned, the name passed in the argv array. |
|
|
The name of the current user is returned by the NXUserName() function: |
const char *who;
who = NXUserName();
|
|
The user's home directory is returned by NXHomeDirectory(): |
const char *domicile;
domicile = NXHomeDirectory();
|
When the Workspace Manager launches an application, it sets the application's current working directory to the user's home directory. The standard UNIX function getwd() returns the current working directory, and chdir() changes it.
If you change the current working directory so that it's on a device--an optical disk--that the user wants to unmount, the Application Kit may change it back to the user's home directory (or to the root directory if for some reason there is no home directory). The Kit makes the change in response to an unmounting:ok: remote message from the Workspace Manager. Since remote messages are received between events, you can be sure that the current working directory will remain constant during the response to an event. But you may need to check before each new event to be sure that it hasn't been changed "behind your back" between events.
You can avoid behind-the-back changes by implementing an appUnmounting: method in the Application object's delegate. Your method will then need to handle those cases in which the user wants to unmount the disk where the current working directory is located.
Command-Line Arguments
Information entered on the command line when launching a C (or Objective-C) program is passed to the main() function as a pair of conventional arguments, argc and argv. (argv points to an array of character strings containing the command-line arguments, and argc counts the number of strings in the array.)
To make command-line arguments available from any point within an application, including from within a class definition, the loader writes them to a well-defined location and the Application Kit provides these global variables to refer to them: |
int NXArgc;
char **NXArgv;
|
It's therefore unnecessary for the main() function to deal with command-line arguments itself.
When the Workspace Manager launches an application, there's no command line where users can specify program options and parameter values. Rather than choose options on the command line, users make choices once the application is launched and activated. An application can record these choices in the defaults database for use the next time the application is launched. It might, for example, remember where the user placed various panels, or which font was preferred.
Nevertheless, the Workspace Manager uses command-line arguments to pass useful information to the applications it launches. If, during testing, you launch your application from a Terminal window, you can also use the command line to pass it test values for various program parameters.
Information passed on the command line as pairs of argument strings in the format |
|
can be read by the functions that prepare a table of default parameter values for an application. The first string begins with a hyphen and names a parameter; the following string assigns the parameter a value. After this information is recorded, the arguments are stripped from the NXArgv array and NXArgc is adjusted accordingly.
Values assigned on the command line in this way override values taken from the user's defaults database. (See "The Defaults System" in Chapter 10 for more information on how command-line arguments contribute to the system of default parameters.)
Arguments that you can pass on the command line when debugging your application include these: |
|
Parameter |
Value |
|
NXShowPS |
If not NULL, all PostScript code sent to the Window Server, and all values returned from the PostScript interpreter to the application, will be written (in ASCII rather than binary form) to the standard error stream. |
|
|
NXShowAllWindows |
If not NULL, all windows will be placed on-screen, including those that normally stay off-screen--such as windows that store images that are composited to other, on-screen windows. |
|
The arguments passed by the Workspace Manager are read and stripped from NXArgv when the Application class is initialized, just before the new message is sent. They define these public parameters: |
|
Parameter |
Value |
|
NXOpen |
The full pathname of the file the application is to open. |
|
|
NXOpenTemp |
The full pathname of a temporary file the application is to open. Temporary files should be deleted before the application quits. |
|
|
NXHost |
The name of the host machine. The Workspace Manager provides this information only when it's run remotely (on a different machine). |
|
|
NXAutoLaunch |
A value other than 0 if the application was launched by the Workspace Manager at login, and undefined otherwise. |
|
When an application is launched by the Workspace Manager, NXArgv[0] is guaranteed to contain the full pathname of the application's executable file. By stripping the last element from the pathname, an application can obtain the path for the file package where auxiliary files essential to the application are located.
Segments
The Mach object file format, the default format for the NeXT computer, allows you to create segments in the executable file and store whatever information you need there. The software kits take advantage of this facility to keep various kinds of information--archived objects, sound files, icons, and other images--in close association with the code that requires it.
Some segments are created by the compiler and can't be altered or added to: |
|
__TEXT |
The text of the program's executable instructions |
|
__DATA |
Initialized and uninitialized data |
|
__OBJC |
Data structures required by the run-time system. |
|
Other segments can be created with the -segcreate option to the link editor: |
cc ... -segcreate ANIMATION paneOne image1.tiff
|
This example creates the ANIMATION segment and copies the image1.tiff file into it as a section named "paneOne." If the ANIMATION segment had already been created, the -segcreate directive would simply have added another section to it. Usually sections keep the same name as the file.
Some segments have well-established names: |
|
__NIB |
Archived objects that were created using Interface Builder. |
|
|
__SND |
Sound files required by the program. |
|
|
__ICON |
Files in Tag Image File Format (TIFF) that specify the icons that the Workspace Manager should |
|
display for the |
application and its files. |
|
|
__TIFF |
Other TIFF images used in the program. |
|
You can add sections to these segments as required by your application. The information you store there can be read by methods and functions defined in the software kits. For example, the findBitmapFor: method will create a Bitmap object from a section of the __TIFF or __ICON segment.
The first section of the __ICON segment isn't an icon; it's a header, appropriately named "__header." It specifies how the Workspace Manager is to use the icons stored in the segment. Each line in the header describes a different icon--a different section within the segment. A line contains four pieces of information, separated by tabs: |
|
1. |
The letter "F" (or "f") if the icon should be displayed for just one file, or the the letter "S" (or "s") if the icon should be displayed for all files bearing a certain extension (or "suffix"). |
|
|
2. |
The name of the file, or the characters in the extension (without the period). |
|
|
3. |
The name of the application. This is the name that the Application object's appName method will return. |
|
|
4. |
The name of the section. The section containing the application icon--the one that will be displayed for the application executable--should be named "app" (and no section should be named "__tiff" or "__TIFF"). |
|
The following is an example of a header section: |
F Crossword Crossword app
S pzl Crossword puzzle.tiff
S pdrome Crossword palindrome.tiff
S agm Crossword anagram.tiff
|
This header corresponds to linker instructions such as these: |
-segcreate __ICON __header Crossword.iconheader
-segcreate __ICON app crossword.tiff
-segcreate __ICON puzzle.tiff puzzle.tiff
-segcreate __ICON palindrome.tiff palindrome.tiff
-segcreate __ICON anagram.tiff anagram.tiff
|
Note: Segment names are usually all uppercase letters; section names are lowercase or mixed case. The double underscore prefixes are used only to prevent potential clashes with other names. |
|
Application Kit Conventions |
|
The Application Kit imposes a small number of constraints on the Objective-C code you write. None of them constrain what you can do, only how you can go about doing it.
Reading and Writing Instance Variables
Because an object's instance variables are private to the object, Application Kit classes provide methods that can be used to modify them and read their values. For example, the setFloatValue: method assigns a value to a SliderCell object, and floatValue returns its current value as a floating-point number: |
float myVal;
myVal = [mySliderCell floatValue];
[mySliderCell setFloatValue:212.0];
|
An object has direct access to all its instance variables, so it can read them without sending a message. A SliderCell subclass could look directly at its value instance variable: |
if ( value >= 0.0 )
[self doSomething];
|
Although they can be read directly, inherited instance variables should be set only through the methods provided. This is because these methods often do more than simply set the instance variable; they have side effects that the Application Kit counts on. For example, the setFloatValue: method makes sure value stays within maximum and minimum bounds. Similarly, the methods that change a View object's frame and superview instance variables automatically update other instance variables. To function accurately, the Application Kit requires that these correspondences be maintained.
Writing Methods That Create Instances
In the Application Kit, class methods that create a new instance generally begin with the word "new." This is usually followed by one or more labeled arguments. For example, three different methods can create an instance of the Button class: |
myButton = [Button new];
yourButton = [Button newFrame:&rect];
ourButton = [Button newFrame:&rect
title:"Panic"
tag:-1
target:anObject
action:@selector(relax:)
key:'p'
enabled:YES];
|
The arguments to these methods serve to initialize the new object (they're explained in Chapter 9). The more arguments a method has, the more freedom it gives you to determine the character of the object at the outset.
Regardless of the number of arguments, each method is guaranteed to return a working, fully initialized object, even if some of its instance variables are initialized to 0. To make good on this guarantee, two things are required: |
|
|
Each method must be linked, directly or indirectly, to the new method defined in the Object class. Object's new method is the one that allocates memory for the new object's instance variables. |
|
|
|
Each method must initialize the new object. Methods with more arguments let you do much of the initialization yourself; methods with fewer arguments must supply default values of their own. |
|
In the Application Kit, methods with fewer arguments work by passing default values to the method with the greatest number of arguments. For its part, the method with the greatest number of arguments maintains the class link to Object's new method. Through a message to super, it performs a class method defined somewhere farther up the inheritance hierarchy; that class method sends its own message to super to perform a method it inherits, and so on. This chain of messages eventually leads back to the new method in the Object class.
Suppose, for example, that a Kit class defines three instance-creating methods, new, newArg:, and newArg:arg:. The new method would have the receiving class object perform the newArg:arg: method: |
+ new
{
return( [self newArg:0 arg:"default"] );
}
|
The newArg: method would do the same: |
+ newArg:(int)anInt
{
return( [self newArg:anInt arg:"default"] );
}
|
The newArg:arg: method, the one with the most arguments, would perform an inherited method: |
+ newArg:(int)anInt arg:(char *)aString
{
self = [super newArg:anInt];
[self setMyString:aString];
return self;
}
|
These conventions matter when you create an instance of a class or define a subclass. The method with the most arguments is the most efficient and direct way to create an instance; the other methods can lead to initializing and reinitializing the object, first with default values, then with values more appropriate to your application.
Defining a Subclass
When you define a subclass of an Application Kit class, it isn't absolutely required that you write your own methods to create instances for it; inherited class methods will create objects belonging to a subclass as well as to the class where they're defined. But you may need your own class methods to initialize objects of the subclass differently so that their instance variables have reasonable values for your program.
If you do define your own instance-creating methods for a Kit subclass, it's important that they follow the Kit conventions. Suppose, for example, that you decide to override the newArg:arg: method illustrated above. If you have your version perform the version of new it inherits, |
+ newArg:(int)anInt arg:(char *)aString
{
self = [super new];
. . .
}
|
your method will perform the new method and the new method will perform yours, in a never-ending loop. In its message to super, a subclass method should always perform the superclass method with the most arguments.
The convention is simply this: To ensure that Object's new method is performed, one instance-creating method in each class is linked to an instance-creating method defined in a class farther up the inheritance hierarchy. Within each class, it's the method with the greatest number of arguments that maintains this link.
Covering Inherited Methods
When you define a subclass, you should guarantee that all the instance-creating methods it inherits produce reasonable objects for the subclass. This may mean overriding the inherited methods to cover them with your own versions.
Two of the example methods illustrated above cover inherited methods: new covers the new method defined in the Object class, and newArg: covers the newArg: method used in newArg:arg:'s message to super.
Covering inherited instance-creating methods makes the class you define more portable to other applications. If you leave an inherited method uncovered, someone else may use it to produce incorrectly initialized instances of your class.
Returning self
As illustrated in the preceding section, class methods that create a new instance return the instances they create.
Instance methods, like C functions, can return a variety of different values--ints, floats, pointers to structures, and so on. Those that don't have meaningful return values of their own return self (the object that receives the message). This permits messages to be chained together, avoiding the need for temporary variables for the receiver. This single line of code, |
[[[ButtonCell newTextCell] setTitle:"Keep"] setType:NX_SWITCH];
|
can substitute for these four: |
id theCell;
theCell = [ButtonCell newTextCell];
[theCell setTitle:"Keep"];
[theCell setType:NX_SWITCH];
|
Tags
Since object ids are determined only at run time, it's sometimes convenient to assign objects integer tags that can be used to identify them at compile time. Views and Cells are prime candidates for tag identifiers, since an application is likely to have many of them. In the Application Kit, the Control and Text subclasses of View define a tag instance variable for their instances, as does the ActionCell class.
The tag method returns the receiver's tag: |
int which;
which = [myView tag];
|
All Views can respond to a tag message. If a subclass doesn't implement its own method, it inherits the version defined in View, which always returns 1.
You'd use the tag method when you know the id of an object, but not its tag. It's also possible to find a View's id from its tag. |
id theView;
theView = [self findViewWithTag:41];